
User Manual


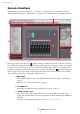


Table Of Contents
- Contents
- An overview of MRX Designer
- Screen structure
- Basic use of MRX Designer
- Menu bar
- Tool buttons
- Shortcut keys
- Design sheet
- “Parameter Sets” area
- “Parameter Link Group” area
- “Gang Edit Group” area
- “Properties” area
- Components and the component editor
- Editing the parameters
- Acoustic Echo Canceller (AEC)
- Ambient Noise Compensator (ANC)
- Audio Detector
- Auto Gain Controller (AGC)
- Combiner
- Delay
- Dynamics
- Effect
- EQ
- Fader
- Feedback Suppressor
- Filter
- Inputs/Outputs
- Meter
- Mixer
- Oscillator
- Paging
- Polarity
- Revolabs Control
- Router
- Source Selector
- Speaker Processor
- Speech Privacy
- Text
- Transmitter/Receiver
- User Defined Block
- Dialog boxes and applications
- “Print” dialog box
- “Install Speech Privacy File” dialog box
- “File Transfer” application
- “PGM1 Label Creator” application
- “Compile” dialog box
- “Snapshot Group” dialog box
- “Remote Control Setup List” dialog box
- “External Events” dialog box
- “GPI” dialog box
- “Digital Control Panel” dialog box / “Wireless DCP” dialog box / “MCP1” dialog box
- “PGM1/PGX1” dialog box
- “Port Name” dialog box
- List of settings in “Settings” dialog boxes
- Context menus
- Troubleshooting

Basic use of MRX Designer
MRX Designer User Guide
9
Basic use of MRX Designer
The basic workflow in MRX Designer is described below.
1. Register the MRX in the “Device Configuration Wizard.”
The “Device Configuration Wizard” appears when you click the [Device Config]
button, etc. Register other devices as necessary.
2. In the System screen, select MRX7-D.
3. Click the “Open MRX Designer” button.
The MRX Designer window opens.