
User Manual


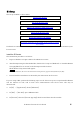


Table Of Contents
- ■ Using the PDF manual
- ■ System Requirements
- ■ Setup
- ■Operating R Remote
- ■Uninstalling the software(Removing the application)
- ■Troubleshooting

R Remote Version 2 User’s Guide 5
■ Setup
The setup workflow is shown below.
Install the R Remote
↓
Set on the R series units
↓
Connect the computer and R series units
↓
Power-on the R series units
↓
Specify the computer's IP address
↓
Use Dante Controller or the CL/QL series console to specify
the routing
For details on connections and settings for the R series units, refer also to the owner's manual of your
R series units.
Install the R Remote
The installation procedure is as follows.
1. Logon to Windows or Login to Mac with administer account.
2. After decompressing the downloaded file, double-click “setup.exe”(Windows) or “Install R Remote
Vxxx.pkg”(Mac)(xxx is version) in the decompressed file location.
The R Remote setup wizard will appear.
・ Under Windows, the “User Account Control” dialog box may appear. Click [Continue] or [Yes].
3. Proceed with the installation as directed by the instructions in the screen.
If you're using a Mac, perform the following steps as well. If these steps are not performed, R Remote
will not function as well, and in some cases communication with the R series unit may be
disconnected.
4. In [Go] → [Applications], choose [R Remote].
5. In [File] → [Get Info], open "R Remote Info."
6. In [General], select the [Prevent App Nap] check box and then close the window.