
User Manual


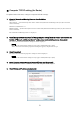

Table Of Contents
- ■ Precautions (Please be sure to read this section first!)
- ■ Checking the version number
- ■ Preparing for the update
- ■ Update procedure sequence
- ■ Install the Dante Firmware Update Manager
- ■ Computer TCP/IP setting (for Ri/Ro unit)
- ■ Computer TCP/IP setting (for Dante)
- ■About Failsafe Mode
- ■ Error Message List (R Series Update Program V2)

4
■ Install the Dante Firmware Update Manager
Before you update the Dante firmware, you must install the Dante Firmware Update Manager.
Double-click the Dante Firmware Update Manager installer downloaded in “Preparing for the update”
(DanteFirmwareUpdateManager-x.x.x.exe) and follow the on-screen instructions to install the
firmware.
x.x.x represents the version number of the Dante Firmware Update Manager.
In addition, extract the Dante firmware (extension: .dnt) from the compressed file.
The Dante firmware will not work correctly if the path contains any characters other than single-byte
alphanumeric characters, "-" (hyphen), or "_" (underscore). You must save the firmware update file in
a directory whose name contains only single-byte alphanumeric characters, "-" (hyphen), or "_"
(underscore). (E.g., C:\temp)
・The “Windows Security” dialog box may appear. In such case, click [Install this driver software anyway].
・You may be prompted to restart the computer after the installation is complete. Before proceeding to update, restart
the computer.
・When installing the Dante Firmware Update Manager, temporarily disable any running anti-virus software.