
User Manual
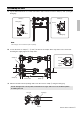
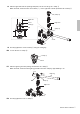
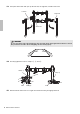


Table Of Contents

11
RS502 Owner’s Manual
4. Attach the snare holder to the snare clamp.
4-1. Loosen the bolt on the snare clamp.
4-2. Insert the snare holder.
4-3. Securely tighten the bolt on the snare clamp.
The rack is unstable even though placed on a level surface.
Check whether the arrow stickers are lined up with the slits in the clamps. (See Step 4 and Step 8 of
Assembling the Rack on pages 6 and 7, respectively.) If they are not, loosen each of the clamp bolts,
adjust the arms to align the arrow stickers with the slits, and then retighten the bolts.
CAUTION
Take special care with the snare holder as the rod has a sharp tip that could cause injury.
If going on to assemble a Yamaha electronic drum kit, please refer to the Assembly Manual booklet
that came with your pad set.
Troubleshooting
Specifications
Size (assembled): 1,196 (w) × 528.3 (d) × 812.3 (h) mm
Weight: 8.3 kg
*: Specifications and descriptions in this Owner’s Manual are for information purposes only. Yamaha Corporation reserves the right to
change or modify products or specifications at any time without prior notice. As specifications, hardware, and optional extras may
not be the same in every region, please check with your Yamaha dealer for details.
Bolt
Snare clamp
Snare holder