
User Manual
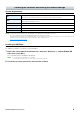
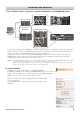
Table Of Contents

RIVAGE PM Editor Installation Guide 5
Network Settings
Make the following network settings when connecting a computer with the PM Editor installed to the RIVAGE PM
system.
TCP/IP settings of the computer
Making TCP/IP settings for the computer
Windows
1 Access the Control Panel, then click or double-click [Network and Sharing Center] or [View
network status and tasks].
The “Network and Sharing Center” window is called up.
2 Click [Manage network connection] or [Change adapter settings] from the “Tasks” list located
in the left side of “Network and Sharing Center” window, then double-click [Local Area
Connection].
(Select [Local Area Connection 2] etc., depending on your environment.)
The “Local Area Connection Status” dialog box is called up.
If the “Local Area Connection properties” dialog box appears instead, skip ahead to step 4.
3 Click [Properties].
The “Local Area Connection properties” dialog box is called up.
4 Select [Internet Protocol Version 4 (TCP/IPv4)], then click [Properties].
The “Internet Protocol Version 4 (TCP/IPv4) Protocol” dialog box is called up.
5 Click [Use the following IP address].
6 Enter your computer’s IP address into [IP address] and the Subnet mask into [Subnet mask].
7 Click [OK].
NOTE The “User Account Control” dialog box may appear during the procedure. If so, click [Continue].
Mac
1 Click [System Preferences], then click [Network].
The “Network” dialog box will be displayed.
2 Click the service that you want to connect to the device.
If you’re using the Ethernet port that’s built into the Mac, click [Ethernet].
3 In “Configure IPv4,” choose [Manually].
4 Enter your computer’s IP address into [IP address] and the Subnet mask into [Subnet Mask].
5 Click [Apply] button, then close “Network” dialog box.
IP address
192.168.53.1 – 192.168.53.32
Subnet mask
255.255.255.0