
Operation Manual

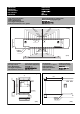


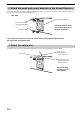

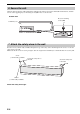
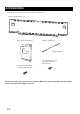
Table Of Contents
- DIMENSIONS
- English
- Français
- Deutsch
- SICHERHEITSANWEISUNGEN
- ZUBEHÖR
- INSTALLATIONSVORGANG
- 1 Befestigen Sie die große Wandhalterung an der Wand.
- 2 Nehmen Sie den Metallbeschlag vom Soundprojektor ab.
- 3 Befestigen Sie die kleinen Wandhalterungen an dem Soundprojektor.
- 4 Bringen Sie den Sicherheitsdraht an.
- 5 Montieren Sie den Soundprojektor an der Wand.
- 6 Sichern Sie das Gerät.
- 7 Befestigen Sie die Sicherungsdrähte an der Wand.
- Svenska
- Italiano
- NORME DI SICUREZZA
- ACCESSORI
- PROCEDURA DI INSTALLAZIONE
- 1 Applicare la grande staffa di installazione a muro su di un muro.
- 2 Rimuovere le parti metalliche dal proiettore audio.
- 3 Applicare le staffe di installazione a muro piccole al proiettore audio.
- 4 Applicare saldamente i fili di sicurezza.
- 5 Installare il proiettore audio sul muro.
- 6 Fermare quest'unità.
- 7 Fermare i fili di sicurezza al muro.
- Español
- INSTRUCCIONES DE SEGURIDAD
- ACCESORIOS
- PROCEDIMIENTO DE INSTALACIÓN
- 1 Coloque el soporte de montaje en pared grande en la pared.
- 2 Separe los aparatos de metal del proyector de sonido.
- 3 Coloque los soportes de montaje en pared pequeños en el proyector de sonido.
- 4 Coloque el cable de seguridad.
- 5 Monte el proyector de sonido en la pared.
- 6 Asegure la unidad.
- 7 Coloque los cables de seguridad en la pared.
- Nederlands
- VEILIGHEIDSINSTRUCTIES
- TOEBEHOREN
- INSTALLATIEPROCEDURE
- 1 Bevestig de grote wandbevestigingsbeugel aan de wand.
- 2 Maak het metalen onderdeel los van de Geluidsprojector.
- 3 Bevestig de kleine wandbevestigingsbeugels aan de Geluidsprojector.
- 4 Bevestig de veiligheidsdraad.
- 5 Bevestig de Geluidsprojector aan de wand.
- 6 Zet het toestel vast.
- 7 Bevestig de veiligheidsdraden aan de wand.
- Chinese
- Korean
- 日本語

English
INSTALLATION PROCEDURE
E-3
Make sure to leave adequate ventilation space around the unit and follow the instructions below.
In order to secure the unit to the wall, you will need to attach the bracket to the wall first in a manner befitting the
structure and quality of the wall.
Choose a location where the wall can bear the weight of the whole unit.
Before installing the bracket, make sure of the size (see “DIMENSIONS” on the first page of this manual).
Choose a secure wall or beam to fasten the screws. Do not install them into walls made of weak
material that can easily come off, such as mortar or plywood wall panels. Loose screws could cause
the projector to fall, resulting in personal injury.
Detach the metal apparatuses from the rear left and right sides of the Sound Projector.
You need the detached screws in procedure 3. Be careful not to lose them.
INSTALLATION PROCEDURE
1 Attach the large wall mount bracket to the wall.
2 Detach the metal apparatuses from the Sound Projector.
Washer
(commercially
available)
4mm Tapping Screw (commercially available)
In order to secure the unit to the wall, drive four (or more) tapping
screws from the outside through the holes in the wall mount bracket.
Installing into a dry
wall
Installing directly
into a wall, etc.
25mm or more
25mm or more
Beam, etc. Dry wall
Metal
apparatus
Metal
apparatus
Installation example