
Owner's Manual


INSTALLATION PROCEDURE
E-4
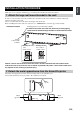
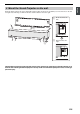
Use screws of the metal apparatus (M4) detached in procedure 2 to securely attach the two small wall mount brackets to
the rear left and right sides of the Sound Projector.
If you tighten the screws on the slant, the screw threads in the projector might be broken.
Be careful when using electric tools.
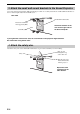
Attach the safety wire to the small wall mount bracket to prevent the Sound Projector from falling.
3 Attach the small wall mount brackets to the Sound Projector.
4 Attach the safety wire.
Detached screw of the
metal apparatus (M4)
Sound Projector
Small wall mount bracket
Rear View
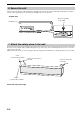
Safety wire
Slip one end
through the loop
at the other end
Repeat the same
procedure for the
other bracket.
Slip the safety wire
between the bracket
and the projector
Attach the brackets to the
rear left and right sides of
the Sound Projector.