Руководство пользователя Саундбар RU
СОДЕРЖАНИЕ СОДЕРЖАНИЕ ВВЕДЕНИЕ 5 О данном Руководстве пользователя.. ...................................................... 5 Функции.. ............................................................................................... 6 Прилагаемые аксессуары......................................................................... 8 НАЗВАНИЯ КОМПОНЕНТОВ И ИХ ФУНКЦИИ 10 Названия компонентов саундбара (передняя/верхняя сторона)................ 10 Названия компонентов саундбара (задняя сторона).............
СОДЕРЖАНИЕ Использование пульта ДУ телевизора для управления саундбаром (Управление по HDMI)............................................................................. 44 Отображение типа аудиосигнала и настроек для функций.. ..................... 45 Управление саундбаром с помощью приложения..................................... 46 КОНФИГУРАЦИЯ 47 Включение/отключение функции управления по HDMI.. ..........................
СОДЕРЖАНИЕ Крепление саундбара на стене................................................................ 91 Меры предосторожности для крепления саундбара на стене........................................................................................ 91 Крепление саундбара на стене (для квалифицированного обслуживающего персонала).. .....................................
ВВЕДЕНИЕ > О данном Руководстве пользователя ВВЕДЕНИЕ О данном Руководстве пользователя ( Данное Руководство пользователя предназначено для следующих категорий читателей: пользователи изделия конструктор, строитель и дилер, которые устанавливают изделие на стене ( ( ( В данном Руководстве пользователя используются следующие сигнальные слова для важной информации: ( ПРЕДУПРЕЖДЕНИЕ Данная информация предупреждает о риске смерти или получения серьезных увечий.
ВВЕДЕНИЕ > Функции Функции Данный саундбар представляет собой колонку для вашего телевизора, которая легко позволит вам наслаждаться окружающим звуком на телевизоре. n Воспроизводите окружающий звук Ссылки по теме “Окружающий звук” (c. 35) n Простое воспроизведение аудиоконтента с устройства Bluetooth Ссылки по теме “Прослушивание аудио с устройства Bluetooth®” (c.
ВВЕДЕНИЕ > Функции n Дополнительные функции Чистый голос (Clear Voice) Данная функция автоматически отличает человеческие голоса от фонового звука и усиливает только громкость голосов. Это позволяет более четко слышать человеческие голоса в телевизионных программах, где используется много фоновой музыки и звуковых эффектов. “Четкое воспроизведение человеческих голосов (CLEAR VOICE)” (c.
ВВЕДЕНИЕ > Прилагаемые аксессуары Прилагаемые аксессуары Убедитесь в наличии всех перечисленных ниже аксессуаров: ( Саундбар (SR-C20A) ( Пульт ДУ * Литиевая батарейка (CR2025) уже вставлена в пульт ДУ. ( Адаптер переменного тока (номер модели: ANAD-420FIOT-B или ANAD-420FIOT-W) ( Шнур питания ( Цифровой оптический аудиокабель ( Проставки (A: ×2, B: ×2 на 1 листе) * Используйте при монтаже саундбара на стену. ( Монтажный шаблон * Используйте при монтаже саундбара на стену.
ВВЕДЕНИЕ > Прилагаемые аксессуары ( Краткое руководство по началу работы ( Брошюра по безопасности 9
НАЗВАНИЯ КОМПОНЕНТОВ И ИХ ФУНКЦИИ > Названия компонентов саундбара (передняя/верхняя сторона) НАЗВАНИЯ КОМПОНЕНТОВ И ИХ ФУНКЦИИ Названия компонентов саундбара (передняя/верхняя сторона) В данном разделе описаны названия и функции компонентов, расположенных на передней/верхней стороне саундбара. b a c d e d a c Индикаторы Индикаторы на верхней панели мигают или горят непрерывно, отображая состояние операции и настройки.
НАЗВАНИЯ КОМПОНЕНТОВ И ИХ ФУНКЦИИ > Названия компонентов саундбара (передняя/верхняя сторона) d Встроенные сабвуферы e Сенсоры ДУ ПРИМЕЧАНИЕ ( ( Для предотвращения непреднамеренного срабатывания ничего не помещайте на органы управления саундбара. Включение функции блокировки от детей предотвращает случайное срабатывание. Яркость индикаторов можно регулировать путем нажатия DIM. Ссылки по теме ( ( “Включение/отключение функции блокировки от детей” (c.
НАЗВАНИЯ КОМПОНЕНТОВ И ИХ ФУНКЦИИ > Названия компонентов саундбара (задняя сторона) Названия компонентов саундбара (задняя сторона) В данном разделе описаны названия и функции компонентов, расположенных на задней стороне саундбара. a a b c d e f Гнездо UPDATE ONLY Используйте для обновления встроенного программного обеспечения саундбара. Дополнительные сведения см. в инструкциях, прилагаемых к встроенному программному обеспечению. b Входное гнездо ANALOG (c. 27) c Входное гнездо OPTICAL (c.
НАЗВАНИЯ КОМПОНЕНТОВ И ИХ ФУНКЦИИ > Названия компонентов пульта ДУ Названия компонентов пульта ДУ В данном разделе описаны названия и функции компонентов пульта ДУ. a b c d e f g h i j a Кнопка z (Питание) Включение и выключение саундбара (c. 31). b Кнопки источника входного сигнала Выберите источник входного аудиосигнала (c. 32).
НАЗВАНИЯ КОМПОНЕНТОВ И ИХ ФУНКЦИИ > Названия компонентов пульта ДУ f Кнопка INFO Отображение такой информации, как тип воспроизводимого аудиосигнала и настройки для функций саундбара (c. 45). g Кнопка DIM Переключение яркости индикаторов саундбара (c. 43). h Кнопка SUBWOOFER (+/-) Регулировка громкости сабвуфера (c. 37). i Кнопка VOLUME (+/-) Отрегулируйте громкость саундбара (c. 32). j Кнопка | (Отключение звука) Отключение звука аудиовыхода (c. 32).
ПОДГОТОВКА > Подготовка ПОДГОТОВКА Подготовка Установите саундбар и подключите к нему телевизор. 1 Установите саундбар. Процедура установки “Установка саундбара” (c.
ПОДГОТОВКА > Подготовка 2 Подключите телевизор к саундбару. В зависимости от типа телевизора подключите телевизор к саундбару следующим образом: ( Подключение телевизора только с помощью прилагаемого цифрового оптического аудиокабеля OPTICAL Процедура подключения “Подключение телевизора только с помощью прилагаемого цифрового оптического аудиокабеля” (c.
ПОДГОТОВКА > Подготовка 4 Подготовьте пульт ДУ. “Подготовка пульта ДУ” (c. 30) 5 Включите саундбар. “Включение и выключение саундбара” (c. 31) ПРИМЕЧАНИЕ ( Подключите аудиовидеоустройства (например, BD/DVD-проигрыватели и телевизионные приставки) к входным гнездам HDMI телевизора.
ПОДГОТОВКА > Меры предосторожности для подготовки Меры предосторожности для подготовки Перед установкой саундбара и подключением других устройств обязательно прочтите следующие меры предосторожности. Обязательно всегда соблюдайте меры предосторожности. n Меры предосторожности для установки ПРЕДУПРЕЖДЕНИЕ ( ( ( ( ( Установите в соответствии с описанием, приведенным в руководстве. Падение или опрокидывание устройства может привести к травмам или повреждениям.
ПОДГОТОВКА > Меры предосторожности для подготовки n Меры предосторожности для подключений ПРЕДУПРЕЖДЕНИЕ ( ( ( ( ( ( ( Напряжение источника питания для данного изделия должно соответствовать указанному на нем значению. Подключение к неподходящей розетке переменного тока может стать причиной пожара, поражения электрическим током или неисправности. Используйте входящий в комплект поставки кабель питания и адаптер переменного тока.
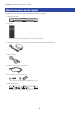
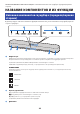
ПОДГОТОВКА > Установка саундбара Установка саундбара ( Перед установкой саундбара обязательно прочтите следующие меры предосторожности. “Меры предосторожности для подготовки” (c. 18) ( Установите саундбар, как показано на следующем рисунке. Органы управления ПРИМЕЧАНИЕ ( ( Саундбар можно также закрепить на стене. Частотные характеристики саундбара можно изменять в зависимости от того, что саундбар либо размещен на ТВ-тумбе, либо закреплен на стене.
ПОДГОТОВКА > Подключение телевизора Подключение телевизора Подключение телевизора только с помощью прилагаемого цифрового оптического аудиокабеля ( Перед подключением внешнего сабвуфера обязательно прочтите следующие меры предосторожности. “Меры предосторожности для подготовки” (c. 18) ( Подключите телевизор только с помощью прилагаемого цифрового оптического аудиокабеля. 1 Подключите телевизор к саундбару.
ПОДГОТОВКА > Подключение телевизора 2 Подключите саундбар к источнику питания. Саундбар (задняя сторона) Адаптер переменного тока (прилагается) Шнур питания (прилагается) В настенную розетку переменного тока ПРИМЕЧАНИЕ Подключите аудиовидеоустройство (например, телевизионную приставку) к телевизору.
ПОДГОТОВКА > Подключение телевизора Подключение телевизора с помощью кабеля HDMI (продается отдельно) ( Перед подключением внешнего сабвуфера обязательно прочтите следующие меры предосторожности. “Меры предосторожности для подготовки” (c. 18) ( При подключении телевизора с помощью кабеля HDMI саундбаром можно управлять с помощью функции управления по HDMI с использованием пульта ДУ телевизора.
ПОДГОТОВКА > Подключение телевизора 2 Подключите саундбар к источнику питания. Саундбар (задняя сторона) Адаптер переменного тока (прилагается) Шнур питания (прилагается) В настенную розетку переменного тока n Телевизор, который не поддерживает Audio Return Channel (ARC) Подключите телевизор с помощью кабеля HDMI (продается отдельно) и прилагаемого цифрового оптического аудиокабеля.
ПОДГОТОВКА > Подключение телевизора 1 Подключите телевизор к саундбару. Гнездо HDMI OUT/TV (ARC) HDMI Вход HDMI HDMI IN HDMI Саундбар (задняя сторона) OPTICAL O ТВ O Аудиовыход (цифровой оптический аудиосигнал) Гнездо TV 1. Снимите крышку. 2. Проверьте ориентацию разъема.
ПОДГОТОВКА > Подключение телевизора 2 Подключите саундбар к источнику питания. Саундбар (задняя сторона) Адаптер переменного тока (прилагается) Шнур питания (прилагается) В настенную розетку переменного тока ПРИМЕЧАНИЕ ( ( ( ( Для активации Audio Return Channel (ARC) включите функцию управления по HDMI саундбара. (Эта функция по умолчанию включена.) Используйте 19-контактный кабель HDMI с нанесенным логотипом HDMI. Во избежание ухудшения качества сигнала используйте как можно более короткий кабель.
ПОДГОТОВКА > Подключение аудиоустройства Подключение аудиоустройства ( Перед подключением аудиоустройства обязательно прочтите следующие меры предосторожности. “Меры предосторожности для подготовки” (c. 18) ( Устройства, оснащенные гнездами аудиовыхода, можно подключать непосредственно к саундбару. n Устройство с цифровым оптическим гнездом аудиовыхода Подключите аудиоустройство с помощью цифрового оптического аудиокабеля. 1 Подключите аудиоустройство к саундбару.
ПОДГОТОВКА > Подключение аудиоустройства 2 Подключите саундбар к источнику питания. Саундбар (задняя сторона) Адаптер переменного тока (прилагается) Шнур питания (прилагается) В настенную розетку переменного тока ПРИМЕЧАНИЕ При подключении устройства, оснащенного видеовыходом, подключите гнездо видеовыхода непосредственно к гнезду видеовхода на телевизоре.
ПОДГОТОВКА > Подключение аудиоустройства 2 Подключите саундбар к источнику питания. Саундбар (задняя сторона) Адаптер переменного тока (прилагается) Шнур питания (прилагается) В настенную розетку переменного тока ВНИМАНИЕ ( Если на устройстве, подключенном к входному гнезду ANALOG саундбара, можно регулировать громкость, отрегулируйте громкость устройства таким образом, чтобы громкость телевизора и устройства была примерно одинаковой.
ПОДГОТОВКА > Подготовка пульта ДУ Подготовка пульта ДУ Перед использованием пульта ДУ удалите изолирующую прокладку батарейки. Изолирующая прокладка батарейки Ссылки по теме “Замена батарейки пульта ДУ” (c.
ПОДГОТОВКА > Включение и выключение саундбара Включение и выключение саундбара Включение и выключение саундбара. 1 Нажмите z. Нажатие кнопки приводит к включению и выключению саундбара. z (Питание) Когда саундбар включен, высвечиваются все индикаторы, а затем некоторые индикаторы продолжат светиться, показывая состояние настройки (обычная индикация). Когда саундбар выключен, индикаторы выключаются.
ВОСПРОИЗВЕДЕНИЕ > Основное управление во время воспроизведения ВОСПРОИЗВЕДЕНИЕ Основное управление во время воспроизведения В данном разделе описаны основные операции управления, доступные во время воспроизведения. n Выбор источника входного сигнала Нажмите одну из следующих кнопок.
ВОСПРОИЗВЕДЕНИЕ > Основное управление во время воспроизведения Для временного отключения звука саундбара нажмите |. Для отмены отключения звука нажмите | еще раз или нажмите VOLUME (+/-). При отключении звука индикаторы будут показывать следующее. Мигает Ссылки по теме ( ( ( ( ( “Окружающий звук” (c. 35) “Стереофонический режим воспроизведения” (c. 36) “Четкое воспроизведение человеческих голосов (CLEAR VOICE)” (c. 38) “Воспроизведение улучшенного звука басов (BASS EXT)” (c.
ВОСПРОИЗВЕДЕНИЕ > Регулировка звука в соответствии с вашими предпочтениями Регулировка звука в соответствии с вашими предпочтениями Функции звука данного изделия Данное изделие имеет следующие функции звука: n Режимы звука Данное изделие позволяет вам наслаждаться прослушиванием звука в следующих режимах. STANDARD Этот режим звука наилучшим образом подходит для обычного контента, например спортивных трансляций, комедийных телевизионных сериалов и реалити-шоу. Выполняется воспроизведение окружающего звука.
ВОСПРОИЗВЕДЕНИЕ > Регулировка звука в соответствии с вашими предпочтениями Окружающий звук Нажмите STANDARD, MOVIE или GAME для переключения на воспроизведение окружающего звука в этом режиме звука. Выберите предпочитаемый режим звука в соответствии с просматриваемым или прослушиваемым контентом. Светится Ссылки по теме “Функции звука данного изделия” (c.
ВОСПРОИЗВЕДЕНИЕ > Регулировка звука в соответствии с вашими предпочтениями Стереофонический режим воспроизведения Нажмите STEREO для переключения на 2-канальное стереофоническое воспроизведение. Выключено Ссылки по теме “Функции звука данного изделия” (c.
ВОСПРОИЗВЕДЕНИЕ > Регулировка звука в соответствии с вашими предпочтениями Регулировка громкости сабвуфера Регулировка громкости только сабвуфера. Громкость всей системы остается прежней. Нажимайте SUBWOOFER (+/-) для регулировки громкости. Светящийся индикатор изменяется, показывая уровень громкости.
ВОСПРОИЗВЕДЕНИЕ > Регулировка звука в соответствии с вашими предпочтениями Четкое воспроизведение человеческих голосов (CLEAR VOICE) Включение функции чистый голос позволяет более четко слышать человеческие голоса в составе аудиосигнала. Данная функция рекомендуется для фильмов или пьес, в которых используется много фоновой музыки и звуковых эффектов. Нажимайте CLEAR VOICE для включения или отключения функции.
ВОСПРОИЗВЕДЕНИЕ > Регулировка звука в соответствии с вашими предпочтениями Воспроизведение улучшенного звука басов (BASS EXT) При включении функции усиления басов звук басов усиливается и становится мощнее. Нажимайте BASS EXT для включения или отключения функции. Мигает три раза: включена Мигает один раз: отключена ПРИМЕЧАНИЕ Нажмите INFO, чтобы проверить, включена или отключена функция усиления басов. Ссылки по теме “Отображение типа аудиосигнала и настроек для функций” (c.
ВОСПРОИЗВЕДЕНИЕ > Прослушивание аудио с устройства Bluetooth® Прослушивание аудио с устройства Bluetooth® Аудиоконтент с устройства Bluetooth можно воспроизводить через саундбар. Устройство Bluetooth 1 Нажмите BLUETOOTH для переключения источника входного сигнала на Bluetooth. Саундбар перейдет в состояние ожидания соединения и будет мигать индикатор BLUETOOTH. Мигает 2 Включите функцию Bluetooth на устройстве Bluetooth.
ВОСПРОИЗВЕДЕНИЕ > Прослушивание аудио с устройства Bluetooth® 3 Выберите саундбар на устройстве Bluetooth. Yamaha SR-C20A или YamahaAV При установлении соединения индикатор BLUETOOTH на саундбаре перестанет мигать и начнет светиться синим цветом. Светится синим цветом 4 Начните воспроизведение на устройстве Bluetooth. Саундбар начнет воспроизведение аудиосигнала с устройства Bluetooth.
ВОСПРОИЗВЕДЕНИЕ > Прослушивание аудио с устройства Bluetooth® Устройство Bluetooth (выполнение воспроизведения) Устройство Bluetooth (воспроизведение остановлено) Выполните следующие процедуры для переключения между устройствами для воспроизведения. 1 2 Остановите воспроизведение на устройстве Bluetooth. Начните воспроизведение на другом устройстве Bluetooth. На саундбаре можно слушать звук с другого устройства Bluetooth.
ДОПОЛНИТЕЛЬНЫЕ ФУНКЦИИ > Изменение яркости индикаторов (Светорегулятор) ДОПОЛНИТЕЛЬНЫЕ ФУНКЦИИ Изменение яркости индикаторов (Светорегулятор) Установите яркость индикаторов саундбара на один из трех уровней: “Яркая”, “Приглушена” или “Выкл”. По умолчанию яркость установлена в “Приглушена”. 1 2 Включите саундбар. Нажмите DIM. Нажимайте кнопку для изменения яркости в порядке “Приглушена”, “Выкл” и “Яркая”.
ДОПОЛНИТЕЛЬНЫЕ ФУНКЦИИ > Использование пульта ДУ телевизора для управления саундбаром (Управление по HDMI) Использование пульта ДУ телевизора для управления саундбаром (Управление по HDMI) Если саундбар подключен к телевизору с помощью кабеля HDMI, саундбаром можно управлять с использованием пульта ДУ телевизора. Это называется функцией управления по HDMI. Пульт ДУ телевизора (пример) a b c a Включение и выключение питания Телевизор и саундбар включаются/выключаются одновременно.
ДОПОЛНИТЕЛЬНЫЕ ФУНКЦИИ > Отображение типа аудиосигнала и настроек для функций Отображение типа аудиосигнала и настроек для функций Можно проверить тип воспроизводимого аудиосигнала и настройки для функций саундбара. 1 Нажмите INFO. Индикаторы на саундбаре будут показывать следующую информацию о типе аудиосигнала и настройках для функций в течение трех секунд сразу после нажатия INFO.
ДОПОЛНИТЕЛЬНЫЕ ФУНКЦИИ > Управление саундбаром с помощью приложения Управление саундбаром с помощью приложения Путем установки на мобильном устройстве специального приложения “Sound Bar Remote” можно управлять саундбаром с мобильного устройства. Выполните поиск приложения “Sound Bar Remote” на App Store или Google Play и установите его на мобильном устройстве.
КОНФИГУРАЦИЯ > Включение/отключение функции управления по HDMI КОНФИГУРАЦИЯ Включение/отключение функции управления по HDMI При включении функции управления по HDMI можно управлять саундбаром с помощью пульта ДУ телевизора. Настройка по умолчанию: Включена 1 2 Выключите саундбар. Нажмите и удерживайте TV не менее пяти секунд. Функция управления по HDMI переключится из включенного положения в выключенное или из выключенного во включенное.
КОНФИГУРАЦИЯ > Включение/отключение функции автоматического энергосберегающего режима ожидания Включение/отключение функции автоматического энергосберегающего режима ожидания При включении функции автоматического энергосберегающего режима ожидания саундбар будет выключен в любой из следующих ситуаций.
КОНФИГУРАЦИЯ > Включение/отключение функции блокировки от детей Включение/отключение функции блокировки от детей Блокировка органов управления саундбара предотвращает случайное срабатывание (функция блокировки от детей). Настройка по умолчанию: Отключена (нет блокировки от детей) 1 2 Выключите саундбар. Нажмите и удерживайте INFO не менее пяти секунд. Функция блокировки от детей переключится из включенного положения в выключенное или из выключенного во включенное.
КОНФИГУРАЦИЯ > Включение/отключение функции ожидания Bluetooth Включение/отключение функции ожидания Bluetooth Если включена функция ожидания Bluetooth, саундбар включится автоматически при подключении устройства Bluetooth к саундбару. Настройка по умолчанию: Включена 1 2 Выключите саундбар. Нажмите и удерживайте BLUETOOTH не менее пяти секунд. Функция ожидания Bluetooth переключится из включенного положения в выключенное или из выключенного во включенное.
КОНФИГУРАЦИЯ > Включение/отключение функции Bluetooth Включение/отключение функции Bluetooth Функцию Bluetooth можно отключить. Настройка по умолчанию: Включена 1 2 Выключите саундбар. Нажмите и удерживайте DIM не менее пяти секунд. Функция Bluetooth переключится из включенного положения в выключенное или из выключенного во включенное. Индикатор покажет примененную настройку следующим образом, и саундбар включится.
КОНФИГУРАЦИЯ > Установка уровня сжатия динамического диапазона Установка уровня сжатия динамического диапазона Сжатие динамического диапазона аудиосигналов (разницы громкости между самыми громкими и самыми тихими звуками) упрощает прослушивание с низкой громкостью. Данная настройка будет применена только при воспроизведении аудиосигналов Dolby Digital. Настройка по умолчанию: Без сжатия 1 Выключите саундбар.
КОНФИГУРАЦИЯ > Установка уровня сжатия динамического диапазона 2 Удерживайте нажатой одну из следующих кнопок в течение по крайней мере пяти секунд. Уровень сжатия Удерживаема я кнопка Функция Максимальное сжатие Применение максимальной величины сжатия динамического диапазона. Стандартное сжатие Применение величины сжатия динамического диапазона, хорошо подходящей для обычной комнаты. Без сжатия Сжатие динамического диапазона не применяется.
КОНФИГУРАЦИЯ > Изменение частотных характеристик в соответствии с установкой саундбара Изменение частотных характеристик в соответствии с установкой саундбара Частотные характеристики саундбара можно изменять в соответствии с тем, как саундбар установлен (размещен на ТВ-тумбе или закреплен на стене). Настройка по умолчанию: ТВ-тумба Закреплен на стене Установлен на ТВ-тумбе 1 Саундбар выключен.
КОНФИГУРАЦИЯ > Изменение частотных характеристик в соответствии с установкой саундбара 2 В соответствии с тем, как саундбар установлен, удерживайте одну из следующих клавиш в течение по крайней мере пяти секунд. ( Закреплен на стене ( Установлен на ТВ-тумбе Настройка частотных характеристик изменена. Индикатор покажет примененную настройку следующим образом, и саундбар включится.
КОНФИГУРАЦИЯ > Инициализация саундбара Инициализация саундбара Восстановление заводских установок саундбара. 1 2 Саундбар выключен. Удерживая нажатой } на саундбаре, удерживайте нажатой z, пока не начнут мигать все индикаторы. Инициализация выполнена. После завершения инициализации индикаторы будут показывать следующее.
ПОИСК И УСТРАНЕНИЕ НЕИСПРАВНОСТЕЙ > При возникновении какой-либо проблемы сначала проверьте следующее ПОИСК И УСТРАНЕНИЕ НЕИСПРАВНОСТЕЙ При возникновении какой-либо проблемы сначала проверьте следующее Если саундбар не функционирует надлежащим образом, проверьте следующее. Шнуры питания всех устройств надежно подключены к настенным розеткам переменного тока. Саундбар, телевизор и аудиовидеоустройства включены. Штекеры каждого кабеля надежно вставлены в соответствующие гнезда каждого устройства.
ПОИСК И УСТРАНЕНИЕ НЕИСПРАВНОСТЕЙ > При возникновении проблемы: Питание или общая работоспособность При возникновении проблемы: Питание или общая работоспособность Неожиданно выключается питание ( Функция автоматического энергосберегающего режима ожидания выключила саундбар. Включение функции автоматического энергосберегающего режима ожидания автоматически выключает саундбар в любой из следующих ситуаций.
ПОИСК И УСТРАНЕНИЕ НЕИСПРАВНОСТЕЙ > При возникновении проблемы: Питание или общая работоспособность Невозможно включить питание ( Схема защиты сработала три раза подряд. С целью защиты изделия включение питания заблокировано. Отсоедините шнур питания от настенной розетки переменного тока и обратитесь к ближайшему авторизованному дилеру или в сервисный центр Yamaha.
ПОИСК И УСТРАНЕНИЕ НЕИСПРАВНОСТЕЙ > При возникновении проблемы: Питание или общая работоспособность Не выполняются операции с помощью органов управления саундбара ( Органы управления саундбара заблокированы. Разблокируйте органы управления саундбара. “Включение/отключение функции блокировки от детей” (c.
ПОИСК И УСТРАНЕНИЕ НЕИСПРАВНОСТЕЙ > При возникновении проблемы: Питание или общая работоспособность Все индикаторы выключены несмотря на то, что питание включено (как будто питание выключено) ( Яркость индикатора установлена в “Выкл”. Измените яркость. “Изменение яркости индикаторов (Светорегулятор)” (c.
ПОИСК И УСТРАНЕНИЕ НЕИСПРАВНОСТЕЙ > При возникновении проблемы: Питание или общая работоспособность Саундбар работает неправильно ( Завис внутренний микрокомпьютер из-за воздействия сильного электрического напряжения от внешних источников (например, молнии или сильного статического электричества) или из-за перепада напряжения электропитания. Извлеките штепсельную вилку из настенной розетки переменного тока, а затем снова вставьте ее спустя по крайней мере 10 секунд.
ПОИСК И УСТРАНЕНИЕ НЕИСПРАВНОСТЕЙ > При возникновении проблемы: Питание или общая работоспособность Саундбар самопроизвольно включается ( Поблизости используется другое устройство Bluetooth. Завершите соединение по Bluetooth со саундбаром. “Прослушивание аудио с устройства Bluetooth®” (c.
ПОИСК И УСТРАНЕНИЕ НЕИСПРАВНОСТЕЙ > При возникновении проблемы: Питание или общая работоспособность Управление саундбаром с помощью пульта ДУ невозможно ( Саундбар находится за пределами рабочего расстояния. Используйте пульт ДУ в пределах рабочего расстояния. “Названия компонентов пульта ДУ” (c. 13) ( ( Разрядилась батарейка. Замените батарейку на новую. “Замена батарейки пульта ДУ” (c. 76) ( ( На сенсор ДУ саундбара действуют прямые солнечные лучи или яркий свет.
ПОИСК И УСТРАНЕНИЕ НЕИСПРАВНОСТЕЙ > При возникновении проблемы: Питание или общая работоспособность Управление саундбаром с помощью пульта ДУ телевизора невозможно ( Функция управления по HDMI не настроена надлежащим образом. Убедитесь, что параметры правильно настроены следующим образом: Функция управления по HDMI саундбара включена. Функция управления по HDMI включена на телевизоре.
ПОИСК И УСТРАНЕНИЕ НЕИСПРАВНОСТЕЙ > При возникновении проблемы: Аудио При возникновении проблемы: Аудио Отсутствует звук ( Источник входного сигнала, который вы пытаетесь воспроизвести, не выбран. Выберите правильный источник входного сигнала. “Основное управление во время воспроизведения” (c. 32) ( ( Активна функция отключения звука. Отмените функцию отключения звука. “Основное управление во время воспроизведения” (c. 32) ( ( Слишком низкая громкость. Увеличьте громкость.
ПОИСК И УСТРАНЕНИЕ НЕИСПРАВНОСТЕЙ > При возникновении проблемы: Аудио Не поступает звук из сабвуфера ( Источник воспроизведения не содержит сигналов канала сабвуфера или низкочастотных сигналов. Попробуйте воспроизвести контент, содержащий сигналы канала сабвуфера, чтобы увидеть, слышен ли какой-либо звук из сабвуфера. ( Громкость сабвуфера слишком мала. Увеличьте громкость сабвуфера. “Регулировка громкости сабвуфера” (c.
ПОИСК И УСТРАНЕНИЕ НЕИСПРАВНОСТЕЙ > При возникновении проблемы: Аудио При включении саундбара громкость уменьшается ( Включена функция автоматической регулировки громкости. Для предотвращения неожиданно чрезмерной громкости в случае, если саундбар был выключен с высокой настройкой громкости, при следующем включении саундбара громкость будет настроена автоматически. При необходимости увеличьте громкость. “Основное управление во время воспроизведения” (c.
ПОИСК И УСТРАНЕНИЕ НЕИСПРАВНОСТЕЙ > При возникновении проблемы: Аудио Нет эффекта окружающего звука ( Выбрано стереофоническое воспроизведение. Выберите воспроизведение окружающего звука. “Окружающий звук” (c. 35) ( ( Слишком низкая громкость. Увеличьте громкость. “Основное управление во время воспроизведения” (c. 32) ( ( Телевизор или аудиовидеоустройство настроено только на 2-канальный вывод звука (например, PCM).
ПОИСК И УСТРАНЕНИЕ НЕИСПРАВНОСТЕЙ > При возникновении проблемы: Аудио Слышен шум ( Саундбар расположен слишком близко к другому цифровому или высокочастотному устройству. Установите эти устройства на достаточном расстоянии от саундбара.
ПОИСК И УСТРАНЕНИЕ НЕИСПРАВНОСТЕЙ > При возникновении проблемы: Bluetooth® При возникновении проблемы: Bluetooth® Невозможно подключить саундбар к устройству Bluetooth® ( Bluetooth не выбран в качестве источника входного сигнала саундбара. Выберите Bluetooth в качестве источника входного сигнала. “Прослушивание аудио с устройства Bluetooth®” (c. 40) ( ( Саундбар расположен слишком далеко от устройства Bluetooth. Переместите устройство Bluetooth ближе к саундбару.
ПОИСК И УСТРАНЕНИЕ НЕИСПРАВНОСТЕЙ > При возникновении проблемы: Bluetooth® Звук с устройства Bluetooth® не слышен или периодически пропадает ( Слишком низкая громкость устройства Bluetooth. Увеличьте громкость на устройстве Bluetooth. ( Bluetooth не выбран в качестве источника входного сигнала саундбара. Выберите Bluetooth в качестве источника входного сигнала. “Прослушивание аудио с устройства Bluetooth®” (c. 40) ( ( На устройстве Bluetooth не выполняется воспроизведение.
ПОИСК И УСТРАНЕНИЕ НЕИСПРАВНОСТЕЙ > При возникновении проблемы: Приложение При возникновении проблемы: Приложение Приложение не может обнаружить саундбар ( Приложение не поддерживается используемым саундбаром. Саундбар поддерживает только Sound Bar Remote. Использование Sound Bar Controller, Home Theater Controller и MusicCast Controller невозможно. ( Функция Bluetooth на мобильном устройстве отключена. Включите функцию Bluetooth на мобильном устройстве.
ПОИСК И УСТРАНЕНИЕ НЕИСПРАВНОСТЕЙ > Прочие действия Прочие действия Оптимизация потребляемой мощности в режиме ожидания Измените настройки следующим образом: Управление по HDMI: Отключен Режим ожидания Bluetooth: Отключен ( ( Ссылки по теме ( ( “Включение/отключение функции управления по HDMI” (c. 47) “Включение/отключение функции ожидания Bluetooth” (c.
ПОИСК И УСТРАНЕНИЕ НЕИСПРАВНОСТЕЙ > Прочие действия Меры предосторожности для батареек пульта ДУ Перед заменой батарейки пульта ДУ на новую обязательно прочтите следующие меры предосторожности. Обязательно выполняйте эти меры предосторожности. ПРЕДУПРЕЖДЕНИЕ ( ( ( Пульт ДУ, поставляемый с данным изделием, содержит плоскую/кнопочную батарейку. Не допускайте проглатывания плоской/кнопочной батарейки. Храните новые и использованные батарейки в местах, недоступных для детей.
ПОИСК И УСТРАНЕНИЕ НЕИСПРАВНОСТЕЙ > Прочие действия Замена батарейки пульта ДУ ( Перед заменой батарейки на новую обязательно прочтите следующие меры предосторожности. “Меры предосторожности для батареек пульта ДУ” (c. 75) ( Когда батарейка разрядится, саундбаром больше нельзя будет управлять с помощью пульта ДУ. Замените батарейку на новую. 1 Сдвиньте крышку в направлении стрелки, чтобы снять ее. Задняя крышка Сдвиньте крышку, крепко взявшись в этих местах.
ПОИСК И УСТРАНЕНИЕ НЕИСПРАВНОСТЕЙ > Прочие действия Сброс настроек саундбара Сбросьте настройки саундбара, выполнив следующие операции. n Для переустановки саундбара Извлеките штепсельную вилку из настенной розетки переменного тока, подождите по крайней мере 10 секунд, затем снова вставьте ее и включите саундбар. n Для инициализации саундбара См. следующие пояснения и выполните восстановление заводских установок саундбара. “Инициализация саундбара” (c.
ПРИЛОЖЕНИЕ > Технические характеристики саундбара ПРИЛОЖЕНИЕ Технические характеристики саундбара Саундбар имеет следующие технические характеристики.
ПРИЛОЖЕНИЕ > Технические характеристики саундбара Bluetooth Функция Функция синхронизации (устройства-источника с данным аппаратом) Версия Bluetooth Вер. 5.
ПРИЛОЖЕНИЕ > Поддерживаемые форматы цифрового аудиосигнала Поддерживаемые форматы цифрового аудиосигнала Данным изделием поддерживаются следующие цифровые аудиосигналы. TV, OPTICAL и TV (ARC) Аудиоформаты Подробности 2-канальный линейный PCM 2 канала, 32/44,1/48/88,2/96 кГц, 16/20/24-бит Битовый поток Dolby Digital ПРИМЕЧАНИЕ Содержание данного Руководства пользователя соответствует последним на дату публикации техническим характеристикам.
ПРИЛОЖЕНИЕ > Список отображаемых индикаторов Список отображаемых индикаторов Индикаторы данного изделия (саундбара) отображают информацию преимущественно следующими способами: ПРИМЕЧАНИЕ В данном документе состояние светящегося индикатора показано следующим образом: Выключено Светится Мигает n Состояние выключенного питания n Состояние обычного воспроизведения a a b c d e TV Светится: Воспроизведение аудиосигнала с телевизора b OPTICAL Светится: Воспроизведение аудиосигнала с входного гнезда O
ПРИЛОЖЕНИЕ > Список отображаемых индикаторов n Состояние выключенного звука n Возникла ошибка Мигает красным цветом ПРИМЕЧАНИЕ ( ( Если яркость индикаторов установлена в “Выкл”, индикаторы светятся только во время операций управления. См. описание каждой настройки, для которой будут отображаться индикаторы при изменении настройки. Ссылки по теме ( ( ( ( “Основное управление во время воспроизведения” (c. 32) “Отображение типа аудиосигнала и настроек для функций” (c.
ПРИЛОЖЕНИЕ > Товарные знаки Товарные знаки Изготовлено по лицензии компании Dolby Laboratories. Dolby, Dolby Audio, Pro Logic и символ в виде двух букв D являются товарными знаками Dolby Laboratories. Термины HDMI и HDMI High-Definition Multimedia Interface и Логотип HDMI являются товарными знаками или зарегистрированными товарными знаками HDMI Licensing Administrator, Inc. в США и других странах.
ПРИЛОЖЕНИЕ > О программных продуктах третьей стороны О программных продуктах третьей стороны В данном саундбаре используется следующие программные продукты третьей стороны. CMSIS CMSIS Device STM32F4 HAL FatFS STM32_USB_Host_Library GNU LIBRARY Для получения информации об авторском праве, а также положениях и условиях лицензионного соглашения каждого программного продукта, см. следующее.
ПРИЛОЖЕНИЕ > О программных продуктах третьей стороны THIS SOFTWARE IS PROVIDED BY THE COPYRIGHT HOLDERS AND CONTRIBUTORS "AS IS" AND ANY EXPRESS OR IMPLIED WARRANTIES, INCLUDING, BUT NOT LIMITED TO, THE IMPLIED WARRANTIES OF MERCHANTABILITY AND FITNESS FOR A PARTICULAR PURPOSE ARE DISCLAIMED.
ПРИЛОЖЕНИЕ > О программных продуктах третьей стороны This license, the Library General Public License, applies to some specially designated Free Software Foundation software, and to any other libraries whose authors decide to use it. You can use it for your libraries, too. When we speak of free software, we are referring to freedom, not price.
ПРИЛОЖЕНИЕ > О программных продуктах третьей стороны 0. This License Agreement applies to any software library which contains a notice placed by the copyright holder or other authorized party saying it may be distributed under the terms of this Library General Public License (also called "this License"). Each licensee is addressed as "you".
ПРИЛОЖЕНИЕ > О программных продуктах третьей стороны In addition, mere aggregation of another work not based on the Library with the Library (or with a work based on the Library) on a volume of a storage or distribution medium does not bring the other work under the scope of this License. 3. You may opt to apply the terms of the ordinary GNU General Public License instead of this License to a given copy of the Library.
ПРИЛОЖЕНИЕ > О программных продуктах третьей стороны * b) Accompany the work with a written offer, valid for at least three years, to give the same user the materials specified in Subsection 6a, above, for a charge no more than the cost of performing this distribution. * c) If distribution of the work is made by offering access to copy from a designated place, offer equivalent access to copy the above specified materials from the same place.
ПРИЛОЖЕНИЕ > О программных продуктах третьей стороны generous contributions to the wide range of software distributed through that system in reliance on consistent application of that system; it is up to the author/donor to decide if he or she is willing to distribute software through any other system and a licensee cannot impose that choice. This section is intended to make thoroughly clear what is believed to be a consequence of the rest of this License. 12.
ПРИЛОЖЕНИЕ > Крепление саундбара на стене Крепление саундбара на стене Меры предосторожности для крепления саундбара на стене Перед креплением саундбара на стене обязательно прочтите следующие меры предосторожности для безопасной установки. Обязательно выполняйте эти меры предосторожности. ВНИМАНИЕ ( ( Для надлежащей установки саундбара на стене обеспечьте, чтобы она была выполнена представителем, у которого вы приобрели устройство, или квалифицированным обслуживающим персоналом.
ПРИЛОЖЕНИЕ > Крепление саундбара на стене Крепление саундбара на стене (для квалифицированного обслуживающего персонала) ( Перед креплением саундбара на стене обязательно прочтите следующие меры предосторожности. “Меры предосторожности для крепления саундбара на стене” (c. 91) ( Для крепления саундбара на стене используйте отверстия для винтов для подвешивания саундбара.
ПРИЛОЖЕНИЕ > Крепление саундбара на стене 2 Отметьте положения для винтов. Положения винтов 3 4 Снимите монтажный шаблон со стены. Установите проставки A (прилагаются) и винты (продаются отдельно) в точках, отмеченных на стене. Обязательно используйте винты следующего размера.
ПРИЛОЖЕНИЕ > Крепление саундбара на стене 5 Снимите защитную бумагу с проставок B (прилагаются) и прикрепите каждую проставку клейкой стороной к задней стороне саундбара. Проставки B 6 7 Подключите кабели к саундбару. Навесьте саундбар на винты. Отверстия для винтов для подвешивания саундбара Индикаторы По завершении установки и всех подключений, пока питание выключено, удерживайте нажатой BASS EXT на пульте ДУ саундбара в течение по крайней мере пяти секунд.
Layout Folder: YMH_PDF_Manual_A5_AV Stylesheet Name: 01_YMH_PDF_Manual_A5_AV_En-Multi Stylesheet Version: 2022.04.13 Yamaha Global Site https://www.yamaha.com/ Yamaha Downloads https://download.yamaha.