Wall Mounting Installation Guide Sound Bar EN
CONTENTS CONTENTS About this Wall Mounting Installation Guide.. ............................................... 3 Precautions.............................................................................................. 4 Items to use for wall mounting installation................................................... 5 Mounting the sound bar on a wall................................................................
About this Wall Mounting Installation Guide About this Wall Mounting Installation Guide ( ( This guide explains the installation method for qualified service personnel who mount the sound bar on a wall. This guide uses the following signal words for important information. CAUTION ( ( ( ( ( This content indicates “risk of injury.” NOTICE Indicates points that you must observe in order to prevent product failure, damage, or malfunction, as well as to protect the environment.
Precautions Precautions Before mounting the sound bar on a wall, be sure to read the following precautions for safe installation. Be sure to follow the precautions. n Precautions for mounting the sound bar on a wall CAUTION ( ( For proper installation of the sound bar on a wall, make sure to have the work done by the dealer from which you purchased the product or by a qualified contractor. Some skills and experience are required for safe installation.
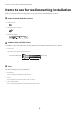
Items to use for wall mounting installation Items to use for wall mounting installation Make sure that all of the following items are present before installing the sound bar. n Items included with this product ( Spacers A (×2) ( Spacers B (×2, on 1 sheet) ( Mounting template n Commercially available items In addition to the included items, the following commercially available items are required.
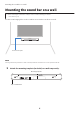
Mounting the sound bar on a wall Mounting the sound bar on a wall ( Before mounting the sound bar on a wall, be sure to read the following precautions. “Precautions” (p.4) ( Use the screw-hanging holes on the sound bar to mount the sound bar on a wall. 3 cm or more apart NOTE To bring out the best performance of the sound bar, install the sound bar 3 cm or more apart from the TV. 1 Attach the mounting template (included) on a wall temporarily.
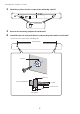
Mounting the sound bar on a wall 2 Mark the positions for the screws on the wall using a pencil. Screw position 3 4 Remove the mounting template from the wall. Install the spacers A (included) and screws at the points marked on the wall. Be sure to use screws of the following size.
Mounting the sound bar on a wall 5 Peel off the backing paper from the spacers B (included), and attach the adhesive face of each spacer to the rear of the sound bar. Spacers B 6 Connect cables to the sound bar. For the connection procedure, see the Quick Start Guide or User Guide of your product. 7 Hang the sound bar on the screws.
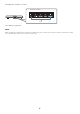
Mounting the sound bar on a wall Sound bar’s indicators Glow The setting is completed. NOTE When changing the installation of the sound bar from wall-mounted to on a stand, also change the frequency characteristics setting. For more information, refer to the User Guide of your product.
Layout Folder: YMH_PDF_Manual_A5 Stylesheet Name: 01_YMH_PDF_Manual_A5_En-Multi Stylesheet Version: 2022.04.13 Yamaha Global Site https://www.yamaha.com/ Yamaha Downloads https://download.yamaha.