Studio Manager for / / / Installation Guide Keep This Manual For Future Reference.
Important Information Special Notices • • • • • • • • The software and this owner’s manual are the exclusive copyrights of Yamaha Corporation. Use of the software and this manual is governed by the Software Licensing Agreement which the purchaser fully agrees to upon breaking the seal of the software packaging. (Carefullyread the agreement at the end of this manual before installing the software.
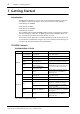
Contents 1 Getting Started . . . . . . . . . . . . . . . . . . . . . . . . . . . . 4 Introduction . . . . . . . . . . . . . . . . . . . . . . . . . . . . . . . . . . . . . . . . . . . . . . . . . . . . . . . . . 4 CD-ROM Contents . . . . . . . . . . . . . . . . . . . . . . . . . . . . . . . . . . . . . . . . . . . . . . . . . . . 4 Windows System Requirements . . . . . . . . . . . . . . . . . . . . . . . . . . . . . . . . . . . . . . . . 5 Macintosh System Requirements . . . . . . . . . . . . . . . . .
Chapter 1—Getting Started 1 Getting Started Introduction • • • • With Yamaha Studio Manager you can control your Yamaha digital mixing console from your Windows or Macintosh computer. There are four versions of Studio Manager: Studio Manager for DM2000 Studio Manager for 02R96 Studio Manager for DM1000 Studio Manager for 01V96 The CD-ROM supplied with the DM2000 or 02R96 contains Studio Manager for DM2000 and Studio Manager for 02R96.
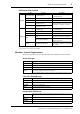
Windows System Requirements 5 DM1000/01V96 CD-ROM Folder Windows Software Adobe Acrobat Reader software for viewing the PDF manuals. Acroread\English Acrobat Reader1, 2 SM_\DM1000 Studio Manager for DM10001 01V961 SM_\01V96 Studio Manager for USBdrv_ Yamaha USB MIDI Driver (Windows 98, Me) USBdrv2k_ Yamaha USB MIDI Driver (Windows 2000, XP) Acroread\English Acrobat Reader,1, 2 SM_\DM1000 Studio Manager for DM10001 SM_\01V96 Studio Manager for 01V961 2.3.
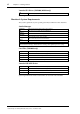
Chapter 1—Getting Started Yamaha CBX Driver (DM2000/02R96 only) OS Windows 95, 98, 98SE, Me, NT4.0, 2000, XP Home Edition, XP Professional System requirements for software not listed here can be found on the CD-ROM. Macintosh System Requirements The system requirements of your operating system may be different to those listed here. Studio Manager Computer A Macintosh G3/233 MHz or better and a USB port OS Mac OS 8.6 to 9.2.
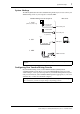
System Hookup 7 System Hookup The following illustration shows the available hookup methods you can use to connect your Yamaha mixing console to your computer: serial, USB, MIDI. Yamaha mixing console rear panel Mac or PC 1. Serial (DM2000/02R96 only) (Yamaha CCJ-Mac or equivalent) Mac serial port Serial cable (Yamaha CCJ-PC2 or equivalent) PC serial port TO HOST USB 2. USB USB port USB cable 3.
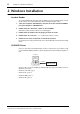
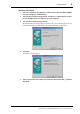
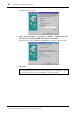
Chapter 2—Windows Installation 2 Windows Installation Acrobat Reader 1 To view the PDF manuals included on the CD-ROM, you need to install the Adobe Acrobat Reader software. If you already have this software installed, skip this section. Start your computer and Windows, and then insert the included CD-ROM into your computer’s CD-ROM drive. 2 Double-click the “Acroread_” folder on the CD-ROM. This folder contains Acrobat software in several languages.
USB MIDI Driver 9 Windows 98 & 98SE 1 Start your computer and Windows, and then insert the included CD-ROM into your computer’s CD-ROM drive. 2 Turn off your Yamaha mixing console, and then use a USB cable to connect its USB TO HOST port to a USB port on your computer. 3 Turn on your Yamaha mixing console. The Add New Hardware Wizard appears. If it doesn’t appear, try disconnecting and reconnecting the USB cable. Alternatively, open the Add New Hardware control panel. 4 Click Next.
Chapter 2—Windows Installation The following window appears. 6 Select “Specify a location,” and specify “D:\USBdrv_” (replacing “D” with the drive letter of your CD-ROM drive), and then click Next. When the driver is located, “YAMAHA USB MIDI Driver” is displayed, as shown below. 7 Click Next. Note: You may be prompted to insert your Windows CD-ROM.
USB MIDI Driver 11 The driver is installed, and the following window appears when the installation is complete. 8 Click Finish, and then restart your computer.
Chapter 2—Windows Installation Windows Me 1 Start your computer and Windows, and then insert the included CD-ROM into your computer’s CD-ROM drive. 2 Turn off your Yamaha mixing console, and then use a USB cable to connect its USB TO HOST port to a USB port on your computer. 3 Turn on your Yamaha mixing console. The Add New Hardware Wizard appears. If it doesn’t appear, try disconnecting and reconnecting the USB cable. Alternatively, open the Add New Hardware control panel.
USB MIDI Driver 13 Windows 2000 1 Start your computer and Windows, log on as the Administrator, and then insert the included CD-ROM into your computer’s CD-ROM drive. 2 Go to My Computer–>Control Panel–>System–>Hardware–>Driver Signing–>File Signature Verification, select “Ignore—Install all files, regardless of file signature,” and then click OK. 3 Turn off your Yamaha mixing console, and then use a USB cable to connect its USB TO HOST port to a USB port on your computer.
Chapter 2—Windows Installation Windows XP 1 Start your computer and Windows, and then insert the included CD-ROM into your computer’s CD-ROM drive. 2 Click the Start button, and then click Control Panel. If the Control Panel window appears as shown below, click “Switch to Classic View” on the left side of the window in order to see all of the control panels.
Yamaha CBX Driver (DM2000/02R96 only) 15 Yamaha CBX Driver (DM2000/02R96 only) 1 If you’re connecting your Yamaha mixing console to a serial port on your computer, you’ll need to install the Yamaha CBX driver. If you already have this driver installed, skip this section. Double-click the “Mididrv_” folder on the CD-ROM. 2 Double-click “Setup.exe.” 3 Follow the on-screen instructions to install the software. Studio Manager 1 Double-click the “SM_” folder on the CD-ROM.
Chapter 3—Macintosh Installation 3 Macintosh Installation Acrobat Reader 1 To view the PDF manuals included on the CD-ROM, you need to install the Adobe Acrobat Reader software. If you already have this software installed, skip this section. Start your Macintosh, and then insert the included CD-ROM into your computer’s CD-ROM drive. 2 Double-click the “Acroread_” folder on the CD-ROM. This folder contains Acrobat software in several languages.
USB MIDI Driver 17 USB MIDI Driver If you’re connecting your Yamaha mixing console to a USB port on your computer, you’ll need to install the Yamaha USB driver. If you already have this driver installed, skip this section. Computer Studio Manager USB cable OMS Driver DM2000/02R96 DM1000/01V96 1 Start your Macintosh, and then insert the included CD-ROM into your computer’s CD-ROM drive. 2 Double-click the “USBdrv_” folder on the CD-ROM. 3 Double-click “Install USB MIDI Driver.
Chapter 3—Macintosh Installation Studio Manager 1 Start your Macintosh, and then insert the included CD-ROM into your computer’s CD-ROM drive. 2 Double-click the “SM_” folder on the CD-ROM. 3 Double-click the “DM2000,” “02R96,” “DM1000,” or “01V96” folder as appropriate. 4 Double-click “Install Studio Manager.” 5 Follow the on-screen instructions to install the software. Card Filer (DM2000 only) 1 Start your Macintosh, and then insert the included CD-ROM into your computer’s CD-ROM drive.
Setting Up OMS 19 Setting Up OMS 1 The “OMS Setup for YAMAHA” folder on the included CD-ROM contains OMS studio setup files preconfigured for use with your Yamaha mixing console. Turn off your Yamaha mixing console, and then use a USB cable to connect its USB TO HOST port to a USB port on your computer. If you are connecting to the SERIAL TO HOST port, use a serial cable to connect to the Printer or Modem port on your computer. 2 Turn on your Yamaha mixing console.
Chapter 4—Getting Started 4 Getting Started Starting Studio Manager The following procedure uses “DM1000” as an example. The content of the menu items selected in the procedure below may vary depending on the version number of Studio Manager software. Windows: Click the Start button and then click Programs–>(YAMAHA OPT Tools–>)YAMAHA Studio Manager for DM1000–>Studio Manager for DM1000. Macintosh: Open the Studio Manager for DM1000 folder and double-click “SM_DM1K.
Configuring Studio Manager 21 Configuring Studio Manager Note: If you’re using Windows, you must specify a MIDI port (see page 20) before making the following settings. Selecting Ports In order to use Studio Manager, you must specify the input and output ports that Studio Manager should use to communicate with your Yamaha mixing console. Windows: Choose System Setup from the File menu, and specify the input and output ports on the Setup dialog box, as shown below.
Chapter 4—Getting Started This is the Macintosh Setup window Input Port/Output Port: (Windows only) These pop-up menus are used to select the ports with which Studio Manager communicates with your Yamaha mixing console. Console Device ID: Studio Manager can control any one of up to eight Yamaha mixing consoles, each with its own exclusive ID. Select the ID of Yamaha mixing console that you want to control. Channel Select: These options determine whether or not channel selection is linked.
Working with Sessions 23 Working with Sessions • • • A Studio Manager Session consists of all your Yamaha mixing console’s mix settings, including Scene and library data. To create a new Session, choose New Session from the File menu. To open a previously saved Session, choose Open Session from the File menu. To save the current Session, choose Save Session from the File menu. • To save the current Session with a new name, choose Save Session as from the File menu.
Chapter 5—Troubleshooting 5 Troubleshooting Cannot control your Yamaha mixing console via USB? • • • • • Have you installed the Yamaha USB MIDI driver (Windows page 8, Mac page 17)? Is the USB cable connected correctly (page 7)? Is your Yamaha mixing console configured correctly (page 7)? Is Studio Manager set to the correct ID? (see the Studio Manager documentation) Macintosh: Is OMS configured correctly (page 19)? On some systems, the included OMS studio setup files may not work correctly.
Troubleshooting • 25 Macintosh: The driver can be removed from your computer by deleting the following files, after which you should restart your computer, reinstall the driver, and then set up OMS. System Folder:Control Panels:YAMAHA USB MIDI Patch System Folder:Extensions:USB YAMAHA MIDI Diver System Folder:OMS Folder:YAMAHA USB MIDI OMS Driver Improving performance • • • If your computer seems unresponsive, make sure it satisfies the system requirements (Windows page 5, Mac page 6).
Software Licensing Agreement The following is a legal agreement between you, the end user, and Yamaha Corporation (“Yamaha”). The enclosed Yamaha software program is licensed by Yamaha to the original purchaser for use only on the terms set forth herein. Please read this licensing agreement with care. Opening this package indicates that you accept all terms outlined herein. If you do not agree to the terms, return this package unopened to Yamaha for a full refund.
For details of products, please contact your nearest Yamaha representative or the authorized distributor listed below. Pour plus de détails sur les produits, veuillez-vous adresser à Yamaha ou au distributeur le plus proche de vous figurant dans la liste suivante. NORTH AMERICA CANADA Yamaha Canada Music Ltd.
Yamaha Manual Library http://www2.yamaha.co.jp/manual/english/ This document is printed on recycled chlorine free (ECF) paper with soy ink. M.D.G., Pro Audio & Digital Musical Instrument Division, Yamaha Corporation © 2003 Yamaha Corporation WA88390 306IPAP24.