
Specifications


15
14
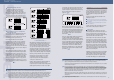
Figure 16
Part 3 Yamaha Samplers — Professional Samplers A4000/5000
◊ Samples
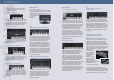
Here, we’ll touch on the Loop Remix function that was
introduced in the section “Break Beats — A New Music
Production Technique Brought About by Samplers” (p. 5).
Operation is simple: just set the Type/Variation on the
EDIT - LoopRmx screen and push Knob 2 <REMIX>.
When processing is complete, the result of the slicing/
rearranging is graphically displayed on the right of the
screen. If you have “Auto Audition” set to ON, the
phrase sample will automatically play after processing,
so you can listen to the results immediately. Each time
you push Knob 2 <REMIX>, a new phrase based on the
original sample will be created at random. Selecting
Types 1 to 5 will produce phrases like you’ve never
heard before! When you get one you like, push Knob 5
<CREATE> and it will be saved in wave memory as a
new sample (Figure 16).
F2: MAP/OUT
This function sets the sample’s output destination,
output level, pan and key range, as well as the pitch,
velocity range, key level, and key scaling.
The Evolution of Loop Remix
Loop Remix is a unique editing feature that first appeared on the A3000 version 2, and was the first function of its kind in the world.
The Loop Remix function on the A4000/5000 allows an even greater degree of freedom in dividing and reordering loops. Here we’ll
explain various Loop Remix parameters, including those that have changed since the A3000 version 2.
There are five built-in Remix Types (1 to 5) as well as five User Remix Types, User 1 to User 5, for a total of 10. The higher the value
of the built-in Remix Type, the more complex the dividing and reordering process. Phrases will be generated randomly as often as
you press the REMIX button (Knob 2). The User 1 through User 5 parameters were added in the A4000/5000 and allow you to
register up to five types of favorite dividing and reordering patterns. This allows you to divide and reorder samples in identical
patterns.
There are eight Remix Type Variations, four more than on the A3000 version 2. These are Normal 1 (“A” on the A3000 ver. 2), Normal
2 (“B” on the A3000 ver. 2), Reverse 1 (“C” on the A3000 ver. 2), Reverse 2 (“D” on the A3000 ver. 2), Break, LoFi, Pitch and Gate.
Normal 1 and Normal 2 are patterns that divide and reorder without imposing any changes in the playback direction and sound
quality of the sample; and Reverse 1 and Reverse 2 are patterns in which parts of the wave are reversed and mixed in a random
order. For Reverse 1, the starting block of the loop is always the same as the original sample, but with Reverse 2, it varies randomly.
(On the graphic display, segmented blocks that are not blacked out indicate sections where the original sample is being used “as is.”
When Normal 1 is selected, the starting block will always be a segment that is not blacked out; with Normal 2, it will change
randomly.)
Break inserts “silent blocks,” LoFi converts portions of the wave to a lo-fi sound, Pitch modifies the pitch of the blocks, and Gate
randomly reorders blocks with abbreviated portions of the wave so that the gate time is shortened. (The arrangement of the blocks
can be seen on the graphic display.)
The A3000 didn’t allow you to apply Loop Remix to only a specified range; for example, only on the fourth beat of a drum loop.
The A4000/5000, however, let you use Knob 4 and Knob 5 to select a range to be divided and reordered in units of one-eighth of the
target loop interval.
Loop Remix is an amazing function. Using it on a drum loop, you can easily produce fresh new patterns—from simple fills to
completely new and complex rhythm grooves that would have otherwise taken a lot of time and effort. You’ll definitely want to try
using it on other types of samples as well. By loop-remixing simple sine waves, you can create an endless number of multi-harmonic
synthesizer waveforms. You can even use it to divide and reorder speech, special effects and synthesizer sounds. You’ll discover
something new every time and get results that are totally different from the original sample.
The A4000/5000 don’t just record and play back sounds—these samplers are designed from the ground up for creating music.
Tip 1: Set the Low Key and Hi Key to =Orig
When producing pieces that make heavy use of phrase samples or when creating drum kits, you’re often faced with the task of
assigning each sample to its own key. To do this, normally you have to set three parameters: the Original Key, the Low Key, and Hi
Key. But by setting the Low Key and Hi Key to =Orig, you can easily map out one sample per key just by setting the Original Key.
Tip 2: Output to two outputs simultaneously
You can output to two sets of output jacks simultaneously. Use the Output function to route the same signal as the STEREO OUTPUT
to multiple effects or to any of the assignable outputs.
Tip 3: Adjust the stereo imaging using the Width setting
When using stereo samples, there are times when you want to adjust how wide the sound is right and left (stereo separation).
You can easily adjust the separation by setting the Width parameter anywhere from +63 (full separation from left to right) to 0
(monaural sound). Setting the Width parameter to -63 reverses the left and right stereo signal.
F3: FILTER
This function sets the sample’s filter type, equalization,
filter key, and scaling parameters.
There are 16 filter types with extremely powerful
resonance.
[LowPass1–3]
[HiPass1–2]
[Band Pass]
[Band Eliminate]
[Peak1–2]
[2 Peaks]
[2 Dips]
[Dual LPFs]
[LPF + Peak]
[Dual HPFs]
[HPF + Peak]
[LPF + HPF]
There are three Sample EQ types that can be set for each
sample—Peak/Dip, Lo Shelving and Hi Shelving. These
enable you to create a diverse range of sounds. The filter
and equalization settings are displayed on the upper
right of the graphic display screen and let you visually
check how the settings affect any given frequency band.
This is particularly convenient when using filters that
combine two filter types because it lets you use the
cutoff Distance parameter to readily set the cutoff
frequencies of the two filters.
F4: EG (Envelope Generator)
This function sets up the sample’s AEG (amplitude
envelope generator), FEG (filter envelope generator) and
PEG (pitch envelope generator).
If you set AEG Attack Mode to Hold, sound output starts
immediately at the maximum volume level. You can then
use AEG Attack Rate to set the time interval at which the
maximum volume is sustained. Setting normal Attack
Mode to Rate and Attack Rate to 127 may slightly
deaden samples that have a sharp attack, such as
drums. But if Attack Mode is set to Hold, the attack can
be reproduced perfectly. In addition, depending on the
settings, you can use the EG to create sounds with
varying volumes similar to when applying heavy
compression (Figure 17). Attack Rate settings function
in the same way as a compressor’s “attack time,” Decay
Rate the same as “release time,” and Sustain Level the
same as “ratio.” (An example of settings would be
Attack Mode set to Hold, Attack Rate to 95, Decay Rate
to 110, and Sustain Level to 90.) The A3000 ver. 2 had
no Rate 2 for the attack; this parameter was added to
the A4000/5000. Because the curve at the rising edge of
Rate 2 is smoother than that of Rate 1, Rate 2 is highly
effective when you want to lengthen the rise of the
envelope in sounds such as special FX or pads. Rate 1 is
ideal when you want to dullen the attack a bit, or don’t
want the rise to be so long.
F5: LFO
This function sets parameters related to the sample’s
LFO (low-frequency oscillator).
This function lets you use the LFO to modulate the filter
cutoff frequency, pitch, and output volume. There are
four LFO waves—Saw, Triangle, Square and S/H
(Sample & Hold). The cutoff and pitch modulation can
be phase-inverted. The A4000/5000 allow a wider range
LFO speed of settings than many high-end synthesizers,
such as the Yamaha CS6x.
F6: MIDI/CTRL
This function lets you set a sample’s MIDI and control
parameters such as Receive Channel and Pitch Bend.
Pitch Bend Type can be set not only to raise and lower
the sample’s pitch, but also to give you control over
sound production, such as the ability to create reverse
playback effects using the pitch bend wheel. This gives
you an effect similar to scratching a vinyl record on a
turntable, depending on the sample being used.
Tip 1: Use Filter Gain to distort sound
Filter Gain can be used not only to prevent sound distortion when increasing the resonance, but also to intentionally distort sounds
(Be careful! Increasing Filter Gain causes the volume level of the sample to get louder. The output level of the sample should be
lowered to avoid damaging your hearing.)
Tip 2: Randomly change the Cutoff and Q/Width
You can get interesting effects by setting the “Velocity ➞ Cutoff” and “Velocity ➞ Q/Wid” values to RND1 and RND5, respectively, to
randomly vary the cutoff and Q/Width with each key-on. The higher the value, the greater the range in variation.