
Specifications


7
6
Part 1 Introduction to Sampling
◊ Break Beats ◊ Producing “Good Sound”
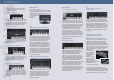
Re-triggering during a measure
By re-triggering (restarting the sample from the
beginning) on the back end of the second beat
(see Figure 13), you can create a rhythm pattern
different from the original sample. If your sampler is a
special phrase sampler with a built-in sequencer, you
can use this technique to create new rhythms.
Create multiple copies of a sample with
different start points
Make multiple copies of a sampled phrase and set the
start points of each one to a different location; for
example, at the top of the second beat, at the back end
of the third beat, at the top of the fill-in, etc.
Then arrange the samples across the keyboard
(or assign them to the pads, in the case of a desktop
sampler). By dividing up a 1-bar, 4-beat sample into
eighth-note units and staggering the start points, for
example, you can make eight unique sample loops
beginning from the top of the 1st beat to the back end of
the 4th beat. (At this time, there’s no need to change the
end point.) (Figure 14)
Now try playing around with the keyboard or the pads,
switching to different samples within a single measure.
Even just playing around, you should be able to come
up with a diverse range of rhythm patterns. If you create
a pattern that you like, you should enter the note data
into the sequencer. To loop your newly created rhythm
pattern, you can 1) use the sequencer to copy the note
data several times so that it repeats as a loop, or 2) use
the Re-sampling function to make a new sample loop of
the note sequence.
*** Synchronizing Samples ***
After gathering a few samples that you want to use in a
composition, often you may discover that they do not
have the same tempo. Moreover, there may be times
when you want to use them at a different tempo. In this
case, you need only change the pitch of the sample
(raising the pitch plays it back at a faster speed, thereby
speeding up the tempo), or change the length of the
sample itself by time stretching. However, making major
changes in tempo drastically changes the sound quality.
Moreover, you may not want the pitch to change at all.
Actually, there is a better method to ensure tempo
synchronization of various samples—even if the
sequencer tempo varies. This method is based on
“cutting up” the sample into pieces.
Example: Take an 8-beat drum sample and divide it up
into eight short segments, A through H. Set the
sequencer tempo to the sample tempo and play back the
sample segments, A to B, B to C, and so on, in eighth-
note intervals. The segments should sound the same as
the original sample. Now try varying the tempo of the
sequencer slightly. The samples should sound as if they
were synchronized to the tempo of the sequencer
(Figure 15).
With the sample phrase divided into tiny segments,
A to H, as shown in Figure 15, you can readily make new
rhythm patterns simply by changing the playback order
of the segments, or by changing the timing of Note On.
By combining sounds taken from other samples, you
can, for example, change only the snare drum of the
sample phrase.
“ReCycle!,” sample editing software from Steinberg Co.,
not only can divide a sample into equal-length
segments, but it can also automatically divide a sample
according to the location of certain sounds. Break points
are processed beautifully, and thus high-quality, highly
polished samples are generated. The divided samples
can be sent to the sampler in the mapped state, and
note information can be written in SMF format in the
divided timing, enabling anyone to create samples with
the tempo of the sequencer and the sampler perfectly
synchronized.
The SU700 allows you to get the same effect in real time by using the Loop Restart function. Use it once, and you’ll be hooked. This
feature is especially useful for break beats, and is consistently rated as the ideal live performance partner. (See p. 34.)
The A4000/5000 have a function called Loop Divide, which enables you to instantly divide a sample phrase into several segments and
map them individually across the keyboard (or pads) without using up additional wave memory. To do the segmenting and mapping
described in the above example, you need only specify: Division = 1/8; Length = ToLoopEnd; MapFrom = Key from which to start
mapping; MapKey = White keys only, or both black and white keys. The Division (number of segments) can be set from 2 to 32, and
the End Point can be set from 10% to 800% of the Division. Copying a sample uses no additional wave memory. This extremely
convenient function eliminates the complex operations of copying samples, setting addresses and mapping.
The Loop Track function of the SU700 and the Loop Track Play function of the SU200 do this processing automatically, instantly
synchronizing the tempos of up to eight samples (up to six in the SU200). With this function, you can concentrate on the creative
aspects of making break beats without having to worry about the samples all having the same tempos.
The A4000/5000 rackmount samplers feature a Loop Divide function. By setting Division to 1/8 and Length to 100%, you can quickly
make the sample set in Figure 15.
The Loop Remix function of the A4000/5000 and the SU200 lets you create new samples by automatically disassembling and
reconstructing the intervals of the loop start and loop end points. This is a unique feature from Yamaha and is designed specifically
for creating break beats. Because the segments are shuffled randomly, you can create a series of completely unique rhythm patterns.
Depending on the settings, reverse sounds and lo-fi sounds can be mixed in, and thus it functions not only as a simple “reshuffler,”
but also as a sample phrase generator that will stimulate your imagination. (Listen to the LOOP REMIX DEMO on the bundled
CD-ROM to hear the results of the Loop Remix function.)
With the SU200, it’s also possible to remix a sample while it plays back, simply by turning a knob. In other words, it can function as a
real-time phrase generator. This makes remixing as easy as adding a fill. This function is unique to Yamaha samplers. (See operation
guide, page 40).
ReCycle! supports the native format of the A3000, with A4000/5000 compatibility expected in the near future, making it possible to
easily exchange samples with these models.
Producing “Good Sound”
This is a topic that is largely subjective, as it is difficult
to define exactly what “good sound” is. But to achieve a
well-produced sound, we first need to understand how
the audio signal moves along its path inside the
sampler.
The path of the audio signal can be divided into the
following three blocks:
The input section (section used to record samples)
The sound processing section (section that generates
the samples)
The output section (section that feeds the sound to
other equipment)
Let’s take a look at the flow of the signal in each block
and see where sound quality can be improved.
Input section
When sampling using the analog input, the signal
travels through a cable connected from the output of a
device to the analog circuitry of the sampler’s input.
The analog signal is then converted to a digital signal by
an A/D converter and stored in wave memory.
Subtle changes in the input sound can be expected at
this stage. The three major factors affecting the sound
are the cable, the input circuitry, and the A/D converter.
The cable is often neglected, but audio quality will vary
depending on the cable used. The input circuitry and the
A/D converter are components internal to the sampler,
and thus are beyond the control of the user. As for the
cable, however, you are free to choose any one you like,
so you should try using different cables and listen to the
differences in sound they offer.
In addition, to get good sound, you will of course want to
sample with the recording level set as high as possible.
It’s also possible to raise the sound level by having a
limiter suppress the peaks before the signal is input to
the sampler. This will give you a compressed sound.