SOUND CARD SW60XG OWNER’S MANUAL
FCC ID : A6RSW60 This device complies with Part 15 of the FCC rules. Operation is subject to the following two conditions: (1) This device may not cause harmful interference, and (2) this device must accept any interference received, including interference that may cause undesired operation. FCC INFORMATION (U.S.A) 1. IMPORTANT NOTICE: DO NOT MODIFY THIS UNIT! This product, when installed as indicated in the instructions contained in this manual, meets FCC requirements.
INTRODUCTION Thank you for purchasing the SW60XG — a high quality sound card with hundreds of musical instrument voices and a variety of high quality digital effects. This owner’s manual covers installation of the SW60XG sound card as well as the installation of the applications and SW60XG driver. To ensure proper installation and use of the hardware and software, please read this owner’s manual carefully, and be sure to keep it in a safe place for future reference.
PACKAGE CONTENTS & MINIMUM SYSTEM REQUIREMENTS PACKAGE CONTENTS The SW60XG package includes the items listed below, so before beginning, please take a moment to make sure you have everything you need. (If something is missing, please contact your authorized Yamaha dealer.
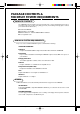
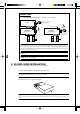
SW60XG SETUP 1. NAMES AND FUNCTIONS For Panasonic For MITSUMI 4 1 21 4 1-2 OPEN & 3 3-4 OPEN 1 21 4 1-2 SHORT & 3 3-4 SHORT 2 21 4 1-2 SHORT & 3 3-4 OPEN 2 21 4 1-2 OPEN & 3 3-4 SHORT 3 21 4 1-2 OPEN & 3 3-4 SHORT 3 21 4 1-2 SHORT & 3 3-4 OPEN 4 21 4 1-2 OPEN & 3 3-4 OPEN 2 1 2 1 4 3 1 2 3 4 3 5 6 1 MIC IN jack: Mono mini plug type jack allows connection to the separately available dynamic microphone (Monaural).
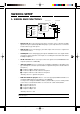
CONNECTIONS The following diagram shows how to connect the various devices. Portable Cassette Recorder or Stereo (for inputting external sounds) MIC SW20 LINE IN OUTPUT CD-ROM CD-ROM Microphone CD IN CD IN MIC MIC SW60XG Sound Card LINE IN Microphone OUTPUT SW60XG Sound Card Powered Speakers LINE IN OUTPUT Portable Cassette Recorder or Stereo (for inputting external sounds) Powered Speakers ¢Before making connections, be sure to UNPLUG THE POWER SUPPLY CORDS OF ALL DEVICES.
3. To remove the expansion slot cover, simply unscrew it and take it away. £Be sure to keep the expansion slot cover in a safe place for future use. 4. Carefully remove the sound card from the anti-static bag. ¢Before touching the sound card, first touch a metal surface to discharge any static electricity in your body; such static electricity can cause serious damage to your SW60XG.
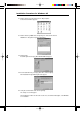
3. SOFTWARE INSTALLATION To use the SW60XG, the SW60XG driver and the application software should be installed in your computer properly. ¢If your computer is run by Windows 3.1, the installation program will overwrite the contents of the MIDI Mapper. The installation program also overwrites the AUTOEXEC.BAT, SYSTEM.INI and CONTROL.INI files. If you don’t want to lose any existing data, please save them before you install the SW60XG application software. Installation Procedure for Windows 3.1 1.
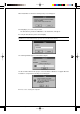
When Install Disk is verified, the following Setup screen will appear. 4. Click [OK] to proceed to next procedure. The drive/directory, which the SW60XG is to be installed into, will appear. 5. Verify the drive/directory names and click [OK]. £The default setting installs the software to the C drive and \_SW60XG directory. If you want to use a different drive/directory, type in the name of the different drive/directory. The following window appears and installation begins.
Installation Procedure for Windows 95 1. Double click the [Control Panel] icon in My Computer. Control Panel window appears. 2. Double click the [Add/Remove Programs] icon in the Control Panel. Add/Remove Programs Properties will appear. 8 3. Click [Install]. Install Program from Floppy Disk Or CD-ROM will appear. 4. Insert Install Disk into your floppy disk drive, and click [Next]. Run Installation Program Dialog Box will appear. 5. Verify the command line and click the [Finish].
Additions to the AUTOEXEC.BAT, SYSTEM.INI and CONTROL.INI files The SW60XG software program will automatically add the following lines to these files. AUTOEXEC.BAT * “_” indicates a space. rem--SW60XG installer wrote. Do not modify the following_line-C:\SW60XG\efcon_/type:1_/line:100_/mic:100_/midi:100_/vcl:0 rem -*If you add the above lines to the AUTOEXEC.BAT when you make the start-up disk for DOS games, you can automatically add effects to the game sounds. SYSTEM.INI CONTROL.
SW60XG APPLICATION SOFTWARE SW60XG offers you to use two types of effect controllers, the one for Windows and the other for DOS; EffectGearII and EFFECTCON respectively. EffectGearII The EffectGearII lets you apply various types of effects to the signal input by a microphone, the line-level input signal from CD-ROM audio playback. You can also change the pitch of a song, or reduce the volume of the main vocal from a song playing on a CD (for karaoke sing-along).
9 LINE/CD IN fader: Lets you adjust the line/CD input level. The fader may disappear and you can not control the input level depending on the type of effect applied. 10 MIDI fader: Lets you adjust MIDI input level. You cannot directly control the effect which is applied to the sounds generated through MIDI. 11 MIC fader: Lets you adjust the microphone input level. 12 EFFECT DEPTH fader: Lets you adjust the effect depth.
Command Names and Functions 1 QUIET: Suppresses configuration messages usually displayed whenever you execute a command. [KEY OPERATION] EFCON_/QUIET + 2 TYPE: Changes the effect type. Valid values are 0~3. [KEY OPERATION] EFCON_/TYPE:x + * x = Type number (0 = Dry, 1 = Reverb, 2 = Chorus, 3 = Reverb+Chorus) 3 LINE: Sets the input level from LINE/CD IN. [KEY OPERATION] EFCON_/LINE:y + * y = Volume (0 - 127) 4 MIC: Sets the input level from MIC IN.
SPECIFICATIONS Minimum System Requirements Computer (PC/AT compatible) CPU: 80386/33MHz or higher Memory: 8MB of system memory or higher 16-bit ISA internal slot Monitor Color or gray scale VGA or Super VGA compatible External Devices OS Mouse, hard disk and audio speakers or headphones DOS Ver 5.0 or higher; Windows 3.
SOFTWARE LICENSING AGREEMENT The following is a legal agreement between you, the end user, and Yamaha Corporation (“Yamaha”). The enclosed Yamaha software program is licensed by Yamaha to the original purchaser for use only on the terms set forth herein. Please read this licensing agreement with care. Opening this package indicates that you accept all terms outlined herein. If you do not agree to the terms, return this package unopened to Yamaha for a full refund. 1.