
User Manual
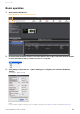
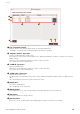

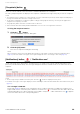
Table Of Contents
- Information
- About Yamaha LAN Monitor
- Contents
- Terminology
- Steps to use the software
- Software operating requirements
- Notes
- Notes regarding device detection
- Notes regarding SWX2100/SWR2100P series PoE switch detection
- Notes regarding the power supply interruption function for the Yamaha PoE switch
- Notes regarding a slave with the stack function enabled
- Notes on printing and print preview of the “Whole map”
- Notes regarding detection of Dante-enabled devices
- Notes regarding when using macOS10.15.x or later
- Installing and uninstalling Yamaha LAN Monitor
- Starting and exiting Yamaha LAN Monitor
- Yamaha LAN Monitor screen structure
- Network settings on the computer
- Basic operation
- Menu bar
- Toolbar and display area
- Main screen
- Web GUI
- Resources
- Troubleshooting

Menu bar
Yamaha LAN Monitor for Mac User Guide
16
1 List of registered VLAN
Displays the list of the VLAN registered with the Yamaha LAN Monitor.
“VLAN ID:1” is registered as the default VLAN and cannot be changed.
2 “Register number” input area
Input the VLAN registration number here.
This number is only used as the ID number on the Yamaha LAN Monitor, and has no relation to the switch’s
VLAN settings.
From two to 255 single-byte characters can be used for this value.
You cannot set the same number twice.
3 “VLAN ID” input area
Input the VLAN ID here.
From two to 4094 single-byte characters can be used for this value.
You cannot set the same VLAN ID twice.
4 “VLAN name” input area
Input the VLAN name here.
The VLAN name you input here is only shown on the Yamaha LAN Monitor display, and is not applied to the
slave.
Up to 32 single-byte characters can be used for this value.
5 [Add] button
Press this to add a VLAN.
Up to 32 VLANs can be registered.
6 [Delete] button
Press this button for the row corresponding to the VLAN registration you wish to delete.
7 [OK] button
Press this to apply the setting contents.
8 [Cancel] button
Press this to close the dialog box without applying the changes you made to the settings.
1
2
❼❽
5
34
❻