
User Manual

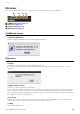
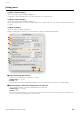
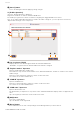

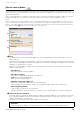
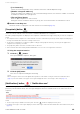
Table Of Contents
- Information
- About Yamaha LAN Monitor
- Contents
- Terminology
- Steps to use the software
- Software operating requirements
- Notes
- Notes regarding device detection
- Notes regarding SWX2100/SWR2100P series PoE switch detection
- Notes regarding the power supply interruption function for the Yamaha PoE switch
- Notes regarding a slave with the stack function enabled
- Notes on printing and print preview of the “Whole map”
- Notes regarding detection of Dante-enabled devices
- Notes regarding when using macOS10.15.x or later
- Installing and uninstalling Yamaha LAN Monitor
- Starting and exiting Yamaha LAN Monitor
- Yamaha LAN Monitor screen structure
- Network settings on the computer
- Basic operation
- Menu bar
- Toolbar and display area
- Map screen
- List screen
- Configuring the device
- Update the firmware
- Import/Export the CONFIG
- Troubleshooting

Toolbar and display area
Yamaha LAN Monitor for Mac User Guide
20
• [Local network:]:
Shows the network information of the network to which the network adapter belongs.
• [Number of target IP address:]:
Shows the number of IP addresses to be searched. During a search, this shows the number of searched
IP addresses and the rate of progression.
• [Execute]/[Stop] button:
Click the [Execute] button to start a search.
During the search, this button switches to [Stop]. You can click this button to terminate the search.
3 Result of searching area
Shows the results of a ping test or an auto search in local network (page 60).
[Snapshots] button
Saves the current network connection status to Yamaha LAN Monitor as a snapshot.
Click the [Snapshots] button to display a save snapshot confirmation message. Click [OK] to save the snapshot.
NOTE
• The snapshot function compares the current network connection status with the previously saved snapshot and displays a
message in the Notification area when a change is detected.
• To save device information to a snapshot, in [Basic Settings] under [Snapshot function], select the [Treat equipment as
comparison for snapshots] check box.
• The [Snapshots] button cannot be used until a slave is detected.
• Slaves that have been detected by Yamaha LAN Monitor even once are not recognized as new slaves.
Using the snapshot function
1. Click the [ ] button.
This opens the “Take Snapshot” dialog box.
2. Click the [OK] button.
This saves a snapshot and begins monitoring.
NOTE
When a change is detected, click the [Notifications] button to view details of changes made in the Notification area
(page 20). For more details on the types of messages that appear, refer to “If a change is detected” (page 21).
[Notifications] button / “Notification area”
Shows a message in the “Notification” area when there is a change in the current network and snapshot (the
previously-saved network status). The message disappears when the network returns to the same state as the
snapshot.
NOTE
• The message history is added to the History area. Click the [ ] button to display the History area.
• For details on the types of messages displayed, refer to “Messages shown in both the Notification area and the History area”
(page 57).