
User Manual
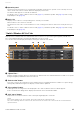
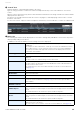

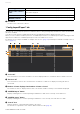
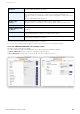
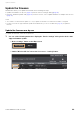
Table Of Contents
- Information
- About Yamaha LAN Monitor
- Contents
- Terminology
- Steps to use the software
- Software operating requirements
- Notes
- Notes regarding device detection
- Notes regarding SWX2100/SWR2100P series PoE switch detection
- Notes regarding the power supply interruption function for the Yamaha PoE switch
- Notes regarding a slave with the stack function enabled
- Notes on printing and print preview of the “Whole map”
- Notes regarding detection of Dante-enabled devices
- Notes regarding when using macOS10.15.x or later
- Installing and uninstalling Yamaha LAN Monitor
- Starting and exiting Yamaha LAN Monitor
- Yamaha LAN Monitor screen structure
- Network settings on the computer
- Basic operation
- Menu bar
- Toolbar and display area
- Map screen
- List screen
- Configuring the device
- Update the firmware
- Import/Export the CONFIG
- Troubleshooting

List screen
Yamaha LAN Monitor for Mac User Guide
32
5 “Search” box
Narrows down the currently displayed device by string.
Type the string you want to search in the text box and press Enter key or the Search button to execute the
search.
When a search is performed, only devices with information that matches the string entered in the text box will be
displayed in the device list.
The title line of the table turns blue while the search is in progress, and “Displaying search results” is shown
below the search box.
To cancel the search, empty the text box and press the Enter key or the Find button, or switch to a different tab.
6 Device list
The following information will be displayed for each device managed by LAN Monitor. Some items may not be
displayed depending on the device.
In addition, items that are hidden in “View settings” will not be displayed.
“Route”
Displays routing information showing where the device is, respective to the PC running
LAN Monitor.
For example, the device labeled “PC” is directly connected to the LAN Monitor, and the
device labeled “PC-3” is connected to port 3 of the switch connected to LAN Monitor.
The switch port numbers that support the stack function are displayed in the format
“<Stack ID>.<Port number>”.
“Device Type”
Shows an icon that indicates the type of device.
“Device name”
The device names of the Yamaha switch and Yamaha wireless LAN access point will be
displayed.
The device name is a character string set in the device itself.
“Device Label”
You can enter any text you like to identify the individual device.
The device label is the information stored in LAN Monitor, and the edited information is
not reflected in the device itself.
This information is the same as the label information used in the “Connected Devices”
view (page 27).
“Serial Number”
Shows the serial number of the device.
“Model name”
Shows the model name.
“MAC address”
Shows the MAC address of the device.
“IP address”
Shows the IPv4 address of the device.
As with the “Connected Devices” view (page 27), you can use the opens the Web
browser button.
“Firmware revision”
Shows the firmware revision of the device.
“Date and time of last
CONFIG import”
Shows the date and time of the last CONFIG import.
When you perform a CONFIG import, the information to be displayed in this area will be
saved.
This information will also be saved in the exported “Label Settings file”.
“CONFIG file of last
import”
Shows the file path of the last imported CONFIG file.
When you perform a CONFIG import, the information to be displayed in this area will be
saved.
This information will also be saved in the exported “Label Settings file”.
“Comment”
Allows you to freely assign a comment. You can enter information about the on-site
cabling or the role of the device.
This is the same as the “Comment” used in the “Connected Devices” view (page 27).