
User Manual
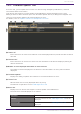
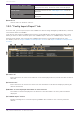
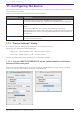

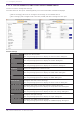
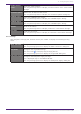
Table Of Contents
- Yamaha LAN Monitor for Mac
- Table of contents
- 1. Introduction
- 2. Installing and uninstalling Yamaha LAN Monitor
- 3. Starting and exiting Yamaha LAN Monitor
- 4. Yamaha LAN Monitor screen structure
- 5. Network settings on the computer
- 6. Basic operation
- 7. Menu bar
- 8. Toolbar and display area
- 9. Map screen
- 10. List screen
- 11. Configuring the device
- 12. Update the firmware
- 13. Import/Export the CONFIG
- 14. Resources
- 15. Troubleshooting
- Yamaha LAN Monitor for Mac

11. Configuring the device
With Yamaha LAN Monitor, you can configure some of the functions for Yamaha switches and Yamaha
wireless LAN access points.
There are the following three methods for setting the device.
Setting method Descriptions
“Device Settings” dialog
You can set basic items such as IP address and device name.
For models without a Web GUI, a detailed setting dialog will be displayed.
Web GUI Using the device’s Web GUI, detailed settings for each function can be
made.
To access the Web GUI of the device, the IP address must be set
appropriately in the “Device Settings” dialog, and IP communication must be
maintained between the PC running Yamaha LAN Monitor and the device to
be operated.
CONFIG import By importing a backup or pre-prepared CONFIG, you can apply the settings
for each function all at once.
11.1. “Device Settings” dialog
The “Device Settings” dialog can be displayed in the following two ways.
Either way, the same dialog will be displayed.
• Map screen - “Device Details” view - “Device Settings” button
• List screen - “L2MS Agent List” tab - “Setting” button
The setting items displayed in the dialog vary from model to model.
11.1.1. For non-SWX2110/SWX2110P series Yamaha switch and Yamaha
wireless LAN access point
Basic items such as label settings, device name settings, and IP address settings can be configured.
Only items that are supported by the device will be displayed.
11. Configuring the device
46 | Yamaha LAN Monitor for Mac User Guide