
User Manual
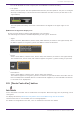
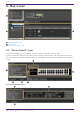
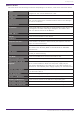
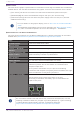
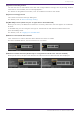
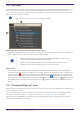

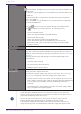
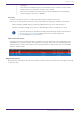
Table Of Contents
- Yamaha LAN Monitor for Win
- Table of contents
- 1. Introduction
- 2. Installing and uninstalling Yamaha LAN Monitor
- 3. Starting and exiting Yamaha LAN Monitor
- 4. Yamaha LAN Monitor screen structure
- 5. Network settings on the computer
- 6. Basic operation
- 7. Menu bar
- 8. Toolbar and display area
- 9. Map screen
- 10. List screen
- 11. Configuring the device
- 12. Update the firmware
- 13. Import/Export the CONFIG
- 14. Resources
- 15. Troubleshooting
-

“IP address” Shows the IPv4 address of the device.
button (opens the Web browser): this opens the registered URL in the
Web browser.
This button is only displayed for connected devices whose IP address can
be acquired.
The destination URL is registered as the URL shown below by default.
http://<IP_ADDR>/
Note: “<IP_ADDR>” is the IP address of a connected device acquired by
the Yamaha LAN Monitor
Press the button to open the registered URL in the Web browser.
Press to display the context menu for the following items.
•
Access via Web browser
Opens the registered URL in the Web browser
•
Destination URL settings
Opens the destination URL settings dialog box.
In the destination URL settings dialog box, you can set the
[Destination URL] that is used when pressing the “Open in Web
browser” button.
“MAC address” Shows the MAC address of the device.
[Keepalive] Select this check box to perform keepalive checks on the device. If this
check box is selected, Yamaha LAN Monitor pings the device to perform
keepalive checks according to settings configured in the “Basic Settings”
dialog box.
Selecting this check box will display the following depending on the
circumstances.
• Checking: Now checking.
• UP: Successfully detected device.
• DOWN: Failed to detect device.
[Power supply
interruption]
Restart devices directly connected to the PoE-enabled Yamaha switch by
turning the power supply on and off.
The duration of power supply interruption is set in the “Basic Settings”
dialog box by configuring the “Power supply interruption time”.
• [Auto] check box: Select this check box to temporarily turn off the
power supply to devices that could not be detected using [Keepalive].
This setting is only available when the [Keepalive] check box is
selected.
• [Execute] button: This manually interrupts the power supply. While
off, a “Stopped” message will appear.
• If multiple Dante-enabled devices are connected in a daisy-chain, the other
devices are also shown together at the same port number as the device that is
connected immediately below the switch.
• Of the settings in the above list, the settings of “Device Type”, [Device
Label], [Model name], [Manufacturer], [Keepalive], [Power supply
interruption] and [Destination URL] can be moved to another computer by
using the [Setup] menu commands [Export Label Settings] and [Import Label
9. Map screen
38 | Yamaha LAN Monitor for Win User Guide