
User Manual

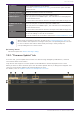
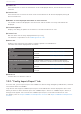

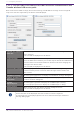

Table Of Contents
- Yamaha LAN Monitor for Win
- Table of contents
- 1. Introduction
- 2. Installing and uninstalling Yamaha LAN Monitor
- 3. Starting and exiting Yamaha LAN Monitor
- 4. Yamaha LAN Monitor screen structure
- 5. Network settings on the computer
- 6. Basic operation
- 7. Menu bar
- 8. Toolbar and display area
- 9. Map screen
- 10. List screen
- 11. Configuring the device
- 12. Update the firmware
- 13. Import/Export the CONFIG
- 14. Resources
- 15. Troubleshooting
-

❶ “Select all”
Press the button to check the checkboxes of all the displayed devices, and all the devices will be
selected.
❷ “Deselect all”
Press the button to remove the check from the checkboxes of all devices displayed, leaving all
devices unselected.
❸ Number of items displayed and number of items selected
The number of devices displayed in the device list and the number currently selected will be
displayed.
❹ “CONFIG import” button
Displays a dialog box to confirm importing CONFIG files in bulk for the currently selected devices.
❺ “CONFIG export” button
Displays a dialog box to confirm exporting CONFIG files of the currently selected devices in bulk.
❻ “Search” box
Narrows down the currently displayed device by string.
The behavior is equivalent to the “L2MS Agent List” tab.
❼ Device list
Displays a list of devices that support CONFIG import/export by LAN Monitor.
The items that will be displayed are as follows.
Check box Used to select or deselect a device.
“Route” The same contents as the “L2MS Agent List” tab will be
displayed.
“Device Type” The same contents as the “L2MS Agent List” tab will be
displayed.
“Device name or Device Label” If a device label has been set, the device label will be
displayed; otherwise, the device name will be displayed.
“Model name” The same contents as the “L2MS Agent List” tab will be
displayed.
10. List screen
Yamaha LAN Monitor for Win User Guide | 45