
User Manual
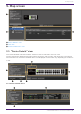
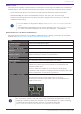
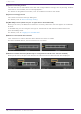
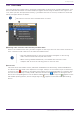
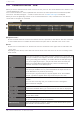
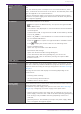
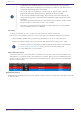
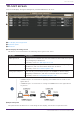
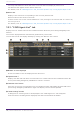
Table Of Contents
- Yamaha LAN Monitor for Mac
- Table of contents
- 1. Introduction
- 2. Installing and uninstalling Yamaha LAN Monitor
- 3. Starting and exiting Yamaha LAN Monitor
- 4. Yamaha LAN Monitor screen structure
- 5. Network settings on the computer
- 6. Basic operation
- 7. Menu bar
- 8. Toolbar and display area
- 9. Map screen
- 10. List screen
- 11. Configuring the device
- 12. Update the firmware
- 13. Import/Export the CONFIG
- 14. Resources
- 15. Troubleshooting
-

❹ [Dante Controller] button
You can click this to start Dante Controller and configure Dante settings, such as patching. If Dante
Controller is not installed, an error message appears.
For details on using Dante Controller, refer to the Dante Controller User Guide.
❺ [Device Settings] button
This shows the “Device Settings” dialog box.
For details, refer to “Device Settings” dialog.
❻ [Web GUI] button (shown only for an agent device with a Web GUI)
When you click this, the Web GUI of the device currently selected in the tree appears in the default
browser.
In the Web GUI, you can configure settings for Yamaha switch and Yamaha wireless LAN access
point and manage them.
For details, refer to “Logging in to the Web GUI”.
❼ Button to show/hide device details
Click the button to switch whether device details are shown or hidden.
For Dante-enabled devices, the switch button is not shown.
❽ Button to switch Stack ID (shown only for an agent device with stack function enabled)
When you click this, the port information of the device with the selected stack ID is displayed.
9. Map screen
34 | Yamaha LAN Monitor for Mac User Guide