
User Manual
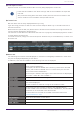


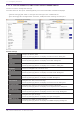
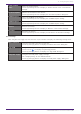
Table Of Contents
- Yamaha LAN Monitor for Mac
- Table of contents
- 1. Introduction
- 2. Installing and uninstalling Yamaha LAN Monitor
- 3. Starting and exiting Yamaha LAN Monitor
- 4. Yamaha LAN Monitor screen structure
- 5. Network settings on the computer
- 6. Basic operation
- 7. Menu bar
- 8. Toolbar and display area
- 9. Map screen
- 10. List screen
- 11. Configuring the device
- 12. Update the firmware
- 13. Import/Export the CONFIG
- 14. Resources
- 15. Troubleshooting
-

10.3. “Config Import/Export” tab
From this tab, you can import/export the CONFIG for devices being managed by LAN Monitor, and view
information about the CONFIG.
Only devices that support CONFIG import/export from LAN Monitor will be displayed in this screen.
When you select a device and then press the “CONFIG import” button or “CONFIG export” button, a
dialog box will appear that confirms the CONFIG import/export of all selected devices at once.
For details, refer to “Import CONFIG on multiple units at once” and “Export CONFIG on multiple units
at once”.
❶ “Select all”
Press the button to check the checkboxes of all the displayed devices, and all the devices will be
selected.
❷ “Deselect all”
Press the button to remove the check from the checkboxes of all devices displayed, leaving all
devices unselected.
❸ Number of items displayed and number of items selected
The number of devices displayed in the device list and the number currently selected will be
displayed.
❹ “CONFIG import” button
Displays a dialog box to confirm importing CONFIG files in bulk for the currently selected devices.
❺ “CONFIG export” button
Displays a dialog box to confirm exporting CONFIG files of the currently selected devices in bulk.
❻ “Search” box
Narrows down the currently displayed device by string.
The behavior is equivalent to the “L2MS Agent List” tab.
10. List screen
44 | Yamaha LAN Monitor for Mac User Guide