
Operation Manual


PERIODIC MAINTENANCE AND MINOR REPAIR
6-12
6
6. Remove the seat. (See page 3-12
for seat removal and installation
procedures.)
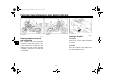
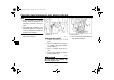
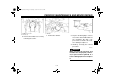
7. Remove the coolant reservoir by
removing the bolts.
8. Remove the coolant reservoir
hose clamp and disconnect the
hose.
9. Drain the coolant from the coolant
reservoir by turning it upside
down.
10. Install the hose and connect the
coolant reservoir hose clamp.
11. Drain the coolant completely and
thoroughly flush the cooling sys-
tem with clean tap water.
12. If the washers are damaged, re-
place them. Tighten the water
pump drain bolt and cylinder drain
bolt to the specified torques.
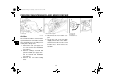
13. Pour the recommended coolant
into the radiator until it is full.
ECA00041
CAUTION:
@
Hard water or salt water is harmful
to the engine. You may use soft wa-
ter if you can’t get distilled water.
@
14. Run the engine several minutes.
Stop the engine and recheck the
coolant level in the radiator. If it is
low, add more coolant until it
reaches the top of the radiator.
15. Fill the coolant reservoir with cool-
ant up to maximum level.
16. Install the radiator cap, radiator
cap stopper bolt and coolant res-
ervoir cap.
17. Check for coolant leakage. If any
leakage is found, ask a Yamaha
dealer to inspect the cooling sys-
tem.
1. Coolant reservoir
2. Bolt
3. Coolant reservoir hose clamp
4. Hose
Tightening torque:
Water pump and cylinder drain
bolts:
10 Nm (1.0 m·kg)
Recommended antifreeze:
High quality ethylene glycol
antifreeze containing corrosion
inhibitors for aluminum engines.
Antifreeze and water mixing ratio:
1 : 1
Total amount:
1.7 L
Coolant reservoir capacity:
0.3 L
E_4tx_Periodic.fm Page 12 Saturday, October 16, 1999 9:37 AM