
User Manual


Basic setup and operation
User’s Guide
TF Editor
-
5
-
Syncing TF Editor and your console
When you first start TF Editor, its settings will be different from your console's settings. Therefore, you will need to sync TF Editor
with your console. This is performed using the CONNECT area of TF Editor.
Preparation
Before you can sync, you need to configure the network interface.
1. Select SETUP Network Interface.
2. Select the desired network interface from the list of available items.
3. Click [OK].
Operation
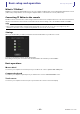
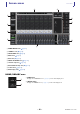
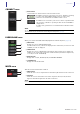
1. Click the status button in the CONNECT area.
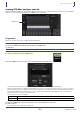
2. In the CONNECT screen, select the console and the direction of the data sync.
Only consoles that correspond to the model number you selected when you first launched TF Editor are displayed.
When the maximum number of TF Editor and TF StageMix sessions (total: 3) are already connected to the TF series console, a "restricted"
mark is displayed to the left of the IP address. Even if you select a TF series console that does not have a "restricted" mark displayed next to
it and click the CONNECT button, depending on the connection status of other TF Editor and TF StageMix sessions, a message may be
displayed that indicates you cannot connect to the console.
The following sync directions are available.
"TF***" indicates the model name of the TF Series you are using.
3. Enter the Administrator's password if you have set it to the Administrator of TF series.
4. Click [Connect].
Do not operate the console while data is being synced.
CONNECT area
TF*** PC Console settings are copied to TF Editor.
TF*** PC TF Editor settings are copied to the console.