
User Manual

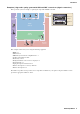


Table Of Contents
- Cover
- Introduction
- Setup workflow
- Example 1) Basic MTX3 system example (analog connections)
- Example 2) High audio quality system with XMV and YDIF connections (digital connections)
- Example 3) Using cascade mode to add MTX input channels (analog connection)
- Using the Device Configuration Wizard to create your device setup
- Making preliminary settings in MTX-MRX Editor
- Connecting the equipment
- Powering-on the MTX
- Powering-on the amp
- Setting the MCP1’s UNIT ID
- Specifying the computer’s TCP/IP address
- Taking MTX-MRX Editor online
- Making XMV settings
- Verifying that the settings were applied
- Example 4) A system using Dante
- Using the Device Configuration Wizard to create your device setup
- Making preliminary settings in MTX-MRX Editor
- Dante settings between systems
- Connecting the equipment
- Powering-on the MTX
- Powering-on the amp
- Specifying the computer’s TCP/IP address
- Taking MTX-MRX Editor online
- Making XMV settings
- Verifying that the settings were applied
- Example 5) A system using the PGM1 for paging
- Using the Device Configuration Wizard to create your device setup
- Making preliminary settings in MTX-MRX Editor
- Connecting the equipment
- Power-on the PoE-equipped gigabit network switch
- Power-on equipment other than amps and powered speakers
- Power-on amps and powered speakers
- Specifying the computer’s TCP/IP address
- Taking MTX-MRX Editor online
- Making XMV settings
- Verifying that the settings were applied
- Q&A
- Uninstalling the software (Removing the application)

Introduction
MTX Setup Manual
5
Example 4) A system using Dante
In this example, existing amps continue to be used, while we set up a new system at a distant location, with connec-
tions made using Dante.
The system using the existing amps is labeled System A, and the new system is labeled System B.
In example 4, our explanation will be centered on the network settings. For more about increasing the number of
mics, DCP settings, or presets, refer to example 2.
This example assumes that you’re using the following equipment.
* As the network switch for Dante connections, we recommend that you use a model that provides IGMP snooping
functionality.
The number of speakers is not specified; choose amps that are suitable for your speaker setup. You will also need to
provide the appropriate number of cables.
System A
Microphone Ch1 Microphone Ch1
Amp
Room A
Amp
Room B
System B
Amp
Room A
Amp
Room B
EXi8 ID=02
MTX5-D ID=01
Power Amp 3
Power Amp 4
Network Switch for MTX-MRX Editor
MTX5-D ID=04
XMV4280 ID=30
Network Switch for Primary
Network Switch for Secondary
XMV4280-D ID=31
EXo8 ID=03
Power Amp 1
Power Amp 2
System A
•MTX5-D × 1
• Exi8 × 1
•EXo8 × 1
• Amplifiers (eight channels of amplification)
• Network switch × 1
• Speakers (the number needed)
• SD memory card × 1
• Paging microphones with switch × 1
System B
•MTX5-D × 1
• XMV4280 × 1
• XMV4280-D × 1
• Network switch × 2*
• Speakers (the number needed)
• SD memory card × 1
• Paging microphones with switch × 1