
User Manual


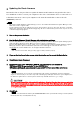
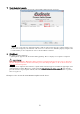
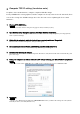
Table Of Contents
- ■ Precautions (Please be sure to read this section first!)
- ■ Checking the version number
- ■ Preparing for the update
- ■ Update procedure sequence
- ■ Decompressing the downloaded file
- ■ Install the MTX-MRX Editor
- ■ Install the Dante Firmware Update Manager (for Dante)
- ■ Computer TCP/IP setting (for Dante)
- ■ Updating the Dante firmware
- ■ Computer TCP/IP setting ( for device main)
- ■ Updating the device main firmware
- ■ About Failsafe Mode

10
■ Computer TCP/IP setting ( for device main)
To update device main firmware, configure computer TCP/IP settings.
If only a YDIF model is being updated, and the computer is already connected to the unit itself, there
is no need to change the TCP/IP settings. Proceed to the next section "Updating the device main
firmware."
1. Start up MTX-MRX Editor.
・The “User Account Control” dialog box may appear. Click [Continue] or [Yes].
2. The “Network Setup” dialog box appears, click [Open Network Connection].
“Network Connections” will appear. You can also access the "Network Setup" dialog box by choosing [System]
menu -> [Network Setup].
3. Right-click the adapter to which the device(s) are connected, and choose [Properties].
The “Local Area Connection Properties” dialog box will appear.
4. Choose [Internet Protocol Version 4 (TCP/IPv4)], and then click [Properties].
The “Internet Protocol Version 4 (TCP/IPv4) Properties” dialog box will appear.
5. Click [Use the following IP address].
For a system in which a router or DHCP assigns the IP address, click [Obtain an IP address automatically ] and
proceed to step 7.
6. Enter your computer's IP address "192.168.0.253" into [IP address], and "255.255.255.0" into [Subnet
mask].
・If there is a device whose UNIT ID is set to 0xFD, specify a value that does create a UNIT ID conflict.
7. Click [OK].
・In some cases, Windows firewall may block MTX-MRX Editor when you make this setting. Select the [Private
Network] check box, and click [Allow Access].