
User Manual


THR30IIA Wireless Reference Manual 8
Connection
Precautions for using the USB jack
Make sure to follow the points on the next page when connecting a computer to the THR30IIA Wireless USB
jack, to avoid loss of data by the computer and prevent the THR30IIA Wireless from freezing or shutting down.
NOTICE
• Use an AB type USB cable of less than 3 meters. USB 3.0 cables cannot be used.
• Be sure to wake the computer from suspended/sleep/standby mode before connecting a computer
to the USB jack.
• Always quit all applications that are running on the computer before connecting or disconnecting
the USB cable and set the volume output on the computer to its minimum level.
• When connecting or disconnecting the USB cable, be sure to set the OUTPUT controls ([VOLUME]
knob and [MIC/INST VOLUME] knob) on the THR30IIA Wireless to their minimum levels.
• Wait at least 6 seconds between connecting or disconnecting the USB cable.
Power
The THR30IIA Wireless can operate on either DC power (via the power adaptor) or with the built‐in rechargeable
battery*.
* When you use the THR30IIA Wireless with the built-in rechargeable battery, the maximum output volume is reduced (
page 16
).
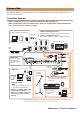
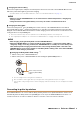
When using the power adaptor
Connect* the supplied power cord to the power adapter, and then connect the supplied power adaptor to the
[15V] DC IN jack located on the rear panel of the THR30IIA Wireless. Finally, connect the AC plug to a power
outlet.
* Follow the included Safety Instruction Sheet before making connections.
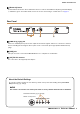
Turning the power on and off
Press and hold the [ ] power button on the top of THR30IIA Wireless for one second to turn the power on or
off*. The LED of the power button lights when turning the power button on. The LED of the THR30IIA Wireless
lights in green while charging. Otherwise, it lights in red.
* Follow the included Safety Instruction Sheet before making connections.
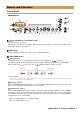
Checking the battery level
Press the [ ] button on top of the THR30IIA Wireless briefly to check the battery level. The remaining battery
capacity is displayed in four levels of 3, 2, 1 and L (Low).
Power adaptor
(supplied)
Power outlet
DC IN jack
DC plug
Supplied power cord
Battery full No battery remaining