
User Manual


Function Buttons
TNR-i Quick Guide 8
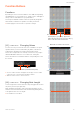
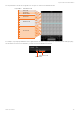
[R2] + LED buttons Changing Tempo
Sets the playback tempo (BPM).
While holding the [R2] button, slide your finger horizontally over the
matrix to move the lit vertical line to the desired tempo setting. Moving
the line to the right produces faster tempos.
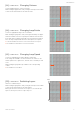
[R3] + LED buttons Transposition
Adjusts the playback pitch in semitone increments.
While holding the [R3] button, slide your finger vertically over the matrix
to move the lit horizontal line to the desired pitch.
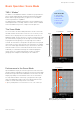
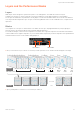
[R4] + LED buttons
Changing the Layer Volume
Displays the individual volume settings of all 16 layers, and allows the
volume of each layer to be adjusted as required to create the ideal
“mix” between layers.
Each row of LED buttons corresponds to a layer, beginning with layer
01 at the bottom row.
While holding the [R4] button, slide your finger horizontally over the row
corresponding to the layer you want to adjust to set the volume as
required. Each LED button row corresponds to a layer (01 – 16 from
bottom to top), and the horizontal axis corresponds to volume level
with volume increasing towards the right (the leftmost setting
corresponds to “0” volume).
You can also use the jog dial to set the overall (Master) volume (the Master
volume setting will appear in the Display).
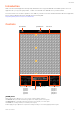
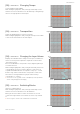
[R5] + LED buttons Switching Blocks
Switches to a different block.
While holding the [R5] button, slide your finger horizontally over the
matrix to move the lit vertical line to the desired block.
Moving the line to the leftmost column selects block 01, the next
column to the right is block 02, then block 03, and so on up to block
16.
You can copy the contents of the current block to another block.
FasterSlower
Higher
Lower
16
01
Layer
Higher
volume
Lower
volume
16
01
Block