OWNER'S MANUAL AB
CAUTION: READ THIS BEFORE OPERATING YOUR UNIT. 1 2 3 4 5 6 7 8 9 10 11 12 13 14 To assure the finest performance, please read this manual carefully. Keep it in a safe place for future reference. Install this unit in a well ventilated, cool, dry, clean place - away from direct sunlight, heat sources, vibration, dust, moisture and cold. For proper ventilation, allow the following minimum clearances.
PREPARATION Information for Users on Collection and Disposal of Old Equipment This symbol on the products, packaging, and/or accompanying documents means that used electrical and electronic products should not be mixed with general household waste. For proper treatment, recovery and recycling of old products, please take them to applicable collection points, in accordance with your national legislation and the Directives 2002/96/EC.
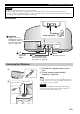
NAMES OF PARTS AND THEIR FUNCTIONS ■ Top panel A VOLUME Controls volume. When you control the volume, the volume level will be displayed on the display for a while. I Grille (☞ page 3) B CLOCK Sets the clock (☞ page 4). C ALARM Sets the alarm (☞ page 4). D TUNING Adjust the time or radio frequency (☞ page 4, 6). E PRESET Stores up to five favorite FM radio stations (☞ page 6). F SOURCE (PAIRING) Selects an input source from (Bluetooth), AUX, or RADIO.
NAMES OF PARTS AND THEIR FUNCTIONS Caution A grille is attached to this product to protect the speakers. • Since the grille cloth is made of soft material, it can be easily damaged, so do not scratch it with a sharp object. • Do not overstress the grille cloth. If it is overstressed, it will become contorted and damaged. This may cause damage to the speakers. Be careful when handling the grille cloth.
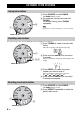
OPERATION BASIC FUNCTIONS Adjusting the clock A Press and hold CLOCK for more than 2 seconds. A, C The display flashes. B B Adjust the time with TUNING. y If you press and hold TUNING, the numbers advance quickly. C Press CLOCK. If you want to cancel clock setting mode, press . y If you press PRESET in step B, you can select the time display method (12 hours/24 hours). Note The time settings are lost approximately one week after unplugging the unit.
BASIC FUNCTIONS ■ Switching the alarm on/off Press ALARM. When the alarm is on, the alarm indicator ( ) and the RADIO indicator light and the alarm time is displayed for a while. Alarm indicator ( ) RADIO indicator Operations during playing back alarm sound At the set time, alarm sound plays back. During playback, operations below are available. ■ Stopping the alarm Press ALARM or . y Alarm indicator ( ) RADIO indicator • Unless you stop the alarm, the alarm stops after 60 minutes automatically.
LISTENING TO FM STATIONS Tuning radio stations A Press SOURCE to select RADIO. The RADIO indicator lights. B B For automatic tuning, press and hold TUNING. For manual tuning, press TUNING repeatedly. Note A If you tune into a station manually, the sound is monaural. RADIO indicator Presetting radio stations You can store up to five favorite FM radio stations with the preset function. A Press TUNING to select a favorite radio station. The radio frequency is displayed temporally.
LISTENING TO MUSIC FROM YOUR Bluetooth DEVICE This unit provides Bluetooth functionality. You can enjoy wireless music playback from your Bluetooth device (smartphone, digital audio player, etc.). Please also refer to the owner’s manual of your Bluetooth device. Installation Within 10 m (33 ft) Install in a stable place, being careful of the following points: • Do not place on top of steel or other metal plates. • Do not cover with a cloth, etc.
LISTENING TO MUSIC FROM YOUR Bluetooth DEVICE ■ Pairing (Registration) A Turn on the system. B Press and hold SOURCE for more than 2 seconds to enter paring mode. A • Pairing mode lasts for 5 minutes. • In paring mode, the Bluetooth indicator ( orange and blue alternately. ) will light in B Bluetooth indicator ( ) – If using an iPhone/iPad/iPod touch C On your iPhone/iPad/iPod touch, turn [Settings] [Bluetooth] on.
LISTENING TO MUSIC FROM YOUR Bluetooth DEVICE Listening to a Bluetooth device A A Press SOURCE to select (Bluetooth). B Connect this unit and your connecting device via Bluetooth. C Play back music from your connecting device. Note Take care that the volume setting of this unit is not too high. We recommend that you adjust the volume on the connecting device. y • While the system is in standby mode, if you connect a Bluetooth device to the unit, the system will automatically turn on.
LISTENING TO EXTERNAL SOURCES A Connect your portable audio device to AUX using a commercially available 3.5 mm (1/8 in) mini plug cable. Rear panel A B C Note Turn down the volume of this unit and your portable audio device before connection. B Turn on the system. C Press SOURCE to set the playback source to AUX. The AUX indicator lights. AUX indicator D Start playback on the connected portable audio device.
TROUBLESHOOTING Refer to the table below if the unit does not operate properly. If the problem you are experiencing is not listed below, or if the instruction below does not help, press to enter standby mode, disconnect the power cable, and contact the nearest authorized Yamaha dealer or service center. General Problem The speakers make no sound. Cause The volume may be set to the minimum level. Solution Adjust the volume level. The source may be incorrect. Select the correct source.
TROUBLESHOOTING Bluetooth Problem Cause Solution The connecting device does not support Perform pairing operations with a device Cannot make this unit which supports A2DP. paired with the connecting A2DP. The passkey of the connecting device that Use a connecting device with a passkey device. you want to pair with this unit is a passkey other than “0000”. This unit and the connecting device are too far apart. There is a device (microwave oven, wireless LAN, etc.) that outputs signals in the 2.
SPECIFICATIONS ■ PLAYER SECTION ■ GENERAL AUX IN • Power Supply............................ AC 100 to 240 V 50/60 Hz • Power consumption .....................................................11 W • Standby consumption (Clock displayed, Bluetooth ready for connection) ....1.0 W • Eco Standby consumption ..........................................0.2 W • Time of power management (Auto Standby) ................................................ No sound: about 20 minutes ........................................
© 2014 Yamaha Corporation Printed in China ZN35300