AB DESKTOP AUDIO SYSTEM TSX-B232 16 May OWNER’S MANUAL
CAUTION: READ THIS BEFORE OPERATING YOUR UNIT. 1 To assure the finest performance, please read this manual carefully. Keep it in a safe place for future reference. 2 Install this unit in a well ventilated, cool, dry, clean place away from direct sunlight, heat sources, vibration, dust, moisture and cold. For proper ventilation, allow the following minimum clearances.
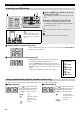
CONTENTS NAMES OF PARTS AND THEIR FUNCTIONS ........2 TURNING THE SYSTEM ON ....................................5 ADJUSTING THE CLOCK ........................................5 LISTENING TO YOUR iPod......................................6 Playing music from your iPod.........................................6 Using repeat/shuffle playback (remote control only) ......6 LISTENING TO CD AND USB DEVICES .................7 Listening to a CD............................................................
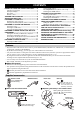
NAMES OF PARTS AND THEIR FUNCTIONS Top panel / Front panel 12 q 3 p 4 5 6 7 o a VOLUME – / + n mlk j h PRESET Adjust the volume. b (Power) c Source buttons Switch the audio source to be played. If you press one of these while the system is off, the system will turn on and then switch the audio source. Press RADIO repeatedly to switch between DAB/FM. i TUNING j Front panel display The clock and other information is displayed here (☞ P. 3). k ENTER Confirm a selected item or value.
NAMES OF PARTS AND THEIR FUNCTIONS Front panel display 2 34 5 6 English 1 ~~~~~~ ~~~~~~ 9 8 7 a Illumination sensor Detect ambient lighting. Do not cover this sensor. b Alarm time This indicates the alarm time. c Repeat/shuffle indicator Display the playback mode (☞ P. 6, 8). d Secondary indicator Turn on if a secondary station is playing when you listen to a DAB station. e Multi-function indicator f Remote control signal receiver Make sure that this sensor is not obstructed (☞ P. 1).
NAMES OF PARTS AND THEIR FUNCTIONS Remote control a Remote control signal transmitter 1 b (Power) Press to turn the system on/off (☞ P. 5). 2 c SNOOZE/SLEEP Set the sleep timer or switch the alarm to snooze mode (☞ P. 19, 20). 3 4 r d ALARM Switch the alarm on/off (☞ P. 19). e Source buttons Switch the audio source to be played. If you press one of these while the system is off, the system will turn on and then switch the audio source. Press RADIO repeatedly to switch between DAB/FM.
TURNING THE SYSTEM ON The system will turn on, and will be ready to play audio sources. To turn the system off, press once again. If you set the rear panel CLOCK switch to the OFF position (☞ P. 3), the clock will not be displayed when the system is off, reducing the power consumption.
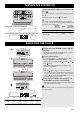
操操 LISTENING TO YOUR iPod Playing music from your iPod • For details on compatible iPod models, refer to “SPECIFICATIONS” (P. 26). • Your iPod can also play back music and recharge while connected to the USB port (☞ P. 8). 1 1 Press the iPod source button to switch the audio source to iPod. 2 2 Set your iPod in the iPod dock (☞ P. 2). RADIO 3 Play the iPod. AUX USB CD iPod Dock adaptor (☞ P. 2) Playback can be controlled with either the remote control, iPod or the unit (☞ P. 2, 4).
LISTENING TO CD AND USB DEVICES − Audio CD: Play from the first track of the CD. − Data CD (a CD containing MP3/WMA files) or USB: Play from the first track in the folder containing the song that you last stopped. • This unit automatically turns off the system if no operation has been performed for 60 minutes after CD/USB device playback is stopped. For details on playable discs and files, refer to “NOTES ON DISCS AND USB DEVICES” (P. 25).
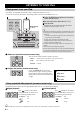
LISTENING TO CD AND USB DEVICES Listening to a USB device 1 2 RADIO 1 Press the USB source button to switch the audio source to USB. If a USB device is already connected, playback will start. 2 Connect a USB device to the USB port. AUX USB CD iPod Playback starts automatically. Playback can be controlled using either the remote control, the unit, or the USB device (☞ P. 2, 4). Folders and files will play in the order in which they were written.
LISTENING TO MUSIC FROM YOUR Bluetooth COMPONENT This unit provides Bluetooth functionality. You can enjoy wireless music playback from your Bluetooth component (mobile phone, digital audio player, etc.). Please also refer to the owner’s manual of your Bluetooth component. Pairing is an operation that registers the communicating component (subsequently called “the other component”) with this unit.
LISTENING TO MUSIC FROM YOUR Bluetooth COMPONENT Listening to a Bluetooth component 1 Press the source button to switch the audio source to Bluetooth. 1 2 Connect this unit and your other component via Bluetooth. RADIO AUX USB CD iPod 3 Play back music from your Bluetooth component. Take care that the volume setting of this unit is not too high. We recommend that you adjust the volume on the other component.
LISTENING TO DAB STATIONS Disconnecting a Bluetooth connection • Hold down source button on this unit or on the remote control. • Turn the system off. • Turn off the Bluetooth setting of the other component. When you connect an iPod touch/iPhone/iPad via Bluetooth, the Bluetooth connection may be disconnected if you switch the audio source to iPod or USB while another iPod/iPhone/iPad is connected.
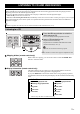
LISTENING TO DAB STATIONS Selecting DAB stations 1 Press the RADIO source button repeatedly to switch the audio source to DAB. 1 2 Press TUNING station. RADIO AUX USB CD iPod to select the DAB While receiving DAB, DAB station information is shown on the front panel display. If the unit does not receive a DAB signal, “Off Air” is displayed instead of the DAB station name. 2 1 / a Secondary indicator: 2 Some stations have sub (secondary) stations.
LISTENING TO DAB STATIONS Presetting DAB stations (remote control only) Use the preset function to store your favorite 30 stations. The display will indicate “PRESET MEMORY”. 2 Press PRESET / to select the preset number that you want to store. 1 3 • The lowest preset number that has not been stored will be selected first. • If you want to cancel the presetting, press . • If you select a preset number in which a station has already been stored, it will be overwritten by the new station.
LISTENING TO FM STATIONS Selecting an FM station Connect the antenna if you want to listen to the FM (☞ P. 3). 1 Press the RADIO source button repeatedly to switch the audio source to FM. 1 2 Tuning FM stations. RADIO AUX USB CD iPod Automatic tuning: Press and hold TUNING / . Manual tuning: Press TUNING / repeatedly. 2 If you tune to a station manually while receiving FM, the sound will be monaural.
LISTENING TO FM STATIONS Presetting FM stations (remote control only) Use the preset function to store your favorite 30 stations. English Auto preset This method tunes automatically, and automatically presets only the stations that have good reception. 1 Press and hold down MEMORY on the remote control. “AUTO PRESET” will appear and “Press MEMORY” will blink. 1 2 2 Press MEMORY. Auto preset will begin. When presetting has finished, the display will indicate “Completed!”.
LISTENING TO EXTERNAL SOURCES Selecting preset FM stations Main unit 1 Press the RADIO source button repeatedly to switch the audio source to FM. 1 RADIO AUX USB CD iPod You can also switch the audio source by pressing RADIO on the remote control. 2 Press PRESET / to select the FM station that you want to listen. 2 You can only select the presets that have been stored. Remote control 1 2 LISTENING TO EXTERNAL SOURCES 1 Using a commercially available 3.
USING THE ALARM FUNCTION The unit includes an alarm function (IntelliAlarm) that plays back audio sources or a set of beep (internal alarm sound) at the set time using a variety of different methods. The alarm function has the following features. Select from 3 alarm types, combining music and beep sounds. SOURCE+BEEP The selected audio source and beep sound are played at the set time. This mode is recommended for the best possible start to the day.
USING THE ALARM FUNCTION Setting the alarm Set the alarm time and alarm type Alarm settings cannot be made when the unit is in power saving. If you want to use the alarm function, set the rear panel CLOCK switch to the ON position. 1 Press SET. 1 The alarm indicator ( ) will blink. 2 Set the alarm. Set items 1-5 described below. Press – / + to select a numerical value, and press ENTER to confirm it.
USING THE “DTA Controller” APPLICATION FOR THE iPod touch/iPhone/iPad Switching the alarm on/off Press ALARM to turn the alarm on/off. When the unit is in power saving, the alarm will not function (☞ P. 5). Operations while the alarm sound is playing When the set time arrives, the selected alarm sound will play. During playback, the following operations are available. To pause the alarm (Snooze) Press SNOOZE/SLEEP. Snooze will stop the alarm and play it again 5 minutes later.
USING THE SLEEP TIMER When the specified time has elapsed, the system will turn off automatically. Press SNOOZE/SLEEP repeatedly to specify the time after which the system will turn off. Press repeatedly You can specify 30, 60, 90 or 120 minutes. When you select a time, the sleep timer is turned on, and the sleep indicator ( ) is shown in the front panel display. If you press SNOOZE/SLEEP while the sleep timer is activated, the sleep timer setting will be canceled.
TROUBLESHOOTING General Problem The speakers make no sound. Cause Solution The volume might be set to the minimum level, or muted. Adjust the volume level. The source may be incorrect. Select the correct source. The headphones are connected. Remove the headphones. The volume of a connected external device is not loud enough. Raise the volume of the external device. Sound suddenly turns off. The sleep timer (☞ P. 20) may be set. Turn the system on and play the source again.
TROUBLESHOOTING iPod Problem No sound. Cause The iPod is not set in the iPod dock firmly. Solution Remove the iPod from the unit, and then set it in the iPod dock again (☞ P. 2). The headphones of the iPod are connected. Remove the headphones. The iPod software version has not been updated. Download the latest iTunes software to update the iPod software version to the latest. The iPod does not charge up. The iPod is not set in the iPod dock firmly.
TROUBLESHOOTING Bluetooth Problem Cause Solution The other component does not support A2DP. Perform pairing operations with a component which supports A2DP. A Bluetooth adaptor, etc. that you want to pair with this unit has a password other than “0000”. Use a Bluetooth adaptor, etc. whose password is “0000”. This unit and the other component are too far apart. Move the other component closer to this unit. There is a device (microwave oven, wireless LAN, etc.) outputs signals in the 2.
TROUBLESHOOTING FM reception Problem Too much noise. Cause Solution The antenna may be connected improperly. Make sure the antenna is connected properly (☞ P. 3) or use a commercially available outdoor antenna. The antenna is too close to the unit or to an electronic device. Position the antenna as far away as possible from the unit or the electronic device. Too much noise during stereo broadcast.
NOTES ON DISCS AND USB DEVICES CD information * ISO 9660 format CD-R/RW This unit can play back discs bearing any of the logo marks above. A disc logo mark is printed on the disc and the disc jacket. • Do not load any other type of disc into this unit. Doing so may damage this unit. • CD-R/RW cannot be played back unless finalized. • Some discs cannot be played back depending on the disc characteristics or recording conditions. • Do not use any non-standard shaped discs such as a heart-shaped disc.
SPECIFICATIONS PLAYER SECTION iPod (Digital connection) Bluetooth SECTION [As of July, 2012] • Compatible iPod models ........................................ iPod touch (1st, 2nd, 3rd and 4th generations) iPod nano (2nd, 3rd, 4th, 5th and 6th generations) • Compatible iPhone models ............................ iPhone 4S, iPhone 4, iPhone 3GS, iPhone 3G, iPhone • Compatible iPad models ..............
Bluetooth Handling Bluetooth communications • The 2.4 GHz band used by Bluetooth compatible devices is a radio band shared by many types of equipment. While Bluetooth compatible devices use a technology minimizing the influence of other components using the same radio band, such influence may reduce the speed or distance of communications and in some cases interrupt communications.
■ For U.K. customers If the socket outlets in the home are not suitable for the plug supplied with this appliance, it should be cut off and an appropriate 3 pin plug fitted. For details, refer to the instructions described below. The plug severed from the mains lead must be destroyed, as a plug with bared flexible cord is hazardous if engaged in a live socket outlet. ■ Special Instructions for U.K. Model LASER SAFETY This unit employs a laser.
© 2012 Yamaha Corporation Printed in Malaysia ZD83580