
Owner's Manual


3 En
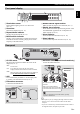
NAMES OF PARTS AND THEIR FUNCTIONS
English
1 Illumination sensor
Detect ambient lighting. Do not cover this sensor
(+ P. 6).
2 Alarm time
Indicates the alarm time (+ P. 17).
3 Repeat/shuffle indicator
Displays the playback mode (+ P. 9).
4 Multi-function indicator
Displays various information, including the clock time,
information about the currently-playing track, and the
frequency of the radio station.
5 Remote control signal receiver
Make sure that this sensor is not obstructed (+ P. 1).
6 Weekly alarm indicator
Shows alarm information specified using the free “DTA
CONTROLLER” application for a smartphone and
tablet computer (+ P. 19).
7 Alarm indicator
Turns on if the alarm has been set (+ P. 18).
8 Sleep indicator
Turns on if the sleep timer has been set (+ P. 19).
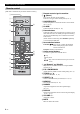
1 CLOCK switch
Sets the clock and specifies whether the clock will be
displayed (+ P. 5).
2 AUX
Use a commercially available 3.5 mm mini-plug cable
to connect your external device here (+ P. 9).
3 FM antenna connector
Connect the FM antenna here.
4
AM antenna connector (North America model only)
Connect the AM antenna here.
• If reception is poor, try changing the height or direction of the
antenna, or move the unit to find a location that has better
reception.
• If you use a commercially available outdoor antenna instead of
the supplied antenna, reception may be better.
Front panel display
~~~~~~
~~~~~~
54
6
21
7 8
3
Rear panel
AM ANT
FM ANT
ON
CLOCK AUX
SET OFF
1 2 3 4
SET:
Set the clock.
ON:
Even when the unit is off, the clock will be
displayed and the alarm function will be available.
OFF:
When the unit is off, the clock will not be displayed
and the alarm function will not be available
.
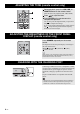
AM ANT
FM ANT
Be sure to stretch out the antenna.
AM ANTFM ANT
Assembling
AM antenna
If there is a digital device near the antenna, you may
experience interference.
The AM antenna cable is not
polarized.
When you've finished making
connections, pull gently on the cable
to ensure that the connection is solid.