En Fr Es OWNER'S MANUAL MODE D'EMPLOI MANUAL DE INSTRUCCIONES ULV
IMPORTANT SAFETY INSTRUCTIONS 1 Read these instructions. CAUTION RISK OF ELECTRIC SHOCK DO NOT OPEN CAUTION: TO REDUCE THE RISK OF ELECTRIC SHOCK, DO NOT REMOVE COVER (OR BACK). NO USER-SERVICEABLE PARTS INSIDE. REFER SERVICING TO QUALIFIED SERVICE PERSONNEL.
IMPORTANT SAFETY INSTRUCTIONS En FCC INFORMATION (for US customers) Compliance with FCC regulations does not guarantee that interference will not occur in all installations. If this product is found to be the source of interference, which can be determined by turning the unit “OFF” and “ON”, please try to eliminate the problem by using one of the following measures: Relocate either this product or the device that is being affected by the interference.
CAUTION: READ THIS BEFORE OPERATING YOUR UNIT. 1 2 3 4 5 6 7 8 9 10 11 12 13 14 To assure the finest performance, please read this manual carefully. Keep it in a safe place for future reference. Install this unit in a well ventilated, cool, dry, clean place - away from direct sunlight, heat sources, vibration, dust, moisture and cold. For proper ventilation, allow the following minimum clearances.
PREPARATION En CONTENTS NAMES OF PARTS AND THEIR FUNCTIONS .................................................................................... 2 BASIC FUNCTIONS................................................................................................................................... 4 USING USEFUL FUNCTIONS ................................................................................................................. 6 LISTENING TO RADIO STATIONS ................................................
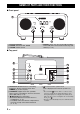
NAMES OF PARTS AND THEIR FUNCTIONS ■ Front panel 1 Front panel display 2 SOURCE: Bluetooth, AUX, RADIO 3 VOLUME: Volume control 4 PRESET: Stores up to five favorite FM (all models) and five AM (U.S.A. and Canada models only) radio stations (☞ P. 8). ■ Top panel 5 Illumination sensor: Measures surrounding illuminance. Do not cover this sensor when DIMMER (E) is set to A (auto). 6 CHARGING: Supplies 5V/2.1A to a portable device, such as a smartphone, when it is connected with a USB cable (☞ P. 9).
NAMES OF PARTS AND THEIR FUNCTIONS E DIMMER: Sets the brightness of the top and front panel A (auto) 3 (brightest) 2 1 (darkest) back to A 0 SET: Alarm setting (☞ P. 4) A NFC mark: Allows easy pairing with NFC technology (☞ P. 11). y B SNOOZE/SLEEP (☞ P. 5) When A (auto) is set, the brightness of the top and front panel is adjusted automatically according to the brightness of the room. F TUNING (☞ P. 8) C FM, AM: Switches FM/AM (U.S.A. and Canada models only) D MEMORY (☞ P.
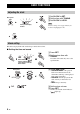
OPERATION BASIC FUNCTIONS Adjusting the clock A Set CLOCK to SET. B Set the time with TUNING. C Set CLOCK to LOCK. Rear panel Front panel display flashes. Note The time settings are lost approximately one week after unplugging the unit. Alarm setting This unit can play back radio and/or beep sound at the set time. ■ Setting the time and sound A Press SET. B Set the alarm time with TUNING. Alarm indicator ( ) flashes and the front panel display indicates alarm mode.
BASIC FUNCTIONS En ■ Switching the alarm on/off Press ALARM. When the alarm is on, the alarm indicator ( ) lights up and alarm time is displayed for a while. Operations during playing back alarm sound At the set time, alarm sound plays back. During playback, operations below are available. ■ Using the snooze function Press SNOOZE/SLEEP. The alarm sound stops and resumes after 5 minutes.
OPERATION USING USEFUL FUNCTIONS DTA CONTROLLER With the DTA CONTROLLER application installed on your smartphone or tablet computer, you can use further convenient features of Yamaha desktop audio systems. To download the application, or obtain the latest information on it, access App Store or Google Play via the QR codes listed below. iPhone, iPad, iPod touch http://itunes.com/app/dtacontroller Android™ https://play.google.com/store/apps/ details?id=com.yamaha.av.dtacontr oller (U.S.A.
USING USEFUL FUNCTIONS En Alarm setting using DTA CONTROLLER Once you have set Weekly Alarm by “DTA CONTROLLER”, you can select the Weekly Alarm mode in the alarm mode select display of this unit. 1d (One Day Alarm mode): An alarm that sounds only once at the specified time. One Day Alarm Weekly Alarm Note The Weekly Alarm mode cannot be selected when all the days of the Weekly Alarm setting are turned off. Turn on any day of the Weekly Alarm setting.
LISTENING TO RADIO STATIONS Tuning radio stations A Set SOURCE to RADIO. B Select FM/AM. (U.S.A. and Canada models only) (U.S.A. and Canada models only) C For automatic tuning, press and hold TUNING. For manual tuning, press TUNING repeatedly. Note If you tune to a station manually during FM reception, the sound is monaural. Presetting radio stations You can store up to five favorite FM (all models) and five AM (U.S.A. and Canada models only) radio stations with the preset function.
En CHARGING WITH THE USB PORT Connecting a portable device such as a smartphone or tablet computer to the USB port on this unit charges the connected device (power supply of up to 5V/2.1A is supported). Prepare a USB cable that is compatible with the portable device and confirm that the device is supported for charging via USB connection before use. In addition, read the documentation provided with the portable device.
LISTENING TO MUSIC FROM YOUR Bluetooth COMPONENT This unit provides Bluetooth functionality. You can enjoy wireless music playback from your Bluetooth component (smartphone, digital audio player, etc.). Please also refer to the owner’s manual of your Bluetooth component. Installation Install in a stable place, being careful of the following points: • Do not place on top of steel or other metal plates. • Do not cover with a cloth, etc.
LISTENING TO MUSIC FROM YOUR Bluetooth COMPONENT En ■ If using other than an iPhone/iPad/iPod touch A Set SOURCE to (Bluetooth). B Perform Bluetooth pairing on the other component. For details, refer to the owner’s manual of the other component. C From the Bluetooth connection list of the other component, choose this unit (TSX-B72 Yamaha). When pairing has been completed, the Bluetooth indicator on the front panel display of this unit will light for about 1 second.
LISTENING TO MUSIC FROM YOUR Bluetooth COMPONENT Listening to a Bluetooth component A Set SOURCE to (Bluetooth). B Connect this unit and your other component via Bluetooth. C Play back music from your Bluetooth component. Bluetooth indicator Note Take care that the volume setting of this unit is not too high. We recommend that you adjust the volume on the other component.
En TROUBLESHOOTING Refer to the table below if the unit does not operate properly. If the problem you are experiencing is not listed below, or if the instruction below does not help, turn off the unit, disconnect the power cable, and contact the nearest authorized Yamaha dealer or service center. General Problem The speakers make no sound. Cause Solution The volume may be set to the minimum level. Adjust the volume level. The source may be incorrect. Select the correct source.
TROUBLESHOOTING Bluetooth Problem Cannot make this unit paired with the other component. Cause The other component does not support A2DP. Solution Perform pairing operations with a component which supports A2DP. A Bluetooth adaptor, etc. that you want to Use a Bluetooth adaptor, etc. whose password pair with this unit has a password other is “0000”. than “0000”. This unit and the other component are too Move the other component closer to this unit. far apart.
En SPECIFICATIONS ■ PLAYER SECTION ■ CHARGING CONNECTOR SECTION AUX IN • Connector type.................................................. USB type A • Output rating .........................................................5 V/2.1 A • Input connector ............STEREO L/R: 3.5 mm (1/8 in) STEREO mini Jack ■ AMPLIFIER SECTION ■ NFC (Near Field Communication) SECTION • Maximum output power .......................... 4 W + 4 W + 8 W (6 Ω 1 kHz, 10% THD) • Driver unit ...................
PRÉCAUTIONS CONCERNANT LA SÉCURITÉ 1 Lire ces instructions. CAUTION RISK OF ELECTRIC SHOCK DO NOT OPEN ATTENTION : POUR RÉDUIRE LES RISQUES D’INCENDIE ET DE DÉCHARGE ELECTRIQUE, NE PAS RETIRER LE COUVERCLE (OU LE PANNEAU ARRIÈRE). AUCUNE PIÈCE INTERNE NE PEUT ÊTRE CHANGÉE PAR L’UTILISATEUR. POUR L’ENTRETIEN, S’ADRESSER À UN PERSONNEL QUALIFIÉ.
PRÉCAUTIONS CONCERNANT LA SÉCURITÉ Informations de la FCC (Pour les clients résidents aux États-Unis) PRÉCAUTION FCC Tout changement ou toute modification non approuvé expressément par le tiers responsable peut aboutir à l’interdiction de faire fonctionner cet appareil. Cependant, la conformité à la Réglementation FCC ne garantit pas l’absence d’interférences dans une installation particulière.
ATTENTION : VEUILLEZ LIRE CE QUI SUIT AVANT D’UTILISER L’APPAREIL. 1 Pour utiliser l’appareil au mieux de ses possibilités, lisez attentivement ce mode d’emploi. Conservez-le soigneusement pour référence. 2 Installez cet appareil dans un endroit frais, bien aéré, sec et propre - à l’abri de la lumière du soleil, des sources de chaleur, des vibrations, des poussières, de l’humidité et du froid. Pour une aération correcte, tenez compte des distances minimales suivantes.
PREPARATION TABLE DES MATIÈRES ■ Caractéristiques – Lecture de qualité supérieure du smartphone/de la tablette compatible Bluetooth et des dispositifs radio et externes. Appariement par simple contact avec la technologie NFC. – Son grave ferme et son stéréo spacieux depuis un haut-parleur à 2.1 canaux (haut-parleur d’aigus × 2, haut-parleur de graves × 1), SR-Bass™ (technologie Yamaha Swing Radiator Bass) et DSP dans un appareil compact.
NOM ET FONCTION DES PIÈCES ■ Panneau avant 1 Afficheur 2 SOURCE : Bluetooth, AUX, RADIO 3 VOLUME : Réglage du volume 4 PRESET : Mémorise jusqu’à cinq stations radio FM favorites (tous les modèles) et cinq stations radio AM favorites (modèles pour les États-Unis et le Canada uniquement) (☞ P. 8). ■ Panneau supérieur 5 Capteur d’illumination : Mesure le niveau d’illumination ambiante. Ne couvrez pas ce capteur lorsque DIMMER (e) est réglé sur A (auto).
NOM ET FONCTION DES PIÈCES E DIMMER : Règle la luminosité du panneau supérieur et du panneau avant A (auto) 3 (le plus lumineux) 2 1 (le plus sombre) retour à A y Lorsqu’elle est réglée sur A (auto), la luminosité du panneau supérieur et du panneau avant s’ajuste automatiquement en fonction de la luminosité de la pièce. F TUNING (☞ P. 8) ■ Panneau arrière 15V : Branchez l’adaptateur secteur et le câble d’alimentation fournis. Antenne tige FM (voir ci-dessous.
OPERATION FONCTIONS DE BASE Réglage de l’horloge A Réglez CLOCK sur SET. B Réglez l’heure avec TUNING. C Réglez CLOCK sur LOCK. Panneau arrière L’afficheur clignote. Remarque Les paramètres de l’heure se perdent environ une semaine après avoir débranché l’appareil. Réglage de l’alarme Cet appareil peut lire la radio et/ou faire retentir le bip à l’heure que vous avez définie. ■ Réglage de l’heure et du son A Appuyez sur SET. B Réglez l’heure d’alarme avec TUNING.
FONCTIONS DE BASE ■ Activer/désactiver l’alarme Appuyez sur ALARM. Opérations durant la lecture du son d’alarme À l’heure sélectionnée, le son d’alarme est lu. Pendant la lecture, les opérations suivantes sont disponibles. ■ Utilisation de la fonction snooze Appuyez sur SNOOZE/SLEEP. Le son de l’alarme s’arrête puis reprend au bout de 5 minutes.
OPERATION UTILISATION DES FONCTIONS UTILES DTA CONTROLLER Lorsque l’application DTA CONTROLLER est installée sur votre smartphone ou tablette, vous pouvez utiliser les fonctions plus pratiques des systèmes audio de bureau Yamaha. Pour télécharger l’application ou obtenir les dernières informations sur celle-ci, accédez à l’App Store ou à Google Play au moyen des codes QR répertoriés ci-dessous. iPhone, iPad, iPod touch http://itunes.com/app/dtacontroller Android™ https://play.google.
UTILISATION DES FONCTIONS UTILES Réglage de l’alarme avec DTA CONTROLLER 1d (mode One Day Alarm) : L’alarme retentit une seule fois à l’heure spécifiée. One Day Alarm Weekly Alarm Remarque Le mode Weekly Alarm est indisponible lorsque tous les jours du réglage Weekly Alarm sont désactivés. Activez n’importe quel jour du réglage Weekly Alarm. 7d (mode Weekly Alarm) : L’alarme retentit chaque jour de la semaine à l’heure spécifiée (réglable uniquement avec le « DTA CONTROLLER »). A Appuyez sur SET.
ÉCOUTE DES STATIONS RADIO Syntonisation sur les stations radio A Réglez SOURCE sur RADIO. B Sélectionnez FM/AM. (modèles pour les États-Unis et le Canada uniquement) (modèles pour les États-Unis et le Canada uniquement) C Pour une syntonisation automatique, appuyez et maintenez TUNING enfoncé. Pour une syntonisation manuelle, appuyez sur TUNING plusieurs fois de suite. Remarque Si vous syntonisez manuellement sur une station pendant la réception FM, le son est en mono.
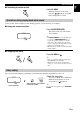
CHARGE AVEC LE PORT USB A Raccordez votre dispositif portable au port USB de cet appareil en utilisant un câble USB disponible dans le commerce. Câble USB du dispositif portable La charge commence automatiquement. B Débranchez le câble USB de l’appareil une fois la charge terminée. Vérifiez l’état de charge sur le dispositif portable. Panneau supérieur Remarques • Il se peut que la charge soit impossible selon le dispositif portable. • Le port USB est uniquement destiné à la charge.
ÉCOUTE DE MUSIQUE AVEC VOTRE PÉRIPHÉRIQUE Bluetooth Cet appareil est doté d’une fonctionnalité Bluetooth. Vous pouvez écouter de la musique sans fil à partir de votre périphérique Bluetooth (smartphone, lecteur audio numérique, etc.). Voir également le mode d’emploi de votre périphérique Bluetooth. Installation Installez cet appareil à un emplacement stable, en vérifiant les points suivants : • Ne posez pas cet appareil sur de l’acier ou d’autres plaques métalliques.
ÉCOUTE DE MUSIQUE AVEC VOTRE PÉRIPHÉRIQUE Bluetooth ■ En cas d’utilisation d’un dispositif autre qu’un iPhone/iPad/iPod touch A Réglez SOURCE sur (Bluetooth). B Effectuez l’appariement Bluetooth sur l’autre périphérique. Une fois l’appariement terminé, l’indicateur Bluetooth de l’afficheur de cet appareil s’allume pendant environ 1 seconde. y Si l’on vous demande un code, saisissez les chiffres « 0000 ».
ÉCOUTE DE MUSIQUE AVEC VOTRE PÉRIPHÉRIQUE Bluetooth Écoute d’un périphérique Bluetooth A Réglez SOURCE sur (Bluetooth). B Connectez cet appareil et votre autre périphérique via Bluetooth. C Écoutez de la musique avec votre périphérique Bluetooth. Indicateur Bluetooth Remarque Veillez à ce que le volume de cet appareil ne soit pas réglé trop fort. Nous vous recommandons de régler le volume sur l’autre périphérique.
GUIDE DE DÉPANNAGE Généralités Anomalies Causes possibles Solutions Les haut-parleurs n’émettent aucun son. Le volume est réglé au niveau minimum. Réglez le niveau du volume. La source est peut-être incorrecte. Sélectionnez la source correcte. Le son est subitement coupé. La fonction de mise en veille (☞ P. 5) peut être réglée. Allumez le système et poursuivez la lecture. Le son grésille/est déformé ou il y a un bruit anormal.
GUIDE DE DÉPANNAGE Bluetooth Anomalies Impossible d’apparier cet appareil avec l’autre périphérique. Causes possibles Solutions L’autre périphérique ne prend pas en charge le profil A2DP. Effectuez les opérations d’appariement avec un périphérique qui prend en charge le profil A2DP. Le code de l’adaptateur Bluetooth, etc. que vous souhaitez apparier avec cet appareil est différent de « 0000 ». Utilisez un adaptateur Bluetooth, etc. dont le code est « 0000 ».
CARACTÉRISTIQUES TECHNIQUES ■ SECTION LECTEUR ■ SECTION CONNECTEUR DE CHARGE • Connecteur d’entrée ...... STÉRÉO L/R : prise STÉRÉO à mini fiche de 3,5 mm • Type de connecteur........................................... USB type A • Puissance de sortie nominale ................................5 V/2,1 A ■ SECTION AMPLIFICATEUR ■ SECTION NFC (Near Field Communication) • Puissance de sortie maximale.................. 4 W + 4 W + 8 W (6 Ω 1 kHz, 10 % THD) • Amplificateur............
PRECAUCIONES DE SEGURIDAD IMPORTANTES 1 Lea estas instrucciones. CAUTION RISK OF ELECTRIC SHOCK DO NOT OPEN PRECAUCIÓN: PARA REDUCIR EL RIESGO DE DESCARGA ELECTRICA, NO QUITE LA CUBIERTA. EL USUARIO NO DEBERA DAR NINGUN TIPO DE SERVICIO A NINGUNA PARTE INTERNA. DEBERA SER REALIZADO SOLO POR PERSONAL DE SERVICIO CALIFICADO.
PRECAUCIONES DE SEGURIDAD IMPORTANTES Información de la Comisión Federal de las Comunicaciones (FCC) (para los consumidores de EE. UU.) ADVERTENCIA FCC Cualquier cambio o modificación no aprobado expresamente por la parte responsable de la compatibilidad anulará la autoridad del usuario de utilizar el equipo. El cumplimiento de las reglas de la FCC no garantiza que no se producirán interferencias en todas las instalaciones.
PRECAUCIÓN: LEA LAS INDICACIONES SIGUIENTES ANTES DE UTILIZAR ESTE APARATO 1 Para asegurar el mejor rendimiento de este aparato, lea atentamente este manual. Y luego guárdelo en un lugar seguro para poder consultarlo en el futuro en caso de ser necesario. 2 Instale esta unidad en un lugar bien ventilado, fresco, seco y limpio, alejado de la luz directa del sol, fuentes de calor, vibración, polvo, humedad y frío.
PREPARATION CONTENIDO ■ Características – Reproducción de alta calidad de ordenadores, tablets, smartphones, radio y dispositivos externos con Bluetooth. Emparejamiento con un solo toque gracias a la tecnología NFC. – Sonido de bajo de calidad y espacioso sonido estéreo, gracias a su altavoz de 2.1 canales (tweeter × 2, woofer × 1), SR-Bass™ (Tecnología de graves, Swing Radiator Bass, de Yamaha) y DSP, juntos en una unidad compacta. – Interfaz fácil de usar, mediante botones con guía LED y diales.
NOMBRES DE LAS PARTES Y SUS FUNCIONES ■ Panel frontal 1 Visor del panel frontal 2 SOURCE: Bluetooth, AUX, RADIO 3 VOLUME: Ajuste del volumen 4 PRESET: Almacena hasta cinco emisoras de radio favoritas FM (todos los modelos) y cinco emisoras AM (solo modelos de EE.UU. y Canadá) (☞ P. 8). ■ Panel superior 5 Sensor de iluminación: Mide la luminosidad del entorno. No cubra este sensor si DIMMER (e) está ajustado en A (automático).
NOMBRES DE LAS PARTES Y SUS FUNCIONES E DIMMER: Regula el brillo del panel frontal y del panel superior A (automático) 3 (lo más claro) 2 1 (lo más luminoso) vuelta a A y Cuando A (automático) está programado, el brillo del panel frontal es ajustado automáticamente, dependiendo del brillo de la habitación. F TUNING (☞ P. 8) ■ Panel posterior 15V : Conecte el adaptador de CA suministrado y el cable de alimentación. Varilla de antena FM (Ver más abajo.) Terminal de antena AM (solo modelos de EE.UU.
OPERATION FUNCIONES BÁSICAS Ajuste del reloj A Ajuste CLOCK en SET. B Programe la hora con TUNING. C Ajuste CLOCK en LOCK. Panel posterior El visor del panel frontal parpadea. Nota El ajuste del tiempo se pierde aproximadamente una semana después de desenchufar la unidad. Ajuste de la alarma Esta unidad puede reproducir sonidos de radio y/o sonido de pitido a la hora programada. ■ Ajuste de la hora y del sonido A Pulse SET. B Ajuste la hora de alarma con TUNING.
FUNCIONES BÁSICAS ■ Activación/Desactivación de la alarma Pulse ALARM. Cuando la alarma está activada, el indicador de alarma ( ) se ilumina y la hora de alarma es mostrada por un instante. A la hora ajustada, el sonido de la alarma es reproducido. Durante la reproducción, las siguientes operaciones son posibles. ■ Utilización de la función de repetición Pulse SNOOZE/SLEEP. El sonido de la alarma se detiene y se reanuda después de 5 minutos.
OPERATION USO DE FUNCIONES ÚTILES DTA CONTROLLER Si tiene la aplicación DTA CONTROLLER instalada en su smartphone o tablet, puede utilizar prácticas funciones adicionales de sistemas de audio de escritorio de Yamaha. Para descargar la aplicación o para conocer la información relacionada más reciente, utilice los siguientes códigos QR para acceder al App Store o a Google Play. iPhone, iPad, iPod touch http://itunes.com/app/dtacontroller Android™ https://play.google.com/store/apps/ details?id=com.yamaha.
USO DE FUNCIONES ÚTILES Ajuste de la alarma con DTA CONTROLLER Una vez establecido Weekly Alarm con “DTA CONTROLLER”, puede seleccionar el modo Weekly Alarm en el visor de selección del modo de alarma de esta unidad. 1d (modo One Day Alarm): Una alarma que suena solo una vez a la hora especificada. Weekly Alarm 7d (modo Weekly Alarm): Una alarma con posibilidad de una hora distinta para cada día de la semana (se ajusta únicamente con “DTA CONTROLLER”). A Pulse SET.
ESCUCHAR EMISORAS DE RADIO Sintonización de emisoras de radio A Ajuste SOURCE en RADIO. B Seleccione FM/AM. (Solo modelos de EE.UU. y Canadá) (Solo modelos de EE.UU. y Canadá) C Para la sintonización automática, mantenga pulsado TUNING. Para la sintonización manual, pulse TUNING repetidamente. Nota Si sintoniza una emisora de radio manualmente durante la recepción FM, el sonido es monoaural (mono).
CARGA CON EL PUERTO USB Si conecta un dispositivo portátil, como un smartphone o una tablet, al puerto USB de esta unidad, el dispositivo conectado se cargará (se admite 5 V/2,1 A de alimentación máxima). Antes de realizar la conexión, tenga preparado un cable USB compatible con el dispositivo portátil y confirme que el dispositivo se puede cargar mediante través de una conexión USB. Además, lea la documentación incluida con el dispositivo portátil. La carga se inicia automáticamente.
ESCUCHAR MÚSICA DESDE EL COMPONENTE Bluetooth Esta unidad está equipada con Bluetooth. Permite disfrutar de reproducción de música inalámbrica desde su componente Bluetooth (smartphone, reproductor de audio digital, etc.). Consulte también el manual de instrucciones del componente Bluetooth. Instalación Instale la unidad en un lugar estable y tenga en cuenta lo siguiente: • No coloque la unidad sobre superficies de acero o sobre placas de metal. • No cubra la unidad con un paño, etc.
ESCUCHAR MÚSICA DESDE EL COMPONENTE Bluetooth ■ Si utiliza otros dispositivos distintos de iPhone/iPad/iPod touch A Ajuste SOURCE en (Bluetooth). B Lleve a cabo el proceso de emparejamiento Bluetooth en el otro componente. Para obtener más información, consulte el manual de instrucciones del otro componente. C En la lista de conexiones Bluetooth del otro componente, seleccione esta unidad (TSX-B72 Yamaha). y Si el sistema le pide una contraseña, introduzca los números “0000”.
ESCUCHAR MÚSICA DESDE EL COMPONENTE Bluetooth Escuchar un componente Bluetooth A Ajuste SOURCE en (Bluetooth). B Conecte esta unidad y el otro componente a través de Bluetooth. C Reproduzca música desde el componente Bluetooth. Indicador de Bluetooth Nota Tenga cuidado para que el ajuste de volumen de la unidad no sea demasiado alto. Recomendamos que ajuste el volumen en el otro componente.
SOLUCIÓN DE PROBLEMAS Consulte la tabla inferior si la unidad no funciona correctamente. Si el problema no aparece en la siguiente lista o las instrucciones siguientes no le ayudan, apague la unidad, desconecte el cable de alimentación y póngase en contacto con el centro de servicio o distribuidor de Yamaha más cercano. General Causa Solución Es Problema Los altavoces no suenan. Es posible que el volumen esté ajustado al Ajuste el nivel del volumen. mínimo. Es posible que la fuente no sea la correcta.
SOLUCIÓN DE PROBLEMAS Bluetooth Problema No se puede emparejar esta unidad con el otro componente. Causa Solución El otro componente no es compatible con Solo puede emparejar componentes el perfil A2DP. compatibles con el perfil A2DP. Un adaptador Bluetooth, etc., que quiere emparejar con esta unidad tiene una contraseña que no es “0000”. Utilice un adaptador Bluetooth, etc., cuya contraseña sea “0000”. Esta unidad y el otro componente están demasiado alejados.
ESPECIFICACIONES ■ SECCIÓN DEL REPRODUCTOR AUX IN ■ SECCIÓN DEL CONECTOR DE CARGA • Conector de Entrada ................... ESTÉREO I /D: 3,5 mm Mini Jack ESTÉREO • Tipo de conector ................................................USB tipo A • Salida nominal ......................................................5 V/2,1 A ■ SECCIÓN DEL AMPLIFICADOR ■ SECCIÓN NFC (Near Field Communication) ■ SECCIÓN Bluetooth • • • • • Versión de Bluetooth .....................................Ver. 2.
© 2013 Yamaha Corporation Printed in China ZJ05640