
manual


1. Installing the Software
4. In-depth information
on DME Units
3. Advanced Setup
(via Ethernet cables)
2. Basic Setup
(via USB cable)
Appendix: Detailed
DME-N Network Driver Settings
USB cable
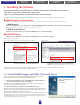
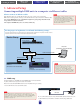
Main Panel window
Upon launch, two windows will be displayed.
2-1. Preparation
Before launching DME Designer, it is critical that the DME unit is turned on and then connected to the computer using a USB cable.
Once the DME unit has been connected, launch DME Designer.
In order to setup the currently-connected DME unit for editing,
double-click [DME] at the le of the Designer window.
04
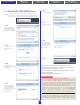
is section covers the most basic conguration
– that is, using a single PC to control a single DME unit.
2. Basic Setup
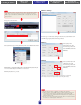
Connecting a single DME unit directly to a computer via USB cable
Designer window
Next, either
double-click the
currently connected
DME unit (a
DME24N in this
case) or drag and
drop it to the editing
area located to the
right of the list.
In response to this action, the Device Group and Sampling Frequency
Settings window will be displayed. Click the [OK] button to proceed.
* Group settings are not
necessary when only one
DME unit is connected.
* The sampling rate can
be changed later on.
Drag and drop