
manual


1. Installing the Software
4. In-depth information
on DME Units
3. Advanced Setup
(via Ethernet cables)
2. Basic Setup
(via USB cable)
Appendix: Detailed
DME-N Network Driver Settings
09
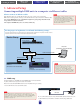
The computer can be connected to the device group master using a
USB cable. It is also possible to connect the computer to a Slave
DME using a USB cable if a DME Satellite is assigned as the device
group master.
Note
1. Ensure that the switch is capable of 100Base-TX operation.
2. Cables used to connect DME units to a network switch can be up to
100 meters in length. Correct operation at this upper-limit length
cannot, however, be guaranteed and will depend on the quality of the
hub and cables used.
3. Be sure to use Cat 5 shielded twisted-pair cables in order to maximize
resistance to electromagnetic interference.
Note
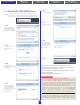
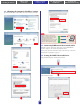
Select [Slave] in the
Master/Slave area of the
Network Setup window for
both the DME8o-C and the
DME64N.
Select [100Base-TX] in the
Link Mode area of the
Network Setup window for
both the DME8o-C and the
DME64N.
Setup ports as shown below.
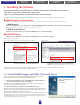
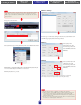
Select [Network Setup] from the [Hardware] menu on the Main Panel window
Click the [OK] button to proceed.
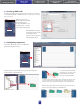
Click [Utility] to display the Utility window and then click the [Network] tab
* For now, the default settings for the DME4io-C can be used as is.
DME4io-C Settings
DME8o-C
DME64N
* Although an error will be displayed on DME units at this time, it can be ignored.
(This message is output due to group settings not yet having been made.)
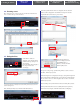
e next step is to make slave settings. In the same way as described above in
(1) DME setup, display the Network Setup window.
Click