
Guide
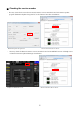
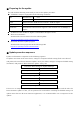


Table Of Contents
- ■ Precautions (Please be sure to read this section first!)
- ■ Checking the version number
- ■ Preparing for the update
- ■ Update procedure sequence
- ■ Install the Dante Firmware Update Manager
- ■ Computer TCP/IP setting (for R series device)
- ■ Computer TCP/IP setting (for Dante)
- ■ Error Message List (RSio64-D Update Program V3)

6
■ Updating the R series firmware
This section explains how to update the R series firmware.
Before you start updating the firmware, decompress the downloaded compressed file. Place
“RSIO_P_Vxxx.BIN,” “RSio64-D_UpdaterV3.exe” and “update.ini” in the same folder.
xxx represents the firmware version number. (E.g., RSIO_P_V310.BIN)
For information about messages displayed by the R series firmware update program, refer to “
Error Message List
(RSio64-D Update Program V3)” at the end of this guide.
・ Before starting the update program, quit all other programs. While the update is in progress, do not start any
other programs or switch between windows.
・ If your computer enters Sleep or Energy Save mode, data transfer to the device may stop. Therefore, you should
disable these functions to prevent this from happening. We also recommend that you do not use any screen saver
or similar background programs.
1. Turn off the power to the R series device.
2. Take note of the dip switch settings on the R series device front panel.
Follow the procedure below to change dip switch settings. Take note of the original dip switch settings in order to
restore the settings when the Dante firmware update is completed.
3. Disconnect the Ethernet cable from the Dante [PRIMARY] connector and [SECONDARY] connector
on the rear panel of the R series device.
4. Pull the dip switch 4 on the R series device front panel down (ON) and turn the power on with the
other switches remaining in their up positions (OFF).
5. After the orange [SYNC] indicator flashes twice periodically on the front panel of the R series device,
turn off the power.
6. Connect the Dante [PRIMARY] connector on the rear panel of the R series device to the Ethernet
connector on the computer using an Ethernet cable.