ELS - 0 2 ELS - 0 2 C ELS - 0 2 X 取扱説明書 DIGITAL ORGAN v2.
安全上のご注意 ご使用の前に、必ずこの「安全上のご注意」をよくお読みください。 ここに示した注意事項は、製品を安全に正しくご使用いただき、お客様やほかの方々への危害や財産への損 害を未然に防止するためのものです。必ずお守りください。 お子様がご使用になる場合は、保護者の方が以下の内容をお子様にご徹底くださいますようお願いいたしま す。 お読みになったあとは、使用される方がいつでも見られる所に必ず保管してください。 ■ 記号表示について この製品や取扱説明書に表示されている記号には、次のような意味があります。 「ご注意ください」 という注意喚起を示します。 〜しないでくださいという 「禁止」を示します。 「必ず実行」 してくださいという強制を示します。 ■「警告」と「注意」について 以下、誤った取り扱いをすると生じることが想定される内容を、危害や損害の大きさと切迫の程度を明示す るために、「警告」と「注意」に区分して掲載しています。 警告 この表示の欄は、 「死亡す る可能性または重傷を負 う可 能 性が想 定される」 内容です。 注意 この表示の欄は、 「傷害を 負う可能性または物的損 害が発生
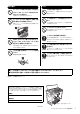
警告 電源 / 電源コード 禁止 水に注意 電源コードをストーブなどの熱器具に近 本体の上に花瓶や薬品など液体の入った づけたり、無理に曲げたり、傷つけたりし ものを置かない。また、浴室や雨天時の屋 ない。また、電源コードに重いものをのせ 禁止 ない。 外など湿気の多いところで使用しない。 内部に水などの液体が入ると、感電や火災、または故 障の原因になります。入った場合は、すぐに電源ス 電源コードが破損し、感電や火災の原因になります。 イッチを切り、電源プラグをコンセントから抜いた 上で、お買い上げの販売店または巻末のヤマハ修理 電源は必ず交流100Vを使用する。 ご相談センターに点検をご依頼ください。 エアコンの電源など交流 200V のものがあります。 誤って接続すると、感電や火災のおそれがあります。 ぬれた手で電源プラグを抜き差ししない。 必ず実行 感電のおそれがあります。 電源プラグにほこりが付着している場合 禁止 は、ほこりをきれいに拭き取る。 必ず実行 感電やショートのおそれがあります。 火に注意 本体の上にろうそくなど火気のあるもの を置かない。
注意 電源 / 電源コード この製品を電源コンセントの近くに設置 する。 たこ足配線をしない。 音質が劣化したり、コンセント部が異常発熱して 必ず実行 火災の原因になることがあります。 感じた場合にはすぐに電源スイッチを切り、電源プ ラグをコンセントから抜いてください。また、電源ス 禁止 イッチを切った状態でも微電流が流れています。こ の製品を長時間使用しないときは、必ず電源プラグ 電源プラグを抜くときは、電源コードを持 をコンセントから抜いてください。 たずに、必ず電源プラグを持って引き抜 必ず実行 電源プラグへ容易に手が届く位置に設置し、異常を く。 電源コードが破損して、感電や火災の原因になるこ とがあります。 接続 すべての機器の電源を切った上で、ほかの 機器と接続する。また、電源を入れたり 必ず実行 切ったりする前に、機器のボリュームを最 小にする。 感電、聴力障害または機器の損傷の原因になります。 長期間使用しないときや落雷のおそれが 必ず実行 あるときは、必ずコンセントから電源プラ 演奏を始める前に機器のボリュームを最 グを抜く。 小にし、演奏しながら徐々
取り扱い 禁止 イス キーカバーや本体のすき間に手や指を入 不安定な場所に置かない。 れない。また、キーカバーで指などをはさ イスが転倒して、お客様やほかの方々がけがをする 原因になります。 まないように注意する。 禁止 お客様がけがをするおそれがあります。 イスで遊んだり、イスを踏み台にしたりし キーカバーやパネル、鍵盤のすき間から金 ない。 属や紙片などの異物を入れない。 禁止 感電、ショート、火災、故障や動作不良の原因になる 禁止 ことがあります。 イスが転倒したりこわれたりして、お客様がけがを する原因になります。 イスには二人以上ですわらない。 イスが転倒したりこわれたりして、お客様がけがを する原因になります。 禁止 イスのネジを定期的に締め直す。 イスを長期間使用すると、イスのネジがゆるむこと があります。ネジがゆるんだ場合は、付属のスパナで 本体の上にのったり重いものをのせたり 禁止 必ず実行 しない。また、ボタンやスイッチ、入出力 端子などに無理な力を加えない。 イスの脚で床やたたみを傷つけないよう 本体が破損したり、お客様やほかの方々がけが
注記(ご使用上の注意) お知らせ 製品の故障、損傷や誤動作、データの損失を防ぐため、以下 の内容をお守りください。 ■ データの著作権に関するお願い ■ 製品の取り扱い/お手入れに関する注意 • テレビやラジオ、ステレオ、携帯電話など他の電気製品の 近くで使用しないでください。楽器本体またはテレビやラ ジオなどに雑音が生じる原因になります。iPad、 iPhone、iPod touchのアプリケーションと一緒に使用 する場合は、通信によるノイズを避けるためiPad、 iPhone、iPod touchの機内モードをオンにしてお使い いただくことをおすすめします。 • 直射日光のあたる場所やストーブの近くなど極端に温度が 高くなるところ、逆に温度が極端に低いところ、また、ほ こりや振動の多いところで使用しないでください。本体の パネルが変形したり、内部の部品が故障したり、動作が不 安定になったりする原因になります(5℃〜40℃の範囲で 動作することを確認しています)。 • 本体上にビニール製品やプラスチック製品、ゴム製品など を置かないでください。本体のパネルや鍵盤が変色/変質 する原因になります。 •
はじめに このたびは、ヤマハエレクトーンSTAGEA ELS-02/ELS-02C/ELS-02Xをお買い上げいただきまして、 ありがとうございます。 この楽器は、長年にわたって培ってきたノウハウと最新の電子テクノロジーの粋を集めて完成されたエレク トーンです。ほとんどの機能は、直感的に操作できるタッチパネルで設定できます。 この楽器の、バラエティーあふれる機能のすべてを使って、演奏をお楽しみいただくために、ぜひこの取扱説 明書をご活用いただきますようお願い申しあげます。 また、ご一読いただいたあとも、不明な点が生じた場合に備えて、大切に保管いただきますようお願いします。 品番名記載について この取扱説明書では、以降の記載でELS-02/ELS-02C/ELS-02XをELS-02シリーズ、ELS-01/ELS-01U/ELS-01C/ ELS-01CU/ELS-01CH/ELS-01X/ELS-01XUをELS-01シリーズと記載します。 取扱説明書について この楽器には、以下の説明書が用意されています。 冊子マニュアル 取扱説明書(本書) この楽器の機能や使い方を説明しています。 電子マニュアル(
特長 スーパーアーティキュレーションボイスが搭載された多彩なボイス 36、41ページ • ギターと指の摩擦音やサックスのブレス音、管楽器の演奏に欠かせない滑らかなレガートやビブラート、グリッサンド といったアコースティック楽器特有の奏法を、鍵盤のタッチや演奏にあわせて自然に表現してくれるスーパーアーティ キュレーションボイスが搭載されています。 • ヤマハ最高峰のフルコンサートグランドピアノ「CFX」から最高の1台を選び、最新の技術でサンプリングしたピアノ 音色やエレクトーンの演奏にはかかせないストリングスやオーケストラパーカッション、世界の民族楽器など高品質な 新音色が搭載されています。 • ELS-02C/ELS-02XではVA音源による94種類のVA音色と本格的なオルガンフルート音色も搭載されています。鍵盤 の持つ高い表現力とあわせて、表情豊かな音色を奏でることができます。 いつでも簡単に呼び出せる、洗練されたレジストレーションメニュー 21ページ パネル上の5つのボタンに、即興演奏やレジスト制作で最初のセッティングとして使えるシンプルなレジストレーションが 用意され、弾きたいと思ったときにい
ELS-02シリーズは、下記のフォーマットや機能に対応しています。 「GM (General MIDI)」とは、メーカーや機種が異なった音源でも、ほぼ同じ系統の音色で演奏が再現される ことを目的に設けられた、音源の音色配列やMIDI機能に関する一定の基準のことです。 「GM2」とは、「GM」に対し同時発音数、音色数、音色パラメーター、エフェクトなどの機能を拡張して規定 することにより、曲データのさらなる互換性を向上させることが可能な一定の基準です。「GM2」に準拠した 音源やソングデータには、このGM2マークがついています。 「XG」とは、音色の配列に関する「GM」をより拡張し、時代と共に複雑化、高度化していくコンピューター 周辺環境にも対応させ、豊かな表現力とデータの継続性を可能とした音源フォーマットです。 「XG」では、 音色の拡張方式やエディット方式、エフェクト構成やタイプなどを規定して、「GM」を大幅に拡張しました。 XGマークのついた市販ソングデータを、XGマークのついた音源で再生することによって、無数の拡張ボイス やエフェクト機能までも含めた壮大な演奏を手軽に楽しむことができます。 SMF (スタ
目次 安全上のご注意 ................................................................................2 ボイスリンクに登録されたボイスを削除する................................... 55 はじめに............................................................................................7 エフェクトリスト .........................................................................57 取扱説明書について ........................................................................7 付属品(お確かめください) .............................................................7 5.
レジストレーションなどのデータを読み込む........................ 123 リズムシーケンスプログラムを終了する ....................................... 179 ソングを再生する ...................................................................... 125 リズムシーケンスを再生する........................................................... 179 特定のパートだけを再生する ........................................................... 125 複数のシーケンスを順番に再生する ............................................... 179 早送り/早戻し/一時停止...................................................................
各部の名称 操作パネル (イラストはELS-02Cのものです) LOWER KEYBOARD VOICE1、2 (下鍵盤ボイス)(27ページ) REVERB(リバーブ)ボタン (49ページ) UPPER KEYBOARD VOICE1、2 (上鍵盤ボイス) (26ページ) UPPER KEYBOARD VOICE 1 REVERB BRILLIANCE MAX BRILLIANT モニタースピーカー STRINGS BRASS WOODWIND TUTTI PAD SYNTH 1 PIANO ORGAN PERCUSSION GUITAR CHOIR WORLD 2 MIN MELLOW LOWER KEYBOARD VOICE 1 SUSTAIN SUSTAIN(サステイン)ボタン (51ページ) BRILLIANCE BRILLIANT UPPER (KNEE) LOWER (KNEE) PEDAL STRINGS BRASS WOODWIND TUTTI PAD SYNTH 1 PIANO ORGAN PERCUSSIO
操作パネル LCDディスプレイ/ DISPLAY SELECT (ディスプレイセレクト) (14ページ) PEDAL VOICE 1、2 (ペダルボイス) (27ページ) DISPLAY SELECT VOICE DISPLAY A.B.C. M.O.C.
LCDディスプレイ/ディスプレイセレクト LCDディスプレイ/ディスプレイセレクト DISPLAY SELECT VOICE DISPLAY 3 A.B.C. M.O.C. 4 FOOT SWITCH 6 MDR 5 UTILITY 7 AUDIO 8 DATA CONTROL RHYTHM PROGRAM VOICE EDIT PATTERN SEQUENCE 9 ) U.ORGAN FLUTES @ 1 ! L.ORGAN ROTARY SP SPEED FLUTES # $ 2 1 LCDディスプレイ(タッチパネル) ........................... 16ページ 9 [VOICE EDIT](ボイスエディット)ボタン ...........142ページ 2 DATA CONTROL(データコントロール)ダイアル17ページ ) [PATTERN]ボタン ...............................................
1 基本操作 ここでは、電源の入れ方や、画面の見方、エレクトーンの基本設定など、エレクトーンを使う上で必要となる基本事項 について説明します。 3 演奏までの準備 1 エレクトーンの[P]電源スイッチを押して、オン にします。 電源プラグをAC100Vのコンセントに差し込み ます。 電源を切るときは、もう一度[P]電源スイッチを押し ます。 注意 電源が切れた状態でも微電流が流れています。楽器を長時間 使用しないときは、必ずコンセントから電源プラグを抜いて ください。 警告 誤ってエアコン用などの200Vのコンセントに接続しないようご注 意ください。 2 4 マスターボリュームを調節します。 MASTER VOLUME (マスターボリューム)ダイアルで は、エレクトーン全体の音量を調節します。 スピーカースイッチ(14ページ)がオンになって いることを確認します。 音量が下がる 音量が上がる REAR SPEAKER OFF ON MASTER VOLUME ELS-02Cの場合、リアスピーカー (REAR SPEAKER)もONにします。(後ろ側から音を出したく ないとき
画面の操作方法 ボタンを操作する 画面の操作方法 このエレクトーンの画面は、タッチパネルを搭載していま す。画面上の設定/選択したい項目に、直接触って操作でき ます。ただし、2か所以上の点を同時に操作することはでき ません。 また、ボリュームやリバーブなどの量を変更したい場合には、 画面の右にあるデータコントロールダイアル(14ページ)を使 います。 ここでは、画面上での操作について、主なものを紹介しま す。 画面に表示されるボタンを直接押すと、押したボタンが選択 できます。そのほかに、オン/オフを切り替えるタイプの ボタン、リストを表示させるためのボタンがあります。 オン/オフを切り替えるボタン: オン NOTE タッチパネルが汚れたら、柔らかい布で乾拭きしてください。 注記 先のとがったものや、爪などの硬いもので、画面を操作しないでく ださい。画面を傷つけるおそれがあります。 画面のページを切り替える 多くの画面では、画面の右上に数字などの書いてある楕円の ボタンが表示されています。 このボタン表示を押すことで、ページを切り替えることがで きます。選択されたページボタンはオレンジ色に変わりま
画面の操作方法 スライダーを直接触る方法: 1 基本操作 リストを表示させるボタン: 値を変更したい枠内を触ると、触った位置にスライダーが動 き、値が変更できます。また、スライダーのつまみ部分を指 で触った状態で上下に動かすと、値が変更できます。 触った位置にスライダーが移動 リストの中から目的のものを選ぶことができます。リスト内 の項目を選ぶと、自動的にリストが閉じます。リスト右上の [閉じる]ボタンを押してリストを閉じることもできます。 エフェクトタイプなどを選ぶときの操作です。 値を変更するボタン: [▲][▼]ボタンを使って大まかに値を変更できます。また、 データコントロールダイアルを回すと、値を一つずつ増減で きます。ゲートタイムやピッチコントロールなど、値を変更 する操作です。 つまみ部分を指で触った状態で上下に動かす データコントロールダイアルを使う方法: 値を変更したいスライダーの上部(パラメーターの名前が書 いてある部分)に触ると、そのスライダーに青枠が移動しま す。この状態でデータコントロールダイアルを回すと、値を 一つずつ増減できます。 ここを触るとスライダーに青枠が移
画面に関する基本設定 画面に関する基本設定 ここでは、エレクトーンを使う前に設定する項目について説 明します。 画面に表示させる言語を選ぶ エレクトーンの画面の表示言語は、初期状態で電源を入れた ときには日本語に設定されています。必要に応じて表示言語 を英語に切り替えることができます。(なお、この取扱説明 書では、表示言語は日本語で説明しています。) 1 タッチパネルの操作音を消す 初期状態で電源を入れたときには、タッチパネルを操作する たびに「ピッ」という音が鳴るように設定されています。 ステージで演奏するときなどは、この操作音を消すことがで きます。 1 [UTILITY]ボタンを押します。 ユーティリティー画面の設定ページが表示されます。 2 「タッチパネル操作音」の[OFF]ボタンを押すと、 タッチパネルの操作音はオフになります。 タッチパネル操作音 [UTILITY]ボタンを押します。 ユーティリティー画面の設定ページが表示されます。 これ以降、タッチパネルを操作しても「ピッ」という 音は鳴らなくなります。再び操作音を鳴らしたいとき は、手順2で[ON]を押してください。 NOT
音声ガイド ボイスディスプレイ 音声ガイドとは、画面の表示内容や実行した操作などを音声 で読み上げる機能です。この機能を使うには、ヤマハウェブ サイトから音声ガイドファイルをダウンロードし、それを保 存したUSBフラッシュメモリーを楽器本体に接続する必要 があります。 音声ガイドの詳しい使い方については、音声ガイド活用マ ニュアル(テキストファイル)をご覧ください。 音声ガイドファイルと音声ガイド活用マニュアルのダウン ロードについては、下記URLの製品情報より対象モデルの サイトにアクセスし、特長のページをご覧ください。 電源を入れたときに表示される画面がボイスディスプレイで す。ボイスディスプレイでは、各鍵盤に設定されているボイ スや、リズム、右フットスイッチ(レジストレーションシフ ト)などのあらゆるデータを確認したり、各ボイスセクショ ンのミュート設定をしたりできる、エレクトーンの最も基本 的な画面といえます。 ここでは、ボイスディスプレイの見方を説明します。操作方 法については、関連ページをご覧ください。 https://jp.yamaha.
ボイスディスプレイ ジストレーションが記録されているかどうかは、バンク名表 示(A〜E)のオン/オフで判別できます。 ボイスディスプレイ【ページ1】 画面切り替え 関連ページ • レジストレーションメモリーとバンク(98ページ) • 別のバンクにレジストレーションを記録する(99ページ) 1 8 レジストレーションシフト表示 レジストレーションシフトの状態を表示します。 8 7 2 3 関連ページ • レジストレーションシフト(102ページ) ボイスディスプレイ【ページ2】 4 5 6 1 ボイス名表示 各ボイスセクションに現在選ばれているボイス名が表示され ます。また、それぞれのボイス名を押すことで、特定のボイ スセクションだけをミュート(消音)することもできます。 ボイス名を押すたびに、音が出る状態とミュートとが切り替 わります。 関連ページ • ボイスを選ぶ(27ページ) 2 リズム名表示 現在選ばれているリズム名が表示されます。 関連ページ • リズムを選ぶ(59ページ) あるパラメーター (リバーブ、ボリューム、パンなど)の、 各レジストレーションメモリーでの値を確認でき
レジストレーションメニュー レジストレーションメニュー 1 基本操作 ここで画面を切り替えます エレクトーンでは、上鍵盤、下鍵盤、ペダル鍵盤のボイスや リズムなどの組み合わせのことを「レジストレーション」と いいます。REGISTRATION MENU (レジストレーション メニュー )の[1]〜[5]ボタンには、それぞれ異なったジャン ルのレジストレーションが用意されています。演奏したい曲 のジャンルにあわせて、それぞれのボタンを使い分けてくだ さい。 NOTE 選んだレジストレーションのボタンはオレンジ色に変 わります。また、画面の下にはオートベースコードの 状態が表示されます。 レジストレーションメモリー 1〜16にも、基本的なレジストレー ションがプリセットされています(98ページ)。 関連ページ レジストレーションを選ぶ 1 • オートベースコード(69ページ) REGISTRATION MENU (レジストレーション メニュー )の[1]〜[5]ボタンのいずれかを押しま す。 3 選んだレジストレーションで、好きな曲を弾いて みましょう。 各ボタンにどんなレジストレー
レジストレーションメニュー レジストレーションメニューリスト レジストレーションメニューリスト 01 画面番号 1 2 3 4 5 (ELS-02C/ ELS-02X) 22 レジストレーションメニュー1 01 キッズ レジストレーションメニュー2 01 ポップス & ロック レジストレーションメニュー3 01 ダンス & バラード レジストレーションメニュー4 01 ジャズ & ラテン シンプル 8ビート 1 シンプル 8ビート 2 レジストレーションメニュー5 01 シンフォニー & ワールド ダイナミック 8ビート オルガン バラード ブロー オン サックス ファンファーレ NY バラード ドラマチック バラード サックス アンサンブル ストリング オーケストラ ライト ステップ ブリティッシュ ポップ ラブ バラード ムーンライト ロマンチック バイオリン サニー ポップ 8ビート モダン スムース リード ビッグ バンド バロック キッズ マーチ 1 ロック バンド ポップ バラード クラリネット スイング フルート&ハープ キ
レジストレーションメニュー レジストレーションメニューリスト 02 1 2 レジストレーションメニュー1 02 シンプル レジストレーションメニュー2 02 ポップス & ロック SR ストリングス 1 70s イージー ポップ SR ストリングス 2 ボーイズギターバラード SR オーケストラ 1 ソウル ポップ SR オーケストラ 2 レジストレーションメニュー4 02 ジャズ & ラテン レジストレーションメニュー5 02 シンフォニー & ワールド R&B ポップ バラード ビッグバンド トゥッティ オーケストラ フル ユニット R&B ソウル バラード アルト サックス コンボ ストリング クラシック R&B クール バラード ジャズ コンボ ファスト スイート ピチカート 70s トップ デュオ クール AOR ジャズ コンボ 66 バロック シンフォニー SR オーケストラ 3 デイドリーム シャッフル スイート チャート ヒット ザ ビッグバンド *A ノスタルジック グリーン SR ポップス 1 オールディーズ ポップ ス
レジストレーションメニュー 画面番号 6 7 レジストレーションメニュー1 02 シンプル レジストレーションメニュー2 02 ポップス & ロック クラシカルオルガン チャペル J-Pop ピアノ バンド クラシカルオルガン ホール J-Pop ボーイズ ロック オルガン バラード J-Pop シャッフルビート R&B ロック オルガン J-Popバンドバラード オルガン コンボ ブリージー バラード 6/8 オルガン バラード ヒーローレンジャーテーマ ソウル ジャズ オルガン サンセット ポップ ポップ オルガン 60s ファンキーパンチ *A トイ オルガン ファンキーパンチ *B シアター オルガン NY ギャラクシーバトルシップA ノスタルジック オルガン ギャラクシーバトルシップB J-Pop アニメ *A J-Pop アニメ *B 70s ハニー 70s ヒーロー DBZ *A DBZ *B DBZ *C DBZ *D 24 ELS-02/ELS-02C/ELS-02X 取扱説明書 レジストレーションメニュー3 02ダンス & バラード
バージョンを確認する 次の手順でエレクトーンのバージョンを確認できます。 1 [UTILITY]ボタンを押します。 ユーティリティー画面が表示されます。 2 設定ページで[バージョン]ボタンを押します。 エレクトーンの初期化 基本操作 バージョンを確認する 1 すべてのデータをリセットして、エレクトーンを初期状態に 戻すことができます。画面の言語設定やタッチパネル操作音 のオン/オフも含めたすべての情報をリセットします。 無線LAN接続に関する設定だけは、この操作ではリセット されません。204ページの方法で初期化をする必要があり ます。 関連ページ • レジストレーションを保存する(121ページ) • 無線LAN設定を初期化する(204ページ) 1 いったん、エレクトーンの電源を切ります。 2 パネルの左下にあるENDING [1]ボタンを押し ながら電源を入れます。 ENDING 画面に、バージョンを示すダイアログが表示されます。 [OK]を押すと、ダイアログが閉じます。 1 2 3 本体ファームウェアのバージョンアップ ヤマハ製品では、機能や操作性向上のために、不
2 ボイス(楽器音色) このエレクトーンには、900種類以上の多彩でリアルな楽器音色が内蔵されており、上鍵盤、下鍵盤、ペダル鍵盤の どの鍵盤にも呼び出して演奏できます。これらの楽器音色のことを、「ボイス」といいます。上鍵盤では4つ、下鍵盤で は2つ、ペダル鍵盤では2つのボイスを重ねて鳴らすことができます。 上鍵盤のボイスセクションのボタン 下鍵盤の ボイスセクションの ボタン ペダル鍵盤の ボイスセクションの ボタン 各鍵盤で選べるボイス 上鍵盤ボイス 上鍵盤ボイス1、上鍵盤ボイス2、リードボイス1、リードボイス2の4つのボイスセクションがあり、それぞれのボイ スセクションで選んだボイスを重ねて鳴らすことができます。各ボイスセクションのボイスは、パネル上のUPPER KEYBOARD VOICE 1、UPPER KEYBOARD VOICE 2、LEAD VOICE 1、LEAD VOICE 2のボタン群で選びま す。 上鍵盤ボイス1 上鍵盤ボイス2 UPPER KEYBOARD VOICE 1 BRILLIANCE BRILLIANT STRINGS BRASS WOODWIND T
ボイスボタンでボイスを選ぶ 下鍵盤ボイス 下鍵盤ボイス1、下鍵盤ボイス2の2つのボイスセクションがあり、それぞれパネル上のLOWER KEYBOARD VOICE 1、LOWER KEYBOARD VOICE 2のボタン群でボイスを選びます。 下鍵盤ボイス2 LOWER KEYBOARD VOICE 1 BRILLIANCE BRASS WOODWIND TUTTI PAD SYNTH 1 PIANO ORGAN PERCUSSION GUITAR CHOIR WORLD 2 LOWER KEYBOARD VOICE 2 VOLUME BRILLIANCE MAX BRILLIANT STRINGS STRINGS BRASS WOODWIND TUTTI PAD SYNTH 1 PIANO ORGAN PERCUSSION GUITAR CHOIR WORLD 2 MIN MELLOW 2 ボイス ︵楽器音色︶ 下鍵盤ボイス1 VOLUME BRILLIANT MAX MELLOW MIN ペダルボイス ペダルボイス
ボイスボタンでボイスを選ぶ クションのユーザーボタンから呼び出される画面中のボイス リンクカテゴリーから選択できます。登録の手順について は、53ページをご覧ください。 NOTE ボリュームの値によっては、パネル上のVOLUMEボタンは2つ点灯 します。 ボイスメニュー画面とボイスコンディション 画面の切り替え 音量を変える 音量を設定するには、ボイスセクションのボリュームボタン を使う方法と、画面上で設定する方法があります。画面上の ボリュームスライダーで設定する方が、音量を細かく設定で きます。 パネル上のボイスボタンを一度押すと、そのボイスの ボイスメニューが画面上に表示されます。もう一度押す と、ボイスコンディション画面が表示されます。ボイス ボタンを押すたびに、ボイスメニューとボイスコンディ ション画面が切り替わります。 UPPER KEYBOARD VOICE 1 ボリュームボタンでの設定: それぞれのボイスセクションの右端にあるVOLUMEボタン を使用します。7段階の設定が可能です。 MIN (一番下)にすると、音は鳴りません。 UPPER KEYBOARD VOICE 1 BR
ボイスボタンでボイスを選ぶ TO LOWER (トゥーロワー )機能 LEAD VOICE 1 BRILLIANCE BRILLIANT VIOLIN SYNTH 1 FLUTE TRUMPET TO LOWER MELLOW PEDAL VOICE 1 BRILLIANCE BRILLIANT CONTRA BASS ELEC.
ユーザーボタンでボイスを選ぶ ここではパーカッションのカテゴリーからマリンバ1 を選んでみましょう。 画面上に表示されている楽器のカテゴリーから 「パーカッション」を選びます。 ユーザーボタンでボイスを 選ぶ 関連ページ • ボイスリスト(31ページ) このエレクトーンには、パネル上のボイスボタン数よりはる かに多くのボイスが内蔵されています。ここでは、それぞれ のボイスセクションの全ボイス(VA音色以外)や、自分でエ ディットして作成したユーザーボイスを自在に使いこなせる 便利なユーザーボタンについて説明します。 ユーザーボタンは、各ボイスセクションの右側に2つまたは 1つある、数字の書いてあるボタンです。 ユーザーボタンを使って、パネル上にボイスボタンがない ボイスを選んでみましょう。 1 使用したいボイスセクションのユーザーボタンを 押します。 UPPER KEYBOARD VOICE 1 BRILLIANCE STRINGS BRASS WOODWIND TUTTI PAD SYNTH 1 PIANO ORGAN PERCUSSION GUITAR CHOIR
ボイスリスト ボイスリスト ボイス ︵楽器音色︶ 2 内蔵されているボイスの一覧です。リストの左の数字は、画面上の数字と対応しています。 ELS-02/ELS-02C/ELS-02X共通 STRINGS/VIOLIN (ストリングス/バイオリン) 1 4 オクターブ ストリングス3 5 バイオリン 1 ブラス セクション 9 ストリングス 1 バイオリン 2 パワー ブラス 1 ストリングス 2 バイオリン 3 パワー ブラス 2 ミュート トランペット 2 ストリングス 3 バイオリン 4 パワー ブラス 3 ミュート トランペット 3 ストリングス 4 バイオリン 5 ソフト ブラス 1 ミュート トランペット 4 ストリングス 5 バイオリン 6 ソフト ブラス 2 コルネット ストリングス 6 バイオリン 7 ソフト ブラス 3 ミュート コルネット ストリングス 7 バイオリン 8 S-ブラスセクション Lgt フリューゲル ホルン 1 ストリングス 8 S-バイオリン 1 S-ブラスセクション フォール フリューゲル
ボイスリスト 1 ピッコロ 2 リコーダー 1 ウッドウィンド 5 ゴスペル クワイア 3 スムース パッド 6 リコーダー 2 ウッドウィンド 6 S-ゴスペルクワイア Hmm スムース パッド 7 オカリナ ウッドウィンド 7 S-ゴスペルクワイアH/Ah スムース パッド 8 ホイッスル クラリネット&フルート S-ゴスペルクワイア Wow クラリネット 1 クラリネット&オーボエ S-ゴスペルクワイアW/Hy クラリネット 2 フルート&オーボエ クラリネット 3 ウッドウィンド&グロッケン 3 スムース パッド 5 スムース パッド 9 2 レゾナンス パッド 1 レゾナンス パッド 3 ポップボーカル Haa 2 レゾナンス パッド 4 クラリネット 5 ポップボーカル Ooh 1 レゾナンス パッド 5 4 TUTTI (トゥッティ ) ポップボーカル Ooh 2 レゾナンス パッド 6 ストリングス&ウィンズ ポップボーカル Ooh 3 レゾナンス パッド 7 S-クラリネット 2 ストリングス&ブラス 1
ボイスリスト 7 アンビ パッド 1 ファット Saw リード 6 シンセ サックス フィルター リード 1 シンセ トランペット シンセ ベル 2 アンビ パッド 5 フィルター リード 2 シンセ バイオリン シンセ ベル 3 アンビ パッド 6 フィルター リード 3 シンセ ブラス 1 シンセ ベル 4 ウォーム パッド 1 フィルター リード 4 シンセ ブラス 2 シンセ ベル 5 ウォーム パッド 2 フィルター リード 5 シンセ ブラス 3 シンセ ベル 6 ウォーム パッド 3 フィルター リード 6 シンセ ブラス 4 ウォーム パッド 4 フィルター リード 7 シンセ ブラス 5 3 8 Oct シンセストリングス 3 12 シンセ ベル 1 スカイ ベル 1 ソフト リード 1 シンセ ブラス 6 スカイ ベル 2 ソフト リード 2 シンセ ブラス 7 ボックス ベル 1 ダーク パッド 1 ソフト リード 3 シンセ ブラス 8 ボックス ベル 2 ダーク パッド 2 ソフト リード 4
ボイスリスト 2 シアター オルガン 1 2 Vin オルガン Fast 3 DX エレピ 2 トーン ホイール オルガン 1 DX エレピ 3 ジャズ ギター 2 シアター オルガン 6 トーン ホイール オルガン 2 DX エレピ 4 ジャズ ギター 3 シアター オルガン 7 トーン ホイール オルガン 3 DX エレピ 5 ジャズ ギター 4 シアター オルガン 8 トーン ホイール オルガン 4 DX エレピ 6 ジャズ ギター スライド シアター オルガン 9 トーン ホイール オルガン 5 DX エレピ スウィート 1 ジャズ ギター Oct ポップ オルガン 1 DX エレピ スウィート 2 S-ジャズ ギター 1 シアター ティビア フル ポップ オルガン 2 DX エレピ&パッド 1 S-ジャズ ギター 2 シアター ティビア 8&4 ポップ オルガン 3 DX エレピ&パッド 2 シアター ティビア 16&4 ポップ オルガン 4 ギャラクシー エレピ シアター Tp & キヌラ ポップ オルガン 5 DX
ボイスリスト 7 ディストーション ギター 3 ディストーション ギター 4 TIMPANI (ティンパニ) 1 S-パン フルート 1 ディストーション ギター 7 ティンパニ 4 ファンク ベース 3 S-パン フルート 2 ディストーション ギター 8 ティンパニ 5 ファンク ベース 4 S-アイリッシュ パイプ 1 ディストーション ギター 9 ティンパニ ロール 1 ファンク ベース 5 S-アイリッシュ パイプ 2 S-ディスト ソリッド 1 ティンパニ ロール 2 ファンク ベース 6 バグパイプ S-ディスト ソリッド 2 ティンパニ ロール 3 ファンク ベース 7 ダルシマー 1 S-ディスト ソリッド 3 ティンパニ ロール 4 ファンク ベース 8 ダルシマー 2 S-ディスト ソリッド 4 S-ティンパニ ロール ファンク ベース 9 ツィター S-ティンパニ ロール fp ファンク ベース 10 2 Sディスト ビンテージ 1 Sディスト ビンテージ 2 S-ディスト クランチ 1 ELECTRIC BASS
ボイスリスト スーパーアーティキュレーションボイス補足リスト ここにあるリストは、31〜35ページにあるボイスリストのうち、「S-」で始まるボイスにつき、演奏時にどのような効果が得 られるかを説明したものです。リスト中の各項目の意味は以下のとおりです。 • スーパーアーティキュレーション: この欄には、通常の鍵盤演奏で得られる効果が書かれています。表中にある「AEM」につい ては、9ページをご覧ください。また「キーオフサンプリング」とは、鍵盤から指を離したときにも、演奏中のボイスに特有の音が 鳴ることを示しています。 • オート: この欄には、ボイスコンディション画面のページ2にある「オート」(48ページ)をONにしたときの鍵盤演奏で得られる効果 が書かれています。表中に (オクターブ) が添記されている効果は、短7度、長7度、オクターブの音程をレガートで演奏をした場合 に得られる効果です。 • ART.1 / ART.2: この欄には、ボイスコンディション画面のページ2にある「フットスイッチレフト」(48ページ)の、[ART.1] または[ART.
ボイスリスト カテゴリー CHOIR (クワイア) 音色名 スーパー アーティキュレーション ― ― ― レガート ― ― ― S-クワイアソフト Ooh レガート ― ― ― S-クワイアBoys Ooh レガート ― S-ゴスペルクワイア Hmm キーオフサンプリング、 レガート ― 効果音 ― "Aah" ― 効果音 キーオフサンプリング、 レガート ― ― "Hey" S-ゴスペルクワイア Hey キーオフサンプリング、 レガート ― 効果音 タイプ 2 ― 効果音 A ― 効果音 B A ― 効果音 B A S-シュビドゥバ/Hmm スキャット ― "Hmm" ― C S-シュビドゥバ/Wah スキャット ― "Wah" ― C S-シュビドゥバ/Doo スキャット ― "Doo" ― C S-シュバドゥバ/Daa スキャット ― "Daa" ― C S-ドゥバビ/Shoo スキャット ― "Shoo" ― C S-ドゥビドゥビ/Wah スキャット ―
ボイスリスト カテゴリー GUITAR (ギター ) 音色名 S-スチールギター 1 スーパー アーティキュレーション キーオフサンプリング、 レガート S-スチールギター 2 ― 効果音 ART.2 効果音 タイプ A ― ハーモニクス キーオフサンプリング、 レガート ― 効果音 効果音 A S-ジャズギター 2 キーオフサンプリング、 レガート ― 効果音 効果音 A ― B S-ジャズギター 3 キーオフサンプリング ― オクターブ奏法 S-クリーン ソリッド 1 キーオフサンプリング、 レガート ― 効果音 効果音 A S-クリーン ソリッド 2 レガート ― 効果音 効果音 A S-クリーン ソリッド 3 レガート ― 効果音 効果音 S-クリーン ギター 1 キーオフサンプリング ― ハーモニクス ― ハーモニクス ― 効果音 効果音 A S-クリーン ギター 3 キーオフサンプリング、 レガート S-クリーン ギター 4 38 ART.
ボイスリスト カテゴリー WORLD (ワールド) 音色名 スーパー アーティキュレーション S-アイリッシュ パイプ 2 レガート、装飾音(AEM) S-中国琵琶(ビワ) キーオフサンプリング オート ART.1 ベンドダウン ベンドアップ/ ベンドダウン ― ART.
ボイスリスト 3 ボイス名 推奨音域 音色解説 V-ストリングボウ C1〜C6 バイオリンの弦を弓とは違うものでこすったようなスローアタックな音色。音域が広いトリル奏法で音 が裏返ります。 V-コスモシス C1〜G5 イニシャルタッチでアタック音に変化のある擦弦楽器系の音色です。 V-エレクトリック バイオリン C1〜C6 シンセバイオリン風の音色です。 V-ボウ C1〜C5 サックスをバイオリンの弓で擦ったような音色です。 V-クラビオリン G2〜G5 バイオリンと木管楽器の中間的な音色の仮想楽器です。 V-エアボウ C2〜G5 ノイズ混じりの擦弦系の音色です。 V-ワスピーホーン C1〜G4 金管楽器のマウスピースを木管楽器につけたような音色。アフタータッチでミュートの具合が変えられ ます。また、ホリゾンタルタッチでトランペットと同様の効果が得られます。 V-ミズホーン C1〜C6 ハーモニカとトランペットの中間のような仮想楽器です。 V-コスモミュート C1〜C5 タッチでミュート効果がかかるディストーション感のある金管楽器風音色です。 V
搭載されている音源について 搭載されている音源について VA音源は、リードボイス2のボイスセクションのボイス用 に採用されており、AWM音源は、それ以外のすべてのボイ スセクションのボイス用に採用されています。 AWM音源 AWM音源は、実際の楽器の音をサンプリングして、複雑な 波形をデジタルデータとして再現することで、リアルな楽器 音をつくり出します。ここでは特別な操作が必要なスーパー アーティキュレーションボイスについて説明します。 スーパーアーティキュレーションボイス スーパーアーティキュレーションボイスは、アコースティッ ク楽器のリアルなサウンドや奏法を再現する音源技術が使わ れています。ギターの弦と指が擦れるノイズやハーモニク ス、エレピの鍵盤アクションノイズまでリアルに再現してい ます。ジャズの即興で使われる歌唱法で「シュビドゥバ…」 といったスキャット、レガート、ベンド、グリッサンド等の 奏法も、奏者の息使いが感じられるほど自然な演奏表現が可 能です。弾き方や左フットスイッチで、自由な表情付けがで きます。スーパーアーティキュレーションボイスには、 「S-」で始まるボイス名がつけられてい
3 オルガンフルート(ELS-02C/ELS-02X) ELS-02C/ELS-02Xにはオルガンフルート機能があり、多彩なスタイルのオリジナルオルガンサウンドをつくること ができます。伝統的なオルガンと同じように、フッテージレバーで各フッテージのレベルを上げ下げしたり、パーカッ シブサウンドを加えたりして、ゴージャスなフルオルガンサウンドが思いどおりにつくれます。9種類のフルートフッ テージと3種類のアタックフッテージを組み合わせて、さまざまなオルガンサウンドをつくってみましょう。 1 [U. ORGAN FLUTES]ボタン(上鍵盤のオルガ ンフルート)、または[L. ORGAN FLUTES]ボ タン(下鍵盤のオルガンフルート)を押します。 ボタンを押すとボタンのランプが点灯し、フルート フッテージの画面が表示されます。 なお、ELS-02にはオルガンフルート機能はないので、 [U. ORGAN FLUTES]ボタンや[L. ORGAN FLUTES]ボタンを押しても何も起こりません。 DISPLAY SELECT VOICE DISPLAY A.B.C. M.O.C.
4 リバーブ エフェクトページ オルガンサウンドにかかるリバーブの量を設定します。ここ でリバーブを最大にしても、パネル上のリバーブ量を上げな いと、リバーブ効果は得られません。 1 関連ページ 5 ボリューム オルガンフルートの全体の音量を決定します。各フッテージ のバランスを保ったままで音量を変更できます。ここが0に なっていると、オルガンフルートの音は出ません。 5 2 オルガンフルート 3 • リバーブ(49ページ) 1 エフェクトタイプ 右上の[ビブラート]ボタンを押してビブラート ページを表示させ、ビブラートに関する詳細を設 定します。 ビブラートページ オルガンサウンドに固有の、ロータリースピーカー (トレモ ロ効果)の設定をします。エフェクトタイプのボタンを押す と、ロータリースピーカーのエフェクトタイプ一覧が画面に 表示されます。一覧の中から使用したいエフェクトタイプを 選びます。 [閉じる]ボタンを押すと、エフェクトタイプを選択せずに一 覧表示を閉じます。 関連ページ • エフェクトリスト(57ページ) • ロータリースピーカー (52ページ) 1 1 -1
オルガンフルート機能とパイプオルガン オルガンフルート機能は、伝統的なオルガンの構造をシミュレートしています。ここでは簡 単に、パイプオルガンと電気オルガンの仕組みについてご紹介します。 パイプオルガンは、鍵盤を弾くとその鍵盤につながれたパイプに空気が送られて、リードの ついたパイプから、正弦波に近い、 「ポー」という縦笛のような音が出ます。素材や形状の違 うパイプがいくつもあり、その一本一本が、音色を構成する倍音を担当するという構造に なっています。これらのパイプにどれだけの空気を送るかを決める、「音栓(ストップ)」と呼 ばれるレバーがあり、この音栓の組み合わせで、クラリネットやオーボエ、フルートのよう な音など、さまざまな音色を合成できるのです。このように合成された音は、教会やホール の全体に反響し、重厚な音の広がりを持って演奏されます。 やがて技術が発達すると、パイプオルガンを電気的に実現した電気オルガンが登場し、小さ な教会やレストランなどでもパイプオルガンそっくりの演奏が聴けるようになりました。 1930年頃に作られた、最も普及したタイプのものは、今でも世界中で愛されています。 それは、1つの鍵盤が
4 コントロールとエフェクト ボイスコンディション画面やパネル上のボタンを使用して、選択したボイスに色々なコントロールやエフェクトを加え て、多彩に変化させることができます。 また、ボイスによっては、あらかじめエフェクトが設定されているものもありますが、すべてお好みに応じて変更でき ます。搭載したエフェクトは、すべてデジタルエフェクトです。 下図は個々のボイスセクションに設定可能なコントロールやエフェクトのリストです。コントロール/エフェクトは種類 によってかかり方が異なり、ボイスセクションごと、鍵盤ごと、そして楽器全体にかかるものがあります。 設定方法 コントロールとエ フ ェ ク ト コントロール/エフェクト 4 コントロール/エフェクトを設定できるボイスセクション 上鍵盤 リードボイス 下鍵盤 ペダル鍵盤 上鍵盤ボイス1 上鍵盤ボイス2 オルガン フルート リードボイス1 リードボイス2 下鍵盤ボイス1 下鍵盤ボイス2 オルガン フルート ペダルボイス1 ペダルボイス2 ボイスコンディション画面で設定 ボタンで設定 パン 46ページ ○ ― ○ ○ ―
ボイスコンディション画面で設定するもの 3 タッチトーン ボイスコンディション画面 で設定するもの パネル上のボイスボタンを二度続けて押すと(画面上に使用 したいボイスがすでに表示されている場合は一度だけ押す と)、画面上にボイスコンディション画面が現れます。 各ボイスにはそれぞれ5ページのボイスコンディション画面 があり、画面右上の[1]〜[5]ボタンでページを切り替えま す。 ボイスコンディション画面【ページ1】 タッチトーンは、弾き方によって音量や音質を変化させる機 能です。より豊かに、またはより繊細に表現する力を発揮す るもので、個々の楽器特有の微妙な表現が可能となります。 タッチトーンには、イニシャルタッチとアフタータッチの 2種類があり、ボイスセクションごとに設定できます。 3-1 イニシャルタッチ 鍵盤を押すスピードによって、音量と音質をコント ロールします。一般的に、鍵盤をより強く弾けばそれ だけ音量は大きくなり、音質は明るくなります。 レベルを0にするとイニシャルタッチはかからなくな り、レベルを上げると、タッチによる変化が大きくな ります。 設定範囲:0〜14 NOTE 1
ボイスコンディション画面で設定するもの 4-2 アフタータッチ 鍵盤を押さえつける強さ(アフタータッチ)によって、 音程をコントロールします。 レベルを0にするとアフタータッチはかからなくなり ます。プラスの値にすると、鍵盤を押す強さに応じて 音程が高くなり、マイナスの値にすると、鍵盤を押す 強さに応じて音程が低くなります。+14または−14 にレベルを近づけるほど、アフタータッチによる変化 幅が大きくなります。 設定範囲:−14〜+14 ボイスコンディション画面【ページ2】 1 -1 1 3 4 5 フィート ボイスセクションごとに異なったオクターブに設定でき、 1つのボイスを幅広い音域で使用することができます。4'、 8'、16'の3種類の設定が選べます。ペダルボイスセクショ ンの場合はさらに2'の設定が追加されます。プリセットを選 ぶと、そのボイスにあらかじめ設定された、最適なフィート になります。 6 リバーブ ボイスセクションごとにかけるリバーブの量を設定します。 このリバーブを最大にしても、パネル上のリバーブ量を上げ ないと、リバーブ効果は得られません。詳しくは49ページ をご覧くださ
ボイスコンディション画面で設定するもの 2 タッチビブラート タッチビブラートのオン/オフを切り替えます。タッチビブ ラートをオンにすると、演奏中に鍵盤を強く押さえること (アフタータッチ)によって、ビブラートをかけることができ ます。鍵盤をさらに強く押さえると、ビブラートはより深く なります。タッチビブラートをオフにすると、鍵盤を押さえ る強さを変えてもビブラートの深さは変わりません。 ボイスコンディション画面【ページ3、4】 2 1 NOTE ELS-02では、ペダルボイスにはタッチビブラートはありません。 3 スライド(リードボイスのみ) スライドは、レガートで演奏したときに、ポルタメント効果 (続けて弾いた2つの音をなめらかにつなげる効果)を加えま す。リードボイスに、1オクターブの範囲内でかけることが できます。1オクターブ以上離れた音を弾いた場合には、 スライドの効果はかかりません。 関連ページ • リードスライドをコントロールする: ニーレバー (185ページ) 3-1 ON/ニーレバー /OFF スライドのオン/オフ、またはニーレバーでの設定を 選択できます。 3-2 タイム ス
パネル上のボタンで設定するもの 3 エフェクトパラメーター 選択しているエフェクトタイプに応じたパラメーターが表示 されます。 パネル上のボタンで設定す るもの ボイスコンディション画面【ページ5】 リバーブやサステイン、ブリリアンス、そしてロータリース ピーカーは、パネル上のボタンを使って、それぞれのページ を画面上に呼び出して、設定します。 コントロールとエ フ ェ ク ト 4 リバーブ 1 2 1 トランスポーズ ボイスセクションごとに、音程を変える(移調する)ことがで きます。 −6〜+6の範囲で、半音ずつ移調できます。 リバーブによって、広い部屋やコンサートホールで演奏して いるような、音が響きわたる効果を得ることができます。 ボイスセクションごとにリバーブをかける量を設定したり、 リズムとアカンパニメントそれぞれにリバーブ量を設定した りできます。 リバーブを設定するには: パネル上の左端にあるREVERB (リバーブ)ボタンを押しま す。画面上にリバーブ画面が現れます。 関連ページ REVERB • トランスポーズ:楽器全体(187ページ) MAX 2 チューン
パネル上のボタンで設定するもの リバーブ画面【ページ2】 1 2 リバーブ画面【ページ3】 3 1 タイプ 各ボイスセクションのボイスとオルガンフルート音色にかか るリバーブのタイプ(種類)を選択します。 ホール、ルーム、ステージなどさまざまなタイプのリバーブ が選択できます。 タイプボタンを押すことで、選択できるリバーブタイプの 一覧が画面に表示されます。 このページでは、ボイスセクションごとにリバーブのかかる 深さを設定します。 それぞれのボイスセクションのボイスコンディション画面 1ページ目にある、リバーブスライダーと同じものです。 設定範囲:0〜24 リバーブ画面【ページ4】 関連ページ • エフェクトリスト(57ページ) 画面を切り替えます 1 2 3 4 1 タイプ リズムやアカンパニメント、キーボードパーカッション、 マイク入力にかかるリバーブの種類を選択します。 画面上の[1]、[2]ボタンを押すことで画面を切り替えて、現 在表示されてないエフェクトタイプを表示させることもでき ます。一覧の中から使用したいリバーブタイプを選びます。 [閉じる]ボタンを押すと、リバー
パネル上のボタンで設定するもの サステイン サステインは、鍵盤から指をはなしたあとに音に余韻を与え る効果です。鍵盤ごとにオン/オフを切り替えたり、ボイス セクションごとにサステインの長さを調節したりできます。 また、ニーレバーを使ってサステインのオン/オフを切り替 えることもできます。サステインはリードボイスにはかかり ません。 関連ページ • ニーレバー (183ページ) • 以下の音色では、ホールドのみ効果します。サステインレングス が0〜12の時は音の余韻に変化はありません。 S-バイオリン 1/ 2 S-テナー サックス 1/2/3 S-トランペット 1/2 S-テナーサックス グロウル S-トロンボーン S-ソプラノサックス S-フルート S-ソプラノサックスグロウル S-フルート フラッター S-ハーモニカ S-クラリネット 1/2 S-ブルースハープ S-アルトサックス S-パン フルート 1/2 S-アルトサックス グロウル S-アイリッシュ パイプ 1/2 4 コントロールとエ フ ェ ク ト • ペダルボイスをホールドにして演奏すると、スーパーアーティ キュレーションボイス(ただ
パネル上のボタンで設定するもの DISPLAY SELECT ロータリースピーカー ロータリースピーカーは、スピーカーを回転させて得られる ような、豊かで広がりのある効果(トレモロ効果)をつくり出 すエフェクトです。パネル上の[ROTARY SP SPEED]ボ タンや、左フットスイッチを使って、演奏中もリアルタイム で効果をオン/オフできます。 ロータリースピーカーは、パネル面の[ROTARY SP SPEED]ボタンをオンにするだけでは、効果は得られませ ん。以下の手順で設定する必要があります。 1 トレモロ効果をかけたいボイスセクション、また はオルガンフルート音色で、エフェクトにロータ リースピーカーを選択します。 VOICE DISPLAY A.B.C. M.O.C. MDR FOOT SWITCH UTILITY AUDIO RHYTHM PROGRAM VOICE EDIT PATTERN SEQUENCE U.ORGAN FLUTES L.
ボイスリンクを活用する ボイスリンクを活用する 設定内容が登録され、画面に表示されたボイス名の右 横にボイスリンク表示が現われます。 ボイスコンディション画面の設定 をボイスリンクに登録する 1 ボイスコンディション画面で必要な設定を行ない ます。 コントロールとエ フ ェ ク ト 4 ボイスコンディション画面の現在の設定(ボリュームとブリ リアンスは除く)を、そのまま1つのボイスとしてボイスリ ンクに登録します。 このリンク表示はボイスディスプレイ画面でも表示さ れ、どのボイスセクションがボイスリンクを使ってい るか、確認ができます。 ここでは、フィートを「4'」に設定します。 ボイスリンクを使用している表示 2 画面左上にある[リンク]ボタンを押します。 3 [登録]ボタンを押します。 NOTE 手順3の操作で、すでに同じ名前のボイスがボイスリンクに登 録されている場合は、[登録]ボタンがグレーアウト表示されて 押せません。これはすでに同名のボイスがボイスリンクに登 録されていることを示しています。この場合は、[名前変更]ボ タンを押してボイス名を変更してからボイスリンクに登録
ボイスリンクを活用する ボイスリンクに登録されたボイス を選択する 1 使用したいボイスセクションのユーザーボタンを 押します。 UPPER KEYBOARD VOICE 1 BRILLIANCE BRILLIANT STRINGS BRASS WOODWIND TUTTI PAD SYNTH 1 PIANO ORGAN PERCUSSION GUITAR CHOIR WORLD 2 VOLUME MAX ボイスリンクからボイスを解除する すでにボイスリンクに登録されているボイスにつき、他のボ イスセクションや他のレジストレーションメモリー番号へ影 響させずにボイスコンディション画面上の設定を変えたい場 合は、該当ボイスをいったんボイスリンクから解除してか ら、再度名前を変えてボイスリンクに登録(55ページ)して ください。 1 MELLOW ボイスリンクのカテゴリー内のボイスメニューか ら解除したいボイスを選びます。 MIN ユーザーボタン 2 画面右上のカテゴリー群の中からボイスリンクの ボタンを押して表示されるボイス群の中から、使 用したいボイス(ここ
ボイスリンクを活用する 設定内容が登録され、画面に表示されたボイス名の右 横にボイスリンク表示が現われます。 ボイス名を変えてボイスリンクに 登録する ボイス名を変えてボイスリンクに登録したい場合の操作方法 を説明します。 1 ボイスリンクに登録するときに[名前変更]ボタン を押します。 コントロールとエ フ ェ ク ト 4 ボイスリンクに登録されたボイス を削除する 2 ボイス名を変更し、[OK]ボタンを押します。 ボイスリンクに登録できるボイスの数は80個までです。 足りなくなってきたときは、使用していないボイスを削除し ましょう。削除は、どのボイスセクションでも操作できま す。 1 ボイスリンクのカテゴリー内のボイスメニューか ら削除したいボイスを選択します。 関連ページ • ソングに名前を付ける(119ページ) 3 [登録]ボタンを押します。 2 [削除]ボタンを押します。 ELS-02/ELS-02C/ELS-02X 取扱説明書 55
ボイスリンクを活用する 3 [OK]ボタンを押します。 ボイスリンクに登録したボイスが削除されました。 ボイスリンクから削除されたボイスを使った設定が記録され ているレジストレーションメモリー番号を押した場合、元の カテゴリーから該当ボイスおよびボイスコンディション画面 設定を呼び出すので、記録当時のサウンドは再現できます。 56 ELS-02/ELS-02C/ELS-02X 取扱説明書
エフェクトリスト エフェクトリスト リバーブ(ホールなどの残響感を与え、サウンドに奥行きや広がりを付加します。) ホール 1 ホール 2 ホール M ホール L XG ホール 1 ルーム 4 XG ホール 2 ルーム 1 ルーム 2 ルーム 3 ルーム S ルーム M ルーム L XG ルーム 1 XG ルーム 2 XG ルーム 3 ステージ 1 ステージ 2 XG ステージ 1 XG ステージ 2 プレート 1 プレート 2 XG プレート GM プレート ホワイト ルーム アトモスフィア ホール アコースティック ルーム ドラム ルーム パーカッション ルーム トンネル キャニオン ベースメント 4 コントロールとエ フ ェ ク ト ホール 3 ディレイ(音声信号を遅らせることで、時間差をおいて繰り返しエコー効果が得られます。) ディレイ LCR XG ディレイ LCR ディレイ LR エコー クロス ディレイ 1 クロス ディレイ 2 テンポ ディレイ 1 テンポ ディレイ 2 テンポ エコー テンポ クロス 1 テ
エフェクトリスト ディストーション+(サウンドに歪みを与えます。) ディスト+ディレイ ドライブ+ディレイ XG ディスト+DLY XG ODRV+DLY CMP+DIST+DLY CMP+ODRV+DLY XG CMP+DT+DL XG CMP+OD+DL VディストH+DLY VディストS+DLY ディスト+Tディレイ ドライブ+Tディレ CMP+DST+TDLY CMP+OD+TDLY1 CMP+OD+TDLY2 CMP+OD+TDLY3 CMP+OD+TDLY4 CMP+OD+TDLY5 CMP+OD+TDLY6 VDST H+TDLY1 VDST H+TDLY2 VDST S+TDLY1 VDST S+TDLY2 アンプシミュレーター (ギターアンプやマイクアンプをシミュレートする機能です。) アンプ シミュレーター XG アンプシミュレタ ステレオ アンプ 1 ステレオ アンプ 2 ステレオ アンプ 3 ステレオ アンプ 4 ステレオ アンプ 5 XG ステレオ アンプ ステレオAMPソリッド ステレオAMPクランチ ステレオAM
5 リズム/キーボードパーカッション このエレクトーンには、実際のドラムやパーカッションサウンドをサンプリングして作成された600種類以上のリアル なリズムパターンが内蔵されています。そのリズムパターンにアルペジオやコードバッキングなどの伴奏パターン(アカ ンパニメント)を付加して、さまざまなリズム伴奏を楽しむことができます。また、鍵盤の一つ一つのキーに打楽器音を 割り当てておき、リアルタイムで打楽器の演奏ができるキーボードパーカッションの機能もあります。 KEYBOARD PERCUSSION 1 2 SEQ. SEQ. 1 2 SEQ. SEQ.
リズムボタンでリズムを選ぶ エンディング リズムの構成 演奏を盛り上げるために、一つのリズムの中にも「セク ション」と呼ばれるリズムパターンのバリエーションが 用意されています。セクションはリズムの再生中に自由 に切り替えることができます。 曲の終わりに適したセクションです。小節数はリズムに よって違い、エンディングの演奏が終了すると自動的に リズムはストップします。3つのエンディングセクショ ンがあり、ENDING [1]〜[3]ボタンで選びます。 ENDING イントロ 1 曲の始まりに適したセクションです。3つのイントロ セクションがあり、INTRO [1]〜[3]ボタンで選びま す。小節数はリズムによって違い、イントロの演奏が終 了すると自動的にメインに移ります。 2 3 選ばれているエンディングセクションが点灯 INTRO 1 2 3 選ばれているイントロセクションが点灯 メイン 曲のメイン部分の演奏で使う、基本のリズムパターンで す。4つのメインセクションがあり、MAIN/FILL IN (メイン/フィルイン) [A]〜[D]ボタンで選びます。数小 節のリズムパターン
リズムボタンでリズムを選ぶ イントロ フィルインを入れるには: INTRO 1 2 リズムを使用して演奏しながら、フィルインを入れたいとこ ろで、現在選ばれているメイン/フィルイン[A]〜[D]ボタン をもう一度押すと、1小節のフィルインが入ります。フィル インが鳴っている間は、ボタンのランプは点滅します。 3 NOTE 自動的に数小節イントロを入れてからリズムをスタートさせ ます。INTRO [1]〜[3]ボタンのいずれかを押したあと、 [START]または[SYNCHRO START]ボタンを押してリズ ムをスタートさせます。 イントロが演奏されている間、BAR/BEAT (バー /ビート) 表示は、マイナス表示で逆にカウントします。 オートフィルイン機能を使って、自動的にフィルインを入れ ることもできます。オートフィルイン機能は、リズムコン ディション画面で設定します。 パネル上の点灯しているRHYTHMボタン(または、画面上 の選ばれているリズムボタン)をもう一度押すことでリズム コンディション画面が表示されます。 5 リズム/キーボードパーカッション BAR / BEAT 選ば
リズムボタンでリズムを選ぶ リズムの音量を変える リズムのテンポを変える 音量を設定するには、リズムのボリュームボタンを使う方法 と、画面上で設定する方法があります。画面上で設定する方 が、音量を細かく設定できます。 TEMPO (テンポ)ダイアルを回して、リズムの速さを変更で きます。時計回りに回すと速くなり、逆に回すと遅くなりま す。 テンポが 遅くなる TEMPO テンポが 速くなる テンポ表示の場合 ボリュームボタンでの設定: BAR / BEAT RHYTHM (リズム)の右端にあるVOLUMEボタンを使用し ます。7段階の設定が可能です。 MIN (一番下)にすると、音は鳴りません。 RHYTHM VOLUME MAX SEQ. SEQ. 1 2 SEQ. SEQ.
ユーザーボタンでリズムを選ぶ 関連ページ • ボイスディスプレイ(19ページ) それぞれのリズムには、あらかじめリズムごとに設定された テンポ(プリセットテンポ)があります。プリセットテンポに 戻したい場合は、リズムメニュー画面の右下にある[テンポ 初期設定]ボタンを押します。 ユーザーボタンでリズムを 選ぶ リズムボタンの右側にあるユーザーボタンを使うことで、 リズムメニューのすべてのリズムだけでなく、リズムパター ンプログラムでつくったユーザーリズムも選択できます。 また、同一カテゴリー内の異なったリズムをパネルに呼びだ しておきたいときに、1つはリズムボタンに、もう1つは ユーザーボタンに呼びだしておくと、すぐに切り替えができ て便利です。 リズムボタンの右側にあるユーザーボタンを押し ます。 RHYTHM 5 リズム/キーボードパーカッション 1 VOLUME MAX リズムのリバーブを設定する SEQ. SEQ. 1 2 SEQ. SEQ.
リズムリスト リズムリスト 下表のとおり、リズムは全部で600種類以上のパターンがあります。リストの左の数字は、画面上の数字と対応してい ます。 MARCH (マーチ) 1 1 モダン ビッグバンド ジャズ ワルツ 2 モダン BB シャッフル ジャズ ワルツ 3 ビッグバンド バップ マーチング バンド 3 ジャズ ワルツ 4 ムービー パンサー ジャーマン マーチ ジャズワルツ ミディアム 6/8 マーチ 1 ジャズワルツ ファスト 6/8 マーチ 2 モダン ワルツ ミディアム ジャズ 2 6/8 キッズ ポップ ワルツ アコースティック ジャズ 1 カントリー ワルツ アコースティック ジャズ 2 マリアッチ ファスト ジャズ ギャラクシー シップ バンダ ヴァルス コンボ スイング SF マーチ 1 スノー ワルツ クール コンボ ボーカル ワルツ ライト スイング アルペン ワルツ インストゥルメンタル ジャズ マンハッタン スイング *2 2 *2 オーケストラ マーチ + *1 アニメ ファンタジー + *1
リズムリスト 6 ラグタイム 2 5 チャールストン ラブリー シャッフル モダン シャッフル + オーケストラ スイング 8ビート アドリア クール R&B ジャズ シンガー スカンジナビアン シャッフル タップダンス スイング シング アロング オルガン グルーブ ジャージー ポップ モダン R&B 2 + *1 ソウル R&B ピアノ ジャズバラード *2、*3 60s チャート スイング ニュー R&B ピアノ ストライド *2、*3 バブルガム ポップ ワーシップ ミディアム ティファナ ワーシップ ファスト + 70s 8ビート ワーシップパワーバラード 70s カントリー ポップ ピアノ ブルース 1 *2、*3 ピアノ ブルース 2 *2、*3 *2 70s チャート カントリー シンプル 3/4 ポップ *2 カントリー ブラザーズ シンプル シャッフルポップ *2 ユーロ ポップ オルガン 8ビート ライト 1 ユーロ フォックス 8ビート ライト 2 ユーロ ポップ 8ビート ライト 3 ピア
リズムリスト 5 6 タンゴ 1 6 チャイナ トラッド 1 タンゴ 2 チャイナ トラッド 2 タンゴ 3 カンフー イタリアン タンゴ エセアリアル ボイス *3 BALLAD (バラード) 1 ピアノ ルンバ *2、*3 ピアノ チャチャ *2、*3 シンプル8ビートバラード シンプル ロック バラード ポップ フラメンコ 2 ポップギター バラード ピアノ バラード クラシックピアノ バラード 16ビート バラード 3 16ビート バラード 4 ポップピアノ バラード 6/8 バラード ピアノ 8ビートバラード *2、*3 *2、*3 ピアノ スロー ロック 6/8 スロー ロック 2 ピアノオーケストラバラード スカンジナビアン ショティス 6/8 スロー ロック 3 メキシカン ダンス 6/8 オーケストラ 1 *3 ポルカ 2 バンダ ポルカ 1 *3 オーケストラ ポルカ チター ポルカ イタリアン ポルカ 3 スコティッシュ ポルカ シンプル ロック *2 ムーンライト 6/8 *2 ユーロ スロー ロッ
リズムリスト 4 5 6/8 ロック 2 60s ロックンロール + *1 ロックンロール シャッフル *3 3 マジョルカ パーティー + パーティー アリーナ ブギー ウギー 1 アプレスキー ヒット ブギー ウギー 2 ディスコ ロック + スインギン ブギー ディスコ フォックス オールディーズロックンロール マジョルカ ディスコ + *1、*2 METRONOME (メトロノーム) *1、*2 メトロノーム 3/4 + *1、*2 メトロノーム 4/4 + *1、*2 メトロノーム 6/8 + *1、*2 ディスコ パレス メトロノーム 9/8 + *1、*2 サザン ロック ディスコ フィリー 1 メトロノーム 12/8 + *1、*2 カウボーイ ロック ディスコ フィリー 2 メトロノーム 5/4 + *1、*2 スカンジナビアン バグ ディスコ ティーンズ 1 メトロノーム 7/4 + *1、*2 カントリー ロック 1 ディスコ ティーンズ 2 メトロノーム 8/4 + *1、*2 クリック 2/4
自動伴奏をつける: アカンパニメント 自動伴奏をつける: アカンパニメント アカンパニメントは、リズムと連動して、多彩な装飾音を施 した伴奏パターンが得られる機能です。アカンパニメント は、リズムメニューとリズムコンディション画面で設定しま す。 1 パネル上の使用したいリズムのボタンを押します。 アカンパニメント 画面下部に、リズムを構成する各パートのボタンがあ ります。ドラム以外のパートをまとめて「アカンパニ メント」といいます。 2 鳴らしたいアカンパニメントのパートをオンにし ます。 アカンパニメントは、コード1、コード2、パッド、 フレーズ1、フレーズ2の5つのパートで構成されてお り、それぞれのパートをオン/オフさせることができま す。 すべてのパートをオフにすると、アカンパニメントは 鳴りません。 コード1/コード2: コード伴奏を担当する、ピアノやギターなどの演奏を 再生するパートです。 パッド: ストリングスやオルガンなどの演奏を再生するパート です。 フレーズ1/フレーズ2: アルペジオや、パンチの効いたブラスフレーズなどを 再生するパートです。アカンパニメントの中でひ
ベースパターンをつける: オートベースコード(A.B.C.) シングルフィンガー: ベースパターンをつける: オートベースコード(A.B.C.) コードCの場合 メジャーコード C コードの根音(コード名と同じキー ) を押します。 マイナーコード Cm コードの根音と、それより左のいず れかの黒鍵を同時に押します。 5 リズム/キーボードパーカッション オートベースコード(A.B.C.)は、リズムと連動し、演奏に合 わせて自動的にベースの伴奏が得られる機能です。選ばれて いるリズムに合わせて、ベースのパターンが自動的に選択さ れます。オートベースコードには、シングルフィンガー、 フィンガードコード、カスタムA.B.C.
メロディーにハーモニーをつける: メロディーオンコード(M.O.C.) リズムを止めた状態で使うと、和音の持続音が得られ ます。 カスタムA.B.C.: 下鍵盤で弾くコードとは別に、ペダル鍵盤を1音押さ えるだけでベース伴奏が得られます。 この機能を使うことで、演奏に幅を持たせることがで きます。 2 メモリー 下鍵盤: メロディーにハーモニーを つける: メロディーオンコード(M.O.C.
鍵盤で打楽器を演奏する:キーボードパーカッション モード2: メロディーに近い音域で最高3音までの付加音がハー モニーとなって得られます。 モード3: メロディーから比較的離れた音域で最高4音までの付 加音がハーモニーとなって得られます。 2 ニーレバー メロディーオンコードをニーレバーでコントロールするため のオン/オフボタンです。 モードを選択したあと、ここでの設定をONにすると、ニー レバーでメロディーオンコードのオン/オフ切り替えができ るようになります。 • メロディーオンコードをコントロールする(184ページ) 上鍵盤のボイスセクションで、音量が0の場合はメロディー オンコードの効果は得られません。また、リードボイスに対 してはメロディーオンコードの効果はかかりません。 ドラム系やラテンパーカッション系、そして和太鼓などの バラエティーあふれる打楽器音を鍵盤に呼びだして、リアル タイムでパーカッション演奏が楽しめます。 このキーボードパーカッションには、プリセットキーボード パーカッションとユーザーキーボードパーカッションがあり ます。プリセットキーボードパーカッションは、各鍵盤にあ ら
鍵盤で打楽器を演奏する:キーボードパーカッション NOTE キーボードパーカッションボタンの[1]と[2]が両方ともオン の場合、[1]と[2]両方を同時に使用できます。 3 4 5 リバーブや音量を設定します。 キーボードパーカッション画面のリバーブスライダー とボリュームスライダーで、リバーブと音量を調節し ます。画面に直接触ってスライダーを動かすか、デー タコントロールダイアルを使って調節します。 画面右上の[アサイン]ボタンを押して、アサイン ページを表示させます。 画面中央の[キット変更]ボタンを押して、キー ボードパーカッションのキット一覧を表示させま す。 ここでの設定は、キーボードパーカッション全体の リバーブ/ボリューム設定です。 個々の打楽器について設定したい場合は、86ページを ご覧ください。 6 38種類のキーボードパーカッションより、使用したい キット名を押してください。 各キットにどんな打楽器が割り当てられているかは、 73ページのプリセットキーボードパーカッションリス トをご覧ください。 キットを変更するときに、「セットアップを初期値にし ますか?」というメッセ
鍵盤で打楽器を演奏する:キーボードパーカッション プリセットキーボードパーカッションリスト ELキット プリセット1(上鍵盤) スネア ブラッシュロール スルド ミュート サイド スティック - スネア ドラム ヘビー スルド オープン スネア クラベス スネア ブラッシュショット 1 ハイQ ハンド クラップ - スネアドラム リバーブ 1 ウィップ スラップ スネア タイト - スネア ドラム ライト スクラッチ H フロア タム L シンセ タム 3 タム 3 スクラッチ L ハイハット クローズ コンサート バスドラム スネア ドラム リム 1 フィンガー スナップ フロア タム H シンセ タム 2 タム 2 クリック ノイズ ハイハット ペダル バスドラム ヘビー ハイハット クローズ メトロノーム クリック ロー タム シンセ タム 1 タム 1 メトロノーム ベル ハイハット オープン バスドラム ライト ハイハット オープン Seq クリック L ミドル タム L - スネア ドラム ヘビー ライド
鍵盤で打楽器を演奏する:キーボードパーカッション ライブ!アコースティックキット プリセット1(上鍵盤) スルド ミュート スティック アコースティック スルド ミュート スティック リアル スルド オープン スネア アコースティック スルド オープン スネア リアル 1 ハイ Q ハンド クラップ パワー ハイ Q クラップ パワー ウィップ スラップ スネア ラフ アコースティック ウィップ スラップ スネア リアル 2 スクラッチ H タム アコースティック 1 スクラッチ H タム リアル 1 スクラッチ L ハイハット クローズ アコ スクラッチ L ハイハット クローズ リアル フィンガー スナップ タム アコースティック 2 フィンガー スナップ タム リアル 2 クリック ノイズ ハイハット ペダル アコ クリック ノイズ ハイハット ペダル リアル メトロノーム クリック タム アコースティック 3 メトロノーム クリック タム リアル 3 メトロノーム ベル ハイハット オープン アコ メトロノーム ベル ハ
鍵盤で打楽器を演奏する:キーボードパーカッション ライブ!リアル ブラッシュ プリセット1(上鍵盤) スティック ブラッシュ スルド ミュート スネア T8 リム スルド オープン ビンテージ スラップ 4 スルド オープン スネア T8 2 ハイ Q クラップ パワー ハイ Q クラップ T9 ウィップ スラップ ビンテージ スラップ 5 ウィップ スラップ スネア T8 1 スクラッチ H タム リアル ブラッシュ 1 スクラッチ H タム T8 1 スクラッチ L ハイハット クローズ RB スクラッチ L ハイハット クローズ T8 フィンガー スナップ タム リアル ブラッシュ 2 スネア ハンマー タム T8 2 クリック ノイズ ハイハット ペダル RB キック ザップ ハード ハイハット ペダル T8 メトロノーム クリック タム リアル ブラッシュ 3 スネア ガルグ L タム T8 3 メトロノーム ベル ハイハット オープン RB キック テクノ パワー ハイハット オープン T8 ビンテージ チップ タ
鍵盤で打楽器を演奏する:キーボードパーカッション アナログT9 キット プリセット1(上鍵盤) スルド ミュート スネア T9 リム ダブル キック スネア T9 リム スルド オープン スネア T9 1 ディスコ Fx スネア T9 1 ハイ Q クラップ T9 ホワイトノイズ ダウン 1 クラップ T9 ウィップ スラップ スネア T9 2 ピンクノイズ ダウン 1 スネア T9 2 スクラッチ H タム T9 1 ホワイトノイズ ダウン 2 タム T9 1 スクラッチ L ハイハット クローズ T9 ピンクノイズ ダウン 2 ハイハット クローズ T8 スネア ドラム&ベース 1 タム T9 2 ホワイトノイズ アップ 2 タム T9 2 キック ブレイク 2 ハイハット ペダル T9 ホワイトノイズ アップ 1 ハイハット ペダル T9 スネア ディストーション タム T9 3 ピンクノイズ アップ タム T9 3 キック テクノ パワー ハイハット オープン T9 ホワイトノイズアップリリース ハイハット オープン T
鍵盤で打楽器を演奏する:キーボードパーカッション ヒップホップ キット プリセット1(上鍵盤) スネア アナログ Sm リム スルド ミュート スネア T9 リム スルド オープン スネア ヒップホップ 1 スルド オープン スネア T9 1 ハイ Q スネア クラッピー ハイ Q クラップ T9 ウィップ スラップ スネア ヒップホップ 2 ウィップ スラップ スネア T9 4 スクラッチ H フロア タム L スクラッチ H タム T9 1 スクラッチ L ハイハット クローズ ヒップ スクラッチ L ハイハット クローズ T9 ハイハット クローズ T8 2 ロー タム スネア ドラム&ベース 1 タム T9 2 タム T8 3 ハイハット ペダル ヒップ キック ブレイク 2 ハイハット ペダル T9 ハイハット オープン T8 2 ミドル タム L スネア ディストーション タム T9 3 タム T8 6 ハイハット オープン ヒップ キック テクノ パワー ハイハット オープン T9 クラッシュ T8 ハイ タム
鍵盤で打楽器を演奏する:キーボードパーカッション ブレイク キット プリセット1(上鍵盤) スルド ミュート スネア ヒップ リム 1 - カッティング ノイズ 2 スルド オープン スネア ブレイク 3 - - ハイ Q スネア ブレイク 1 - ストリング スラップ ウィップ スラップ スネア ブレイク 2 - - スクラッチ H タム ブレイク 1 - - スクラッチ L ハイハットクローズロックソフト - - フィンガー スナップ タム ブレイク 2 - - スネア ブレイク 8 ハイハット ペダル ロック - - スネア ブレイク 9 タム ブレイク 3 - - ハイハットクローズブレイク1 ハイハットハーフオープンロック - - ハイハットクローズブレイク2 タム ブレイク 4 - - - キック ブレイク ディープ タム ブレイク 5 - - - - スネア ヒップ クラッシュ シンバル 1 - - - - スネア ローファイ タム ブレイク 6 - - - - スネ
鍵盤で打楽器を演奏する:キーボードパーカッション SFX キット 2 / ライブ! SFX キット2 プリセット1(上鍵盤) ドアのきしみ - ピンクノイズ - ドアを閉める - ホワイトノイズ ダウン 1 - スクラッチ カット - ピンクノイズ ダウン 1 - スクラッチ スプリット - ホワイトノイズ ダウン 2 - ウィンド チャイム - ピンクノイズ ダウン 2 - 電話 - ホワイトノイズ アップ 2 - - - ホワイトノイズ アップ 1 - - - ピンクノイズ アップ - - - ホワイトノイズアップリリース - - - ピンクノイズアップリリース - - - ホワイトノイズアップ LFO - - - - - ピンクノイズアップ LFO - - - - - - - - - - - - - - - - - - - - イグニッション - - - - - タイヤ - - - - - レーシングカー - - - - - 衝
鍵盤で打楽器を演奏する:キーボードパーカッション ボーカルエフェクト キット プリセット1(上鍵盤) - 女声 Ha 1 - - - 男声 Ha 2 - - - 男声 Ha 3 - - - 男声 Bh 1 - - - 女声 Bh 1 - - - 男声 Kh 1 - - - 女声 Kh 1 - - - 男声 Ph 1 - - - 女声 Ph 1 - - - 男声 Th 1 - - - 女声 Th 1 - - - - 男声 Bh 2 - - カモン - - 女声 Bh 2 - - ホー ! - - 男声 Kh 2 - - アーハー ! - - 女声 Kh 2 - - オー イェー - - 男声 Ph 2 - - ヤヤヤヤヤー - - 女声 Ph 2 - - プット ユア ハンズ… - - 男声 Th 2 - - カモン ナウ - - 女声 Th 2 - - ヘーーイ - - - - - - - - - - -
鍵盤で打楽器を演奏する:キーボードパーカッション ワンダーランドキット プリセット1(上鍵盤) 馬 カホン L ボンゴ H Op. 3 f ウォーター ホーン バス ドラム カホン スラップ ボンゴ H リム 泡 足音 カホン チップ ボンゴ H チップ 水たまり スネア ドラム クラベス H ボンゴ H ヒール 雷 スネア ロール クラベス L ボンゴ H スラップ 雨 足音 ハンド クラップ ボンゴ L Op. 1 f 波 ライオン - ボンゴ L Op.
鍵盤で打楽器を演奏する:キーボードパーカッション アラビック キット プリセット1(上鍵盤) - サイド スティック アズマ ダヴル レフト テフ シンバル - スネア ソフト アズマ ダヴル ライト テフ シンバル ミュート - アラビック ハンド クラップ アズマ ダヴル サイド テフ トレモロ - スネア ドラム アズマ ダヴル ボス テフ シェイク 1 - フロア タム L コルトゥック ダヴル フラム テフ シェイク 2 - ハイハット クローズ コルトゥック ダヴル テケ テフ テク フラム - フロア タム H コルトゥック ダヴル テク テフ フル オープン - ハイハット ペダル コルトゥック ダヴルドゥン テフ テケ オープン ショート - ロー タム ベンディル テケ フラム テフ テク オープン ショート - ハイハット オープン ベンディル テケ デッド テフ テク オープン - ミドル タム L ベンディル テク デッド テフ ドゥン オープン - ナカラザン ドム ミドル タム H -
鍵盤で打楽器を演奏する:キーボードパーカッション チャイナ キット プリセット1(上鍵盤) ゴング バター シンフォニック ゴング 1 サスペンデッド1 ロールS - ジン ルオ シンフォニックゴングロング サスペンデッドシンバル1 - ルオ ハイ 2 シンフォニック ゴング 2 サスペンデッド2 ロールL - ルオ ミッドロー ティンパニ E サスペンデッドシンバル2 - ルオ ティンパニ F コンサート タム 5 - ジン ルオ ロー ティンパニ F♯ オーケストラシンバル1チョーク - ダ チャ 1 ティンパニ G コンサート タム 4 - ダ チャ エフェクト ティンパニ G♯ オーケストラ シンバル 1 - ゾンチャ ティンパニ A コンサート タム 3 - シャオチャ エフェクト ティンパニ A♯ オーケストラ シンバル 2 ダ チャ 2 シャオチャ ティンパニ B コンサート タム 2 - ダ グ mp マン ルオ ロー - ティンパニ C コンサート タム 1 - ダ グ リム マン ルオ
鍵盤で打楽器を演奏する:キーボードパーカッション ユーザーキーボードパーカッション を作る 打楽器をどの鍵盤で発音させるか、自分で設定することによ り、オリジナルのキーボードパーカッションを作ることがで きます。各ユーザーキーボードパーカッション(ユーザー 1 〜40)に、キット(88〜97ページ)のいずれかを割り当て、 さらに上鍵盤/下鍵盤/ペダル鍵盤の各キーに対して自由に打 楽器を割り当てます。このようにして作られたユーザーキー ボードパーカッション(ユーザー 1〜40)は、パネル上の KEYBOARD PERCUSSION [1]または[2]ボタンで呼び出 します。 ここでは、ユーザー 1に打楽器を割り当て、パネル上の[1] ボタンで呼び出す手順を例として説明します。 NOTE ユーザーキーボードパーカッション1〜2には、あらかじめELキッ トのプリセット1〜2と同じデータがそれぞれ保存されています。 1 パネル左端のKEYBOARD PERCUSSION (キーボードパーカッション)の[1]ボタンを押し ます。 画面上にキーボードパーカッションのメニューページ が表示されます。 2 各キッ
鍵盤で打楽器を演奏する:キーボードパーカッション 6 打楽器を任意の鍵盤に割り当てます。 打楽器メニューの中で使用したい打楽器名を押しなが ら、その打楽器音を割り当てたい鍵盤を押します。 打楽器を割り当てる鍵盤名 入力を間違えたときは: アサインページの[消去]ボタンを使って、入力した打楽器音 を消去できます。 [消去]ボタンを押しながら、消去したい打楽器が割り当てら れている鍵盤を押します。 打楽器名 リズム/キーボードパーカッション 5 打楽器名を押しながら... 鍵盤を押します 画面上部に、鍵盤名と割り当てた打楽器名が表示され、 打楽器音が鍵盤に割り当てられました。割り当てた打 楽器は、手順2で選んだユーザー (ここではユーザー 1)に保存されます。 7 8 手順5〜6の操作を繰り返して、必要な打楽器を 鍵盤に割り当てます。 キーボードパーカッションのメニューページで、 演奏に使いたいユーザー番号を選択します。 たとえば、K.B.
鍵盤で打楽器を演奏する:キーボードパーカッション キーボードパーカッションを コピーする プリセットキーボードパーカッションや、すでに作成してあ るユーザーキーボードパーカッションを、別のユーザーにコ ピーして、それをもとに新しいユーザーキーボードパーカッ ションをつくることができます。ここでは、プリセット1を ユーザー 1にコピーする場合を例に説明します。 1 メニュー画面上で、コピー先にしたいユーザー (ここではユーザー 1)を選択します。 5 [コピー ]ボタンを選択すると、プリセット1の コピーを実行し、画面上に「プリセット1をユー ザー 1にコピーしました。」という操作完了の メッセージが一時的に表示されます。 [キャンセル]ボタンを選択すると、操作をキャンセル し、前の画面に戻ります。 各打楽器の細かい設定をする 各打楽器について、パンやボリューム、リバーブなどを設定 したり、ドラムのチューニングを変更したりして、自分の好 みの打楽器音をつくることができます。ここでの設定は、楽 器全体で1つなので、レジストレーションごとに設定を変え ることはできません。 1 2 3 コピーしたいキ
鍵盤で打楽器を演奏する:キーボードパーカッション 1 パン 現在選ばれている打楽器のステレオ出力による位置を設定し ます。7か所の位置で、打楽器ごとに設定できます。 2 ピッチコース 現在選ばれている打楽器のピッチを、100セント単位で設 定します。 設定範囲:−64〜+63 3 ピッチファイン 現在選ばれている打楽器のピッチを、1セント単位で設定し ます。ピッチコース(2)よりも細かく設定できます。 設定範囲:−64〜+63 5 リズム/キーボードパーカッション 4 リバーブ 現在選ばれている打楽器のリバーブの量を設定します。 設定範囲:0〜24 5 ボリューム 現在選ばれている打楽器のボリュームを設定します。 設定範囲:0〜24 6 初期化 すべての打楽器の、パンやピッチ、リバーブなどの設定を、 すべて初期設定に戻します。 [実行]ボタンを押すと、以下の画面が表示され確認を求めて きます。 [実行]ボタンを選択すると、初期設定に戻ります。この場 合、画面上に初期化完了のメッセージが一時的に表示され、 操作が完了したことを示します。 [キャンセル]ボタンを選択すると、操作を中止し、前の画面
鍵盤で打楽器を演奏する:キーボードパーカッション キットアサインリスト • ボンゴ ミュート EL キット シンバル • • • • • • • • • • • • クラッシュ シンバル 1 クラッシュ シンバル 2 クラッシュシンバル ミュート ライド シンバル 1 ライド シンバル 2 ライドシンバル カップ オーケストラ シンバル オーケストラ シンバル ロール オーケストラシンバル ミュート シンバル マーチ シンバル ブラッシュショット タム タム ハイハット • • • • • • ハイハット オープン ハイハット クローズ ハイハット ペダル 1 ハイハット ペダル 2 アナログハイハット オープン アナログハイハット クローズ スネアドラム • • • • • • • • • • • • スネア ドラム ライト スネア ドラム ヘビー スネア ドラム リム 1 スネア ドラム リム 2 スネア ドラム アクセント 1 スネア ドラム アクセント 2 スネアドラム リバーブ 1 スネアドラム リバーブ 2 シンセ スネア ドラム オーケストラ スネア ドラム スネア ドラム ロール
鍵盤で打楽器を演奏する:キーボードパーカッション • • • • • • カバサ シェイカー アゴゴ H アゴゴ L サンバ ホイッスル H サンバ ホイッスル L パーカッション3 • • • • • • • • • • • • タンバリン カスタネット ジングル ベル ベル ツリー トライアングル オープン トライアングル ミュート ウッド ブロック H ウッド ブロック L スティック ウィップ スラップ フィンガー スナップ ハンド クラップ • • • • • • • • ハイ Q クリック ノイズ スクラッチ H スクラッチ L Seq クリック L Seq クリック H メトロノーム クリック メトロノーム ベル クラベス ギロ ロング ギロ ショート マラカス ビブラスラップ パーカッション2 • • • • • • • • • • スルド ミュート スルド オープン クイーカ ミュート クイーカ オープン カバサ シェイカー アゴゴ H アゴゴ L サンバ ホイッスル H サンバ ホイッスル L パーカッション3 • • • • • • • • • • • • タンバリ
鍵盤で打楽器を演奏する:キーボードパーカッション スネアドラム • • • • • • • • • • スネア ノイジー 2 スネア ノイジー 3 スネア スナップ エレクトロ スネア ロール サイド スティック オープン リム ショット ブラッシュ タップ ブラッシュ スラップ ブラッシュ スワール リバース シンバル タム • • • • • • タム タム タム タム タム タム エレクトロ エレクトロ エレクトロ エレクトロ エレクトロ エレクトロ 1 2 3 4 5 6 バスドラム • キック ゲート ヘビー • キック ゲート • キック 3 パーカッション1 • • • • • • • • • • • • • コンガ H オープン コンガ L コンガ H ミュート ボンゴ H ボンゴ L ティンバル H ティンバル L カウベル クラベス ギロ ロング ギロ ショート マラカス ビブラスラップ パーカッション2 • • • • • • • • • • スルド ミュート スルド オープン スクラッチ H 2 スクラッチ L 2 カバサ シェイカー アゴゴ H アゴゴ L サンバ
鍵盤で打楽器を演奏する:キーボードパーカッション • • • • • • • • クイーカ ミュート クイーカ オープン カバサ シェイカー アゴゴ H アゴゴ L サンバ ホイッスル H サンバ ホイッスル L パーカッション 3 タンバリン カスタネット ジングル ベル ベル ツリー トライアングル オープン トライアングル ミュート ウッド ブロック H ウッド ブロック L スティック ウィップ スラップ フィンガー スナップ ハンド クラップ パーカッション 4 • • • • • • • • ハイ Q クリック ノイズ スクラッチ H スクラッチ L Seq クリック L Seq クリック H メトロノーム クリック メトロノーム ベル ティンバル L カウベル クラベス ギロ ロング ギロ ショート マラカス ビブラスラップ パーカッション 2 • • • • • • • • • • スルド ミュート スルド オープン クイーカ ミュート クイーカ オープン カバサ シェイカー アゴゴ H アゴゴ L サンバ ホイッスル H サンバ ホイッスル L パーカッション 3 • •
鍵盤で打楽器を演奏する:キーボードパーカッション • ハイハット オープン アコ • ハイハット クローズ アコ • ハイハット ペダル アコ スネアドラム • • • • • • • • • • スネア アコースティック スネア ラフ アコースティック スネア ソフト アコースティック スネア ロール アコースティック スティック アコースティック リム アコースティック ブラッシュ タップ ブラッシュ スラップ ブラッシュ スワール ブラッシュ タップ スワール タム • • • • • • タム タム タム タム タム タム アコースティック アコースティック アコースティック アコースティック アコースティック アコースティック 1 2 3 4 5 6 バスドラム • キック ミュート アコ • キック オープン アコ • キック ソフト アコースティック パーカッション 1 • • • • • • • • • • • • • コンガ H オープン コンガ L コンガ H ミュート ボンゴ H ボンゴ L ティンバル H ティンバル L カウベル クラベス ギロ ロング ギロ ショート
鍵盤で打楽器を演奏する:キーボードパーカッション • • • • • • • • クイーカ ミュート クイーカ オープン カバサ シェイカー アゴゴ H アゴゴ L サンバ ホイッスル H サンバ ホイッスル L パーカッション 3 タンバリン カスタネット ジングル ベル ウィンド チャイム トライアングル オープン トライアングル ミュート ウッド ブロック H ウッド ブロック L スティック ウィップ スラップ フィンガー スナップ ハンド クラップ パワー パーカッション 4 • • • • • • • • ハイ Q クリック ノイズ スクラッチ H スクラッチ L Seq クリック L Seq クリック H メトロノーム クリック メトロノーム ベル ライブ!リアルドラムス シンバル • • • • • • • • • • クラッシュシンバル リアル 1 クラッシュシンバル リアル 2 スプラッシュシンバル リアル チャイナ シンバル リアル ライド シンバル リアル 1 ライド シンバル リアル 2 ライドシンバルカップリアル ハイハット オープン リアル ハイハット クローズ リ
鍵盤で打楽器を演奏する:キーボードパーカッション アナログT9 キット シンバル • • • • • • • • • • クラッシュ シンバル T9 スプラッシュ シンバル 2 クラッシュ シンバル 4 チャイナ シンバル 2 ライド シンバル T9 ライド シンバル 3 ライドシンバル カップ 2 ハイハット オープン T9 ハイハット クローズ T9 ハイハット ペダル T9 スネアドラム 1 • • • • • • • • • • スネア スネア スネア スネア スネア スネア スネア スネア スネア スネア T9 T9 T9 T9 T9 T9 T8 T9 T9 T9 1 2 3 4 5 6 7 ゲート 1 ゲート 2 リム スネアドラム 2 • • • • • • • • スネア スネア スネア スネア スネア スネア スネア スネア ドラム&ベース 1 ジャングル 1 ディストーション アナログ CR ブラッシュ ミュート ロックロール ディスト ピッコロ ロック ロール タム • • • • • • タム タム タム タム タム タム T9 T9 T9 T9 T9 T9
鍵盤で打楽器を演奏する:キーボードパーカッション • • • • • • • • • • • • スネア スネア スネア スネア スネア スネア スネア スネア スネア スネア スネア スネア T9 4 T9 リム R&B 1 R&B 2 ヒップ 1 ティンバー ウッド ドラム&ベース 1 ドラム&ベース 2 ジャングル 1 アナログ CR ディストーション タム • • • • • タム タム タム タム タム T9 T9 T9 T9 T9 1 2 3 4 5 • • • • • • • • • • • • • • • • キック T8 2 キック T8 3 キック T9 2 キック T9 4 キック T9 HD 3 キック テクノ パワー キック ブレイク 2 キック ディストーション RM BD ドラム & ベース 1 バス ドラム ディスト 1 バス ドラム ディスト 3 バス ドラム ディスト 5 バスドラム テクノパワー バスドラム ハードロング バス ドラム ブリップ バス ドラム アナログSm パーカッション 1 • • • • • • • • コンガ T8 1 コンガ
鍵盤で打楽器を演奏する:キーボードパーカッション 女性 2 • • • • 女声 女声 女声 女声 Th Th Th Th 1 2 3 4 男性 1 • • • • • • • • • • • • • • 男声 男声 男声 男声 男声 男声 男声 男声 男声 男声 男声 男声 男声 男声 Bh 1 Bh 2 Bh 3 Bh 4 Ha 1 Ha 2 Ha 3 Ha 4 Ha 5 Ha 6 Kh 1 Kh 2 Kh 3 Kh 4 男声 男声 男声 男声 男声 男声 男声 男声 自然 • • • • 雷 雨 波 せせらぎ 日常 • • • • • • • • • • • 足音 ドアのきしみ ドアを閉める アラーム ベル 鳩時計 大時計 ベル 電話 カメラ かじる 拍手 乗り物 男性 2 • • • • • • • • • • • • • • • • • • 泡 • 水たまり Ph 1 Ph 2 Ph 3 Ph 4 Th 1 Th 2 Th 3 Th 4 • • • • • • • • 列車 クラクション 1 クラクション 2 サイレン イグニッション 衝突 ヘリコプター スター
鍵盤で打楽器を演奏する:キーボードパーカッション ダヴル • • • • • • • • アズマ ダヴル レフト アズマ ダヴル ライト アズマ ダヴル サイド アズマ ダヴル ボス コルトゥック ダヴル テケ コルトゥック ダヴル テク コルトゥック ダヴルドゥン コルトゥック ダヴル フラム ダラブッカ 1 ダラブッカ テク 1 ダラブッカ テク 2 ダラブッカ テク デッド ダラブッカテクダンプド ダラブッカ テケ フィン 1 ダラブッカ テケ フィン 2 ダラブッカ テケ フィン 3 ダラブッカ テケ フィン 4 ダラブッカ テケ ダラブカテケフラムダンプ ダラブッカ テケ フラム ダラブッカ スラップ ダラブッカスラップミッド ダラブッカ ロールオープン ダラブッカ ロールクローズ ダラブッカ ドゥン ダラブッカ 2 • • • • • • • • • ベンディル ベンディル ベンディル ベンディル ベンディル ベンディル ベンディル テク テク デッド テケ テケ フラム テケ デッド スラップ ドゥン テフ • • • • • • • • • • • • • • • • テフ テ
6 レジストレーションメモリー エレクトーンのパネル上、または画面上で設定したボイスやリズムなどのセッティング(=レジストレーション)は、上鍵 盤と下鍵盤の間にある1〜16までのナンバーボタンに記録できます。記録したレジストレーションは簡単に呼び出すこ とができます。この機能を「レジストレーションメモリー」と呼びます。記録したレジストレーションは、演奏中にナ ンバーボタンを押して呼び出すだけでなく、あらかじめプログラムしておいてフットスイッチを使って呼び出すことも 可能です。 13 14 15 16 1 2 3 4 5 6 7 8 9 10 11 12 D.
別のバンクにレジストレーションを記録する NOTE 別のバンクにレジストレー ションを記録する 初期状態の、レジストレーションメモリーのバンクAが選択 されている状態では、バンクAだけでなくバンクBにもレジ ストレーションの記録ができます。バンクBに記録されれば バンクCまで、バンクCに記録されればバンクDまで、バン クDに記録されればバンクEまでレジストレーションが記録 できるようになり、最大でバンクA〜Eに記録ができます。 1 ボイスディスプレイで、バンク選択ボタンを押し ます。 レジストレーションの呼びだし後、バンクを変えてからレジスト レーションを記録しようとすると、選択されているバンクに記録す るかを確認するダイアログが表示されます。記録先のバンクが正し いかご確認ください。 レジストレーションを呼び 出す ボイスディスプレイのバンク選択ボタンでバンクを選択し、 呼び出したいナンバーボタンを押すだけで、記録したレジス トレーションをパネル上に呼び出すことができます。 6 レジストレーションメモリー • 手でボタンを押すのではなく、フットスイッチを使って レジストレーションを呼び出す方
記録したレジストレーションをUSBフラッシュメモリーに保存する ディスエーブルモードを選ぶには: ディスエーブルモードで、[D.
レジストレーションメモリーの初期化 5 [保存]ボタンを押します。 画面に、保存中であることを示すメッセージが表示さ れます。保存が終了すると、メッセージが消えます。 レジストレーションメモ リーの初期化 関連ページ • レジストレーションなどのデータを読み込む(123ページ) • ソングに名前を付ける(119ページ) これで、本体のレジストレーションメモリー (A〜Eバンク) に記録されているレジストレーションが、一つのユニットと してUSBフラッシュメモリーに保存されました。 レジストレーションメモリーに記録されたレジストレーショ ンを消去し、レジストレーションメモリーを初期状態に戻す ことができます。この場合、すべてのバンクのレジストレー ションデータが消去されてしまいます。大切なデータは、あ らかじめUSBフラッシュメモリーに保存しておきましょう。 関連ページ • エレクトーンの初期化(25ページ) バンクとユニット 1 [UTILITY]ボタンを押して、ユーティリティー 画面の設定ページを表示させます。 6 レジストレーションメモリー 楽器本体に記録されたレジストレーションメモ
演奏中にレジストレーションを切り替える: レジストレーションシフト 2 シフト 演奏中にレジストレーション を切り替える: レジストレーションシフト 右フットスイッチを押すたびにレジストレーションナンバー が一つずつ進み、1から16までのナンバー順にレジスト レーションが選択されていきます。16の次は1に戻ります。 選択されたナンバーボタンは点灯します。 NOTE シフトでは他のバンクのレジストレーションは選択できません。 レジストレーションシフトは、エクスプレッションペダルの 右側についているフットスイッチを使ってレジストレーショ ンを切り替える機能です。演奏中に手を使わずにレジスト レーションの変更ができ、演奏に専念できます。ある特定の レジストレーションを選択したり、ナンバー順に、または自 分で設定した順序で、レジストレーションを選択できます。 レジストレーションシフトには、シフト、ジャンプ、ユー ザーの3つのモードがあり、レジストシフト画面で設定しま す。また、ボイスディスプレイで内容を確認できます。 3 ジャンプ 右フットスイッチを押すと、指定したナンバーのレジスト レーションへジャンプ
演奏中にレジストレーションを切り替える: レジストレーションシフト 編集画面 3 [消去]ボタンを押すと、すべてのデータは消去され、消去が 実行されたことを示すメッセージが一時的に画面上に表示さ れます。 [キャンセル]ボタンを押すと、消去せずにもとの画面に戻り ます。 3 シフトエンド レジストレーションシフトが最後まで進んだときの動作を設 定します。 4 2 1 1 ポジション カーソルを最初の位置(TOP)に戻します。 カーソルを1つだけ左に移動します。 トップ:最後のレジストレーションナンバーを選択したあ と、最初のレジストレーションナンバー (TOP)に戻って繰 り返しシフトします。 ネクストユニット:最後のレジストレーションナンバーを 選択したあと、MDRのソングに入っている次のユニットを 自動的に読み込みます。一つのソング内に複数のユニットを 保存した場合に有効な設定です。 関連ページ カーソルを1つだけ右に移動します。 • 一つのソングに複数のレジストレーションを保存する(121ページ) カーソルを5つ右に移動します。 NOTE 2 データ ユーザーレジストレーシ
演奏中にレジストレーションを切り替える: レジストレーションシフト ボイスディスプレイで確認する ジャンプモード時 ボイスディスプレイの1ページ目で、レジストレーションシ フトの確認ができます。 パネル上の[VOICE DISPLAY]ボタンを押して、ボイス ディスプレイの1ページ目を表示させます。 DISPLAY SELECT VOICE DISPLAY A.B.C. M.O.C. MDR FOOT SWITCH UTILITY AUDIO RHYTHM PROGRAM VOICE EDIT PATTERN SEQUENCE U.ORGAN FLUTES 現在のレジストレーションナンバーとジャンプ先のレジスト レーションナンバーを表示します。また、データコントロー ルダイアルや ボタンを使って、ジャンプ先のレジ ストレーションのナンバーを変更できます。 ユーザーモード時 L.
パラメーターの一括変更 パラメーターの一括変更 ボイスディスプレイの2ページ目には、バンク内のレジスト レーションの同一パラメーターを同時に変更する機能があり ます。上鍵盤の音を全レジストレーションについて明るめに 設定したい、といった場合にこの機能を使うと便利です。 3 バンクを選んだ後にパラメーターボタンを押し て、一括変更をしたいパラメーターを選びます。 パラメーターボタンには、現在選ばれているパラメー ターが表示されています。 ここを押すと、パラメーター選択画面が開き、一括変 更の対象となるパラメーターを選ぶことができます。 一括変更できるパラメーター • リバーブ • リズムのリバーブ • ボリューム 6 • パン • ブリリアンス レジストレーションメモリー • サステイン パラメーター 1 2 パネル上の[VOICE DISPLAY]ボタンを押して、 ボイスディスプレイを表示させます。 画面右上の[2]ボタンを押して2ページ目を表示 させます。 DISPLAY SELECT VOICE DISPLAY A.B.C. M.O.C.
パラメーターの一括変更 4 画面右下の操作ボタンを使って、一括変更の対象 となるレジストレーションナンバーをすべて選び ます。 ONになっているレジストレーションが一括変更の対象となります。 すべての値を同じにそろえるには: [セット]を押します。 現在ONになっているレジストレーションナンバーのパラ メーター値を、一括して現在カーソルが置かれているレジス トレーションのパラメーター値にそろえます。[セット]を押 すと、次のようなメッセージ画面が表示されます。 画面でオン/オフしたいレジストレーションのナンバー を選び、画面右下の5つの操作ボタンでON/OFFを切 り替えます。 [そろえる]ボタンを選択すると、一括変更が行なわれます。 作業を中止したい場合は[キャンセル]ボタンを選択します。 [すべてON]: すべてのレジストレーションをON (一括変更の対象)にします。 すべての値を1ずつ増減させるには: [すべてOFF]: すべてのレジストレーションの選択を 画面の[+]ボタンや[−]ボタンを押すか、データコントロー ルダイアルを操作すると、一括変更の対象となっているレジ ストレーション
レジストレーションを コピーする レジストレーションを コピーする 3 画面のコピー元の左下のレジストボタンを押します。 [閉じる]ボタンを選択すると、操作をキャンセルして、 前の画面に戻ります。 ボイスディスプレイの3ページ目には、レジストレーション メモリーのナンバーに記録されているレジストレーション を、レジストセクション(ボイスセクションやリズム、キー ボードパーカッション)単位で別のレジストレーションナン バーにコピーする機能があります(レジストセクションコ ピー )。レジストレーションナンバー 4の上鍵盤の音を1と 同じにしたい、といった場合にこの機能を使うと便利です。 1 6 画面右上の[3]ボタンを押して3ページ目を表示 させます。 レジストレーションメモリー 2 パネル上の[VOICE DISPLAY]ボタンを押して、 ボイスディスプレイを表示させます。 DISPLAY SELECT VOICE DISPLAY A.B.C. M.O.C.
レジストレーションを コピーする 5 同様にコピー先のレジストレーションナンバーと レジストセクションを選びます。 コピー先で選べるレジストセクションは、コピー元で 選んだレジストセクションによって変わります。 NOTE レジストセクションについては、コピー先を変更したあとで コピー元を変更すると、コピー先が自動的にコピー元と同じ に変わることがあります。 6 画面のセクションコピー側の[実行]ボタンを押し ます。 以下の画面が表示され、コピーを実行するかどうか確 認を求めてきます。 7 [コピー ]ボタンを選択すると、レジストレー ションのコピーを実行し、「コピーしました。」と いう操作完了のメッセージが一時的に表示されま す。 [キャンセル]ボタンを選択すると、コピーせずに前の 画面に戻ります。 バンクをコピーするには: レジストレーションデータをバンク単位でコピーすることも できます。「バンクコピー」にある「コピー元」「コピー先」 でそれぞれコピー元/コピー先のバンクを選択したあと、画 面右下にある[実行]ボタンを押すと、レジストレーション データがコピーされます。 108 ELS-
7 ミュージックデータレコーダー (MDR) MDR (ミュージックデータレコーダー )は、USBフラッシュメモリーに、レジストレーションや演奏データを録音した り、録音したデータを再生/編集したりする機能です。 USBフラッシュメモリーは動作確認済みのものをお使いください。動作確認済みUSB機器については、下記ウェブサ イトの「資料/データ」から確認できます。 サポート・お問い合わせ: https://jp.yamaha.com/support/ また、ご使用前に113ページの注意事項をお読みください。 MDR機能に入る DISPLAY SELECT VOICE DISPLAY A.B.C. M.O.C.
MDR画面の操作 1 現在の位置 9 ソングコントロール 現在選択されているUSBフラッシュメモリー /フォルダー が表示されます。「:/」の前にはUSBフラッシュメモリー が、「:/」の後ろにはフォルダー名が表示されます。 たとえば、「USB 01:/Folder1/」と表示されている場合 は、「USBフラッシュメモリー内の」「Folder1という名前 のフォルダー」であることを示します。 ソングの録音、再生などをコントロールします。 2 USBフラッシュメモリー /フォルダー /ソング リスト 関連ページ • 演奏を録音する(117ページ) • ソングを再生する(125ページ) ) カスタムプレイ 選択されているソングの演奏データだけを録音/再生します。 このボタンを使うと、レジストレーションデータは読み込ま れません。 選択できるUSBフラッシュメモリー /フォルダー /ソングが 表示されます。選択できるフォルダーは最大120個です(画 面上には5個表示されます)。 ! 譜面 3 スクロールボタン • 譜面を表示する(128ページ) 選択可能なUSBフラッシュメモリー /フォルダ
MDR画面の操作 * 情報 USBフラッシュメモリーが選択されているときは空き容量 (残量)を、ソングが選択されているときは容量や曲名、作曲 者名などを表示します。表示される内容は、ソングによって 異なります。 関連ページ • ソング容量/USBフラッシュメモリーの残量の確認(134ページ) • プロテクトソングの詳細表示(124ページ) アイコン一覧 ソングを選ぶときに表示される画面で使われているアイコン です。それぞれのアイコンの意味は次のようになっていま す。 USBフラッシュメモリーであることを示します。 USBフラッシュメモリー /フォルダー /ソングリ ストで表示されます。 USBフラッシュメモリーが見つからないとき は: フォルダーであることを示します。 1 USBフラッシュメモリーにライトプロテクトま たはコピープロテクトがかかっていることを示し ボタンがグレー表示になって押せなくな るまで、数回押します。 USBフラッシュメモリーがリスト表示されます。表示 されているUSBフラッシュメモリーが多い場合、画面 外に隠れていることがあります。その場合は、スク ロールボタン(110ペ
MDR画面の操作 USBフラッシュメモリー内の構成:フォルダー /ソング/ファイル フォルダーとは フォルダーとは、USBフラッシュメモリー内のソングを整理するための保管場所です。容量の大きいUSBフラッシュメモ リーには、数多くのソングを保存することができるので、多くのソングを保存した場合には、呼び出したいソングを探す のが大変になります。そこで、フォルダーをつくってソングを管理することで、USBフラッシュメモリー内のソングを管 理しやすくします。 ソング 1 ソング 2 ソング 3 ソング 4 ソング 5 ソング 6 ソング ソング ソング USBフラッシュメモリー ソング1 ソング2 3 フォルダーA フォルダーを つくると ソング4 5 6 フォルダーB USBフラッシュメモリー ソングとは ソングとは、本来は「曲」という意味ですが、エレクトーンでは、USBフラッシュメモリーに保存する1曲分のデータの ことをソングと呼びます。1つのソングには、レジストレーションデータや演奏を録音したデータなどがファイルとして保 存されています。 ファイルとは エレクトーンでは、ソ
MDR画面の操作 [USB TO DEVICE]端子ご使用上 の注意 注記 • USB機器の抜き差しは、再生や録音中、ファイル操作中(保存/コ ピー /削除/フォーマットなど)、およびUSB機器へのアクセス中 には行なわないでください。楽器本体の機能が停止したり、USB 機器やデータが壊れたりするおそれがあります。 本機には以下のとおり、USBフラッシュメモリーを接続で きる[USB TO DEVICE]端子が装備されています。 • USB機器の抜き差しは、6秒以上間隔を空けて行なってくださ い。 • 鍵盤の左側手前にあるUSB DOCKに[USB TO DEVICE] 端子×2個 NOTE • 鍵盤下右側にある[USB TO DEVICE]端子×1個 (合計3個) • ELS-01シリーズにSTAGEAバイタライズユニットを取り付けた 楽器には、USB DOCKは搭載されていません。USB DOCKに 関して詳しくは、190ページをご覧ください。 • USBフラッシュメモリー以外のUSB機器を接続する場合は、鍵 盤下の右側にある[USB TO DEVICE]端子に接続してください。 ただし
USBフラッシュメモリーを初期化(フォーマット)する USBフラッシュメモリーを 初期化(フォーマット)する 新しいUSBフラッシュメモリーは、そのままでは使えない 場合があります。この場合、USBフラッシュメモリーを フォーマット(初期化)する必要があります。 フォーマットとは、USBフラッシュメモリーをエレクトー ンで使用できる形式にする作業です。 フォーマットを実行すると、USBフラッシュメモリーの中 のすべてのデータは消去され、新たにデータが記録できる状 態になります。消去されたデータは永久に失われてしまいま す。フォーマットを実行する前に、重要なデータが入ってい ないかどうかよくご確認ください。誤消去を防ぐため、 フォーマットを実行するUSBフラッシュメモリーのみ接続 することをおすすめします。 NOTE USBフラッシュメモリーは動作確認済みのものをお使いください。 動作確認済みUSB機器については、下記ウェブサイトの「資料/ データ」から確認できます。 サポート・お問い合わせ: https://jp.yamaha.
ソングを選ぶ ソングを選ぶ 演奏データやレジストレーションデータを保存するときに は、何も記録されていないソングを選びます。ソングを再生 したり、ソングに名前を付けたりするときには、データが保 存されているソングを選びます。 ソングの演奏設定 演奏設定ページは、ソングページでソングを選択後、 ボタンを押して表示させます。ここでは、選択し たソングの再生テンポ、各パートの再生設定が可能です。 MDR画面には、現在選ばれているUSBフラッシュメモリー /フォルダー内のソングが表示されています。表示されてい るソングの中から、目的のソングを選びます。 1 USBフラッシュメモリーを確認します。 画面左上に目的のUSBフラッシュメモリーが表示され ていることを確認します。 現在選ばれているUSBフラッシュメモリー/フォルダー [R](再生)ボタンを押したときには、この画面で「PLAY」 になっているパートだけが、表示されているテンポ(録音さ れたときの50%〜200%の範囲)で再生されます。 演奏データの入っていないソングの場合は、すべてのパー と、各パートの再生状態を保存できます。(テンポの値は保 存さ
ソングを選ぶ 3 画面の[検索]ボタンを押します。 6 [OK]ボタンを押します。 検索が実行され、実行中の結果が表示されます。 NOTE 前回検索した結果が表示されます。ただし、以下の場合は表 示されません。 • 電源を入れ直した場合 • USBフラッシュメモリーを抜いて差し直した場合 実行を中断する場合は[中断]ボタンを押します。 7 画面に検索結果が表示されます。 • USBフラッシュメモリーに書き込んだ場合 4 検索結果リスト 画面の[キーワード]ボタンを押します。 8 前回検索したキーワード 検索結果を確認します。 検索結果数 表示しているデータの番号 検索結果から目的のソング/フォルダーのボタン を押します。 自動的に検索画面が閉じ、ソング/フォルダーが選ばれ ます。 目的のソング/フォルダーが選ばれなかった場合は手順4に 戻り、別のソング名/フォルダー名で検索してみてください。 5 検索したいソング名/フォルダー名を入力します。 必要に応じ、前回検索したキーワードを[削除]ボタン で削除します。そのあとで、今回検索したいソング名/ フォルダー名を入力します。
演奏を録音する NOTE 演奏を録音する 現在のユニット番号にかかわらず、録音によって演奏以外の データはソングの先頭のユニットに記録されます。したがっ て、先頭のユニット以外のユニットが本体に読み込まれてい るときに [●](録音)ボタンを押すと、先頭のユニットに記録し てよいかどうかの確認ダイアログが表示されます。[OK]を押 せばダイアログを閉じて録音待機状態になり、[CANCEL]を 押せば録音状態から抜けます。 演奏を録音する 演奏を録音する前に、あらかじめ、レジストレーションメモ リーの設定など、録音したい曲の演奏の準備をしておきま しょう。 注記 5 6 録音中は、絶対に電源を切ったり、USBフラッシュメモリーを抜い たりしないでください。 1 2 USBフラッシュメモリーを[USB TO DEVICE] 端子に接続します。 演奏を録音するソングを選択します。 注記 砂時計や書き込み中のメッセージが表示されている間は、 USBフラッシュメモリーを抜かないでください。 演奏をやり直す 下の画面が表示され、録音待機状態になります。 録音中に演奏をミスした場合には、はじめからや
演奏を録音する パートごとに録音する 上鍵盤、下鍵盤、ペダル鍵盤の、それぞれのパートの演奏 や、レジストレーションの変更やエクスプレッションペダル の操作といったコントロールデータを、個別に記録すること ができます。また、リードボイス1とキーボードパーカッ ション1は、上鍵盤/下鍵盤の演奏と独立して録音すること もできます。ここでは、はじめに下鍵盤とペダル鍵盤の演奏 を録音し、次に上鍵盤の演奏を録音する手順を例に説明しま す。 NOTE リードボイス2とキーボードパーカッション2は、パートの録音がで きません。 1 2 3 4 次に、録音しなかった(上鍵盤)パートの録音を行ない ます。 5 6 キーボードパーカッションを録音する場合は、パネル上の KEYBOARD PERCUSSION [1]ボタンがオンになっている ことを確認してください。 下のように設定すると、下鍵盤とペダル鍵盤の演奏だ けをパート録音できます。 録音したいパートを選択します。 新たに録音したいパート(ここでは上鍵盤)を「REC」 にします。また、手順2で録音したパート(ここでは下 鍵盤とペダル鍵盤)とコントロールを「P
ソングに名前をつける パンチイン録音 録音したソングの一部だけを録音し直すことができます。 パートを選択することによって、特定のパートだけをパンチ イン録音することもできます。 NOTE 休符と休符ではさまれたフレーズごとに、パンチイン録音すると便 利です。 1 3 NOTE パンチイン録音したいソングを選びます。 1 録音し直したい位置で、[K](一時停止)ボタンを 押します。 名前を変更したいソングを選びます。 ソングの選択については、115ページをご覧ください。 [R](再生)ボタンを押して、ソングを再生します。 ソングが一時停止状態になります。 2 3 画面右上の[ツール]ボタンを押して、ツールペー ジを表示させます。 画面の[名前変更]ボタンを押します。 以下の文字入力画面が表示されます。 [I](録音)ボタンを押します。 録音画面が表示され、録音待機状態になったことを示 します。 5 6 [R](再生)ボタンを押して録音を開始します。 変更したい部分だけを演奏します。 録音し直したい部分の演奏が終わったら、速やか に[J](停止)ボタンを押して録音を終了します。
ソングに名前をつける 5 文字種選択のボタンで、入力したい文字種を選び ます。 漢字変換をするには: 1 入力した文字列が反転表示されているときに[漢 字変換]ボタンを押します。 反転表示の範囲が漢字に変換されます。候補の漢字が 出てこない場合は、[漢字変換]ボタンを何度か押すと、 次の候補が表示されます。 6 NOTE • 文節(反転表示の範囲)を変えたいときは、[L][R]ボ タンまたはデータコントロールダイアルを使います。 言語設定(18ページ)を「ENGLISH」(英語)にしている場合、 ひらがなやカタカナは入力できません。 • 反転表示の文字をすべて一度に消したいときは、 [キャンセル]ボタンを押します。 入力したい文字を押します。 最大で25文字(半角文字の場合は50文字)まで入力す ることができます。文字種を「かな漢」にしていると きは、漢字変換もできます。漢字変換については右コ ラムをご覧ください。 NOTE XGソングのソング名は最大で全角23文字です。 7 2 [OK]ボタンを押すか、次の文字を入力すると、 漢字が確定します。漢字に変換された文字列をひ らがな
レジストレーションなどをユニットに保存する レジストレーションなどを ユニットに保存する 3 表示されているユニットの一番下にある、空白の ボタンを押します。 演奏データを録音せずに、レジストレーションメモリーなど のデータだけを、以下のとおりユニットに保存できます (101ページ)。 • レジストレーションメモリー関連データ(レジストレー ションシフト設定を含む) • VAカスタムボイス(ELS-02C/ELS-02Xのみ)および ユーザーボイスデータ • キーボードパーカッションデータ • ユーザーリズムデータ • リズムシーケンスデータ 1 レジストレーションメモリーなど作成したデータ を保存するための、空のソングを選択します。 2 画面右下の[ユニット編集]ボタンを押します。 ユニット編集画面が表示されます。 3 [保存]ボタンを押します。 データが保存中であることを示すメッセージが、画面上 に表示されます。メッセージが消えたあと、[閉じる]ボ タンを押すとソングページに戻り、ソング名が 「SONG̲XXX」になります(XXXには数字が入ります)。 1つのソングで5バンク(=1ユ
レジストレーションなどをユニットに保存する NOTE 以下の方法で、レジストレーションなどのデータだけを記録するこ ともできます。 1. 記録させたいソングナンバーを選択します。 2. [I](録音)ボタンを押して、録音を待機状態にします。 3.
レジストレーションなどのデータを読み込む レジストレーションなどの データを読み込む 5 「読み込みますか?」というメッセージが表示されま す。[読み込み]ボタンを押すと、手順4で選んだデータ が読み込まれます。 [キャンセル]ボタンを押すと、データを読み込まずに 手順4の画面に戻ります。 ソングに記録されたレジストレーションなどのデータは、簡 単にエレクトーンに読み込むことができます。また、レジス トレーションに含まれている以下の5つの情報を、個別に読 み込むこともできます。 • レジスト:レジストレーション(レジストレーションメモ リーに保存されている情報) • ユーザーボイス:ユーザーボイス、VAカスタムボイス [読み込み]ボタンを押します。 NOTE リズムの再生中にレジストレーションを読み込むと、シーケ ンスデータやユーザーリズムは読み込まれません。 6 画面右上の[閉じる]ボタンを押して、ユニット編 集画面を閉じます。 • K.B.P.
レジストレーションなどのデータを読み込む フォルダー プロテクトソング (オリジナル) プロテクトソング (編集) コピー レジストレーションの編集 や上書き録音はできない 編集や録音が可能(プロテクトオリ ジナルソングと同じUSBフラッシュ メモリー/フォルダー内にあるとき のみ再生/編集できる) 注記 プロテクトソングをコンピューター上で直接コピー /移動する と再生できなくなります。 コンピューター上でプロテクトソングを移動する場合は、必ず ミュージックソフトダウンローダーをお使いください。ミュー ジックソフトダウンローダーについては、下記ウェブサイトの 「ソフトウェア」から検索してください。 サポート・お問い合わせ https://jp.yamaha.
ソングを再生する ソングを再生する MDRで録音したソングの再生方法を説明します。MDRで は市販のソングデータも再生できるので、合わせて説明しま す。 1 カスタムプレイ レジストレーションやほかのデータを読み込まないで、 演奏データだけを再生したい場合は、[R](再生)ボタン の代わりに[カスタムプレイ]ボタンを押します。すぐに 再生がスタートします。 再生させたいソングを選択します。 ソングの選択については115ページをご覧ください。 2 画面上の[R](再生)ボタンを押して再生を開始し ます。 • ソングにレジストレーションデータだけがある場 合(演奏データがない場合): ネクストユニット機能を使った曲を再生する場合には、 [カスタムプレイ]ではなく[R](再生)ボタンで再生をス タートさせてください。 • ソングにレジストレーションデータ、演奏データ の両方がある場合: 画面上に砂時計が表示されてレジストレーション データが読み込まれたあと、ソングの演奏が始まり ます。 • ソングに演奏データだけがある場合: すぐにソングの演奏が始まります。 再生を止めたい場合は、画面上の[J]
ソングを再生する XGソングデータで特定のパートだけを再生す るには: XGソングデータの再生中に、パート[XG]ボタンを押しま す。下のXGパート設定画面が表示されます。 関連ページ • XG変換機能(132ページ) 再生テンポを変更する USBフラッシュメモリーに録音されているデータを再生す る場合には、パネル上のテンポダイアルではテンポ変更でき ません。ソングの再生テンポは、MDR画面で変更します。 ソングの再生中でも停止中でも、テンポを変更できます。 NOTE 演奏が録音されていないソングデータでは、再生テンポの変更はで きません。 テンポを変更するには: チャンネルボタン([CH1]など)を押して、各チャンネルの再 生/ミュートを切り替えます。 ボタンを押すたびに、PLAY/OFFが切り替わります。再生 したいパートを「PLAY」に、再生したくないパートを 「OFF」に設定します。 [すべて]ボタンを押すと、すべてのチャンネルのPLAY/ OFFを一括して切り替えます。 画面のテンポ ボタンやデータコントロールダイア ルで、再生テンポを変更できます。50%〜200%の範囲で 設定できます
ソングを再生する (シングル) 現在選ばれている曲を繰り返し再生します。 リピート再生する 特定の曲だけを繰り返し再生したり、同じフォルダーに録音 されている全部の曲を繰り返し再生することができます。 1 2 3 (すべて) 現在選ばれているフォルダー内のすべての曲を、順番 に繰り返し再生します。 リピート再生したいソングを選択します。 フォルダー内の全曲をリピート再生したい場合は、 1曲目に再生したい曲を選択します。ソングの選択に ついては115ページをご覧ください。 (ランダム) 現在選ばれているフォルダー内のすべての曲を、任意 の順番で繰り返し再生します。 画面右上の[ソング]ボタンを押して、ソングペー ジを表示させます。 (停止) リピート再生しません。 画面上の ボタンを押します。 5 演奏設定画面が表示されます。 6 画面右上の ます。 ボタンを押して、画面を閉じ [R](再生)ボタンを押すと、上で選んだ方法でリ ピート再生がスタートします。 ミュージックデータレコーダー M(DR 7 ) 4 リピートボタンを押して、リピート再生の方法を 選択します。 ボ
譜面を表示する NOTE 譜面を表示する USBフラッシュメモリーに録音されている演奏データの譜 面を表示することができます。また、表示する譜面サイズや 内容を変更することもできます。ソングを再生すると、演奏 箇所に合わせてカーソルが移動し、自動的に譜めくりされま す。 1 演奏データの入っているソングを選択します。 ソングの選択については、115ページをご覧ください。 2 変更した譜面サイズはレジストレーションメモリーに記録し ておくことはできません。 4 譜面を手でめくるには、ソングの再生を停止また は一時停止し、画面のページ[L]または[R]ボタ ンを押します。 前のページまたは次のページを表示することができま す。また、ページ[R]ボタンは左フットスイッチに割 り当てることができます。 5 譜面を閉じるには、画面の[譜面OFF]ボタンを押 します。 画面の[譜面]ボタンを押します。 現在選択されているソングの譜面が表示されます。 譜面の表示内容や設定を変更する 譜面に表示する内容を選んだり、表示/非表示を切り替えた りできます。また、左フットスイッチに譜めくりの機能を割 り当て
その他の機能(ツール)を使う 3 譜面に表示する内容を変更します。 [ON]または[OFF]ボタンで各パートの表示/非表示を 選べます。ただし、上鍵盤、下鍵盤、ペダル鍵盤のう ち、少なくとも一つが自動的に[ON]になります。 音名は、[OFF]、[A, B, C]、[固定ド]、[移動ド]から 選べます。 CH設定は、上鍵盤、下鍵盤、ペダル鍵盤に割り当てる チャンネルを[▲]または[▼]ボタンを使って選べます。 また、[▲]または[▼]ボタンを押したあと、データコン トロールダイアルを回して選ぶこともできます。 [AUTO]を選ぶと、曲に応じて自動的にチャンネルが 割り当てられます。 クオンタイズは、[▲]または[▼]ボタンを使って選べま す。また、[▲]または[▼]ボタンを押したあと、データ コンロールダイアルを回して選ぶこともできます。 細かい音符を選ぶほど、譜面表示が正確になります。 その他の機能(ツール)を使う ソングをコピーしたり削除したり、あるいはソングの容量を 確認したりなどさまざまな機能があります。MDR画面の ツールページで設定します。 ソングコピー 1つのソングをコピーしたり、ソング
その他の機能(ツール)を使う ソングコピーの一般的な操作: 同じUSBフラッシュメモリー内でも、異なるUSBフラッ シュメモリー間でもソングコピーやフォルダーコピーができ ます。コピーしたいソングが入っているUSBフラッシュメ モリーと、コピー先となるUSBフラッシュメモリーをあら かじめ挿入しておいてください。 注記 USBフラッシュメモリーはしっかりと奥まで差し込んで使用してく ださい。しっかりと差し込んでいないと、データが失われるおそれ があります。 1 コピーしたいソング、フォルダーまたはUSBフ ラッシュメモリーを選択します。 ソングの選択については115ページをご覧ください。 2 3 5 [実行]ボタンを押してコピーを実行します。 [キャンセル]または[閉じる]ボタンを押すと、 コピーせずにもとの画面に戻ります。 コピー先のフォルダー /ソング名は、もとのフォル ダー /ソング名と同じになります。コピー先に、もと のフォルダー /ソングと同名のフォルダー /ソングがあ る場合、たとえば元のソング名が「コピー元フォルダー /ソング名̲XXX」の場合、「コピー元フォルダー /ソン グ名̲
その他の機能(ツール)を使う [USB TO DEVICE]端子が1つしか空いてい ない場合の操作: 通常は、コピー元のUSBフラッシュメモリーとコピー先の USBフラッシュメモリーの両方を[USB TO DEVICE]端子 に接続して130ページの方法でコピーしますが、[USB TO DEVICE]端子に空きがない場合は以下の方法で1ソングず つコピーしてください。 ここの操作で、フォルダーごとのコピーはできません。 1 2 130ページの1〜3の操作を行ないます。 ボタンがグレー表示になって押せなくな るまで、数回押して、USBフラッシュメモリー のリストを表示させます。 3 「MEMORY」を選びます。 8 コピー先の指定が終わったら、[実行]ボタンを押 してソングコピーを実行します。[キャンセル]ま たは[閉じる]ボタンを押すと、コピーせずにもと の画面に戻ります。 コピー先のソング名は、もとのソング名と同じになり ます。コピー先に、もとのソングと同名のソングがあ る場合、コピーしたソングは、「コピー元ソング名 ̲XXX (XXXには数字が入ります)」というソング名に なります。 XGソン
その他の機能(ツール)を使う ソングの削除 ソング内のデータを削除します。レジストレーションデータ だけ、演奏データだけを削除したり、ソング自体を削除した りできます。ここで説明する方法は、ELS-02シリーズで作 成したレジストレーションデータや演奏データ、XGソング の削除です(EL-900などのELシリーズのソングは、削除で きません)。 1 削除したいデータがフォルダー、レジストレー ションだけのソング、演奏データだけのソング、 プロテクトソング、XGソングの場合: 削除したいデータの入っているソングを選択しま す。 ソングの選択については115ページをご覧ください。 2 3 画面右上の[ツール]ボタンを押して、ツールペー ジを表示させます。 画面の[削除]ボタンを押します。 「削除しますか?」というメッセージが表示されます。 削除したいソングのソング名が画面に表示されている ことを確認します。削除するソングを変更したい場合 は、[キャンセル]ボタンを押して、ソングを選び直し ます。 4 [削除]を選ぶと削除が実行されます。[キャンセル]を選ぶと、 削除せずにもとの画面に戻ります。
その他の機能(ツール)を使う ELS→EL変換機能 ELS-01シリーズやELS-02シリーズで録音したソングを ELシリーズで再生できるよう、データ変換ができます。変 換されたデータをUSBフラッシュメモリーに保存すること で、別売のMDR-5を取り付けたELシリーズで再生ができま す。USBフラッシュメモリーのルートにF01〜F99のフォ ルダーを作った上で、下記操作を行なってください。 NOTE プロテクトソングは変換できません。 関連ページ • プロテクトソングについて(123ページ) 1 ELシリーズの形式に変換したいソングを選びます。 ソングの選択については115ページをご覧ください。 2 ツールページで[変換]ボタンを押します。 「どの変換を行いますか?」というメッセージが表示さ れます。 ミュージックデータレコーダー M(DR 4 7 [XG変換]ボタンを押します。 下の変換先選択画面が表示されます。 ) 5 (必要に応じて)XG変換後のソングの保存先を変 更します。 保存先の変更については115ページをご覧ください。 6 [変換実行]ボタンを押します。 画面に
その他の機能(ツール)を使う 4 画面上の[変換実行]ボタンを押します。 ELS→EL変換が実行されます。 EL→ELS変換機能 USBフラッシュメモリーに保存されているEL-900などの ELシリーズ用のソングを、このエレクトーンで使用できる データに変換します。 1 ELS変換をしたいソングを選びます。 ソングの選択については115ページをご覧ください。 2 ツールページで[変換]ボタンを押します。 「EL→ELS変換を実行しますか?」というメッセージ が表示されます。 3 4 画面の[EL→ELS変換]ボタンを押して表示され る画面で、変換後のソングの保存先を指定しま す。 画面上の[変換実行]ボタンを押します。 EL→ELS変換が実行されます。 134 ELS-02/ELS-02C/ELS-02X 取扱説明書 ソング容量/USBフラッシュメモ リーの残量の確認 ツールページで[情報]ボタンを押すと、USBフラッシュメ モリーが選択されているときは空き容量(残量)を、ソングが 選択されているときは容量やバンク数の合計、曲名、作曲者 名などを表示します。表示される内容は、ソングによ
8 オーディオ [AUDIO]ボタンを使うことにより、ご自分の演奏をオーディオファイル(.WAV)としてUSBフラッシュメモリーに録音 することができます。録音したオーディオファイルをコンピューターを使って活用することにより、知り合いとお互い の演奏データをやりとりしたり、オリジナルのCDを制作したりするなど、さまざまな用途で楽しめます。USBフラッ シュメモリーに入っているオーディオファイルをこの楽器で再生することもできます。 オーディオ ファイル オーディオ ファイル USBフラッシュ メモリー サポート・お問い合わせ: https://jp.yamaha.
演奏を録音する 1 動作確認済みのUSBフラッシュメモリーを、 [USB TO DEVICE]端子に接続します。 4 画面の[I](録音)ボタンを押して録音待機状態に します。 関連ページ • 動作確認済みのUSBフラッシュメモリー (135ページ) 2 パネル上の[AUDIO]ボタンを押して、オーディ オページを表示させます。 DISPLAY SELECT VOICE DISPLAY A.B.C. M.O.C. MDR FOOT SWITCH UTILITY AUDIO RHYTHM PROGRAM VOICE EDIT PATTERN SEQUENCE U.ORGAN FLUTES L.
オーディオファイルを再生する 6 演奏が終わったら、画面の[J](停止)ボタンを押 して、録音を終了します。 録音したオーディオファイルに自動的に名前が付けら れ、オーディオページで選択されます。 7 画面の[R](再生)ボタンを押して、録音した演奏 を聞いてみましょう。 オーディオファイルを再生 する USBフラッシュメモリーに入っているオーディオファイル をこの楽器で再生してみましょう。 NOTE DRM(デジタル著作権管理)付きファイルは非対応です。 再生できるファイル形式 拡張子.wav、サンプリング周波数44.1kHz、量子化ビット 数16bit、stereo 1 再生したいオーディオファイルの入っている動作 確認済みのUSBフラッシュメモリーを、[USB TO DEVICE]端子に接続します。 関連ページ • 動作確認済みのUSBフラッシュメモリー (135ページ) 2 パネル上の[AUDIO]ボタンを押して、オーディ オページを表示させます。 オーディオ 8 DISPLAY SELECT VOICE DISPLAY A.B.C. M.O.C.
オーディオファイルを再生する 3 再生したいオーディオファイルを選びます。 データの入っているオーディオファイルには、 (波 形アイコン)が付いています。オーディオファイルの選 び方は、ソングの選び方と同じです。115ページの手 順2、3を参考に、目的のオーディオファイルを選んで ください。 4 オーディオファイルが選ばれた状態で画面の [R](再生)ボタンを押すと、オーディオ再生画面 の再生ページが表示され、再生が始まります。 再生中は画面の左下に再生時間が表示されます。 早戻し/早送り/一時停止 オーディオファイルの再生中に、早戻しや早送り、一時停止 などができます。 早戻し/早送りをするには: 早戻しは画面の[LL](早戻し)ボタン、早送りは画面の [RR](早送り)ボタンを押します。オーディオファイルの再 生は中断され、画面の時間表示も、早戻し/早送りに従って 変化します。ボタンをはなしても、再生は中断されたままで す。早戻し/早送りをしたところから再生をスタートするに は、画面の[R](再生)ボタンを押してください。 一時停止するには: オーディオファイルの再生中に、画面の[K](一時
オーディオファイルを再生する • 音量を変更するには: 音量、テンポ、ピッチの調節 画面に表示されたスライダーを直接触って音量の値を 変更するか、データコントロールダイアルを回して、 ボリュームを変更します。 設定範囲: 0〜127 オーディオファイルの再生音量、テンポ、ピッチ(再生音の 高さ)を調節できます。 1 • テンポを変更するには: オーディオファイルの入った、動作確認済みの USBフラッシュメモリーを挿入します。 画面のテンポ ボタンを続けて押すか、デー タコントロールダイアルを回して、再生テンポを変更 します。もとのテンポが100%で表示され、それより も大きい数値にすると速く、小さい数値にすると遅く なります。画面の[リセット]ボタンを押すか、別の オーディオファイルを選ぶと、値は初期設定(100%) に戻ります。 設定範囲: 75%〜125% 関連ページ • 動作確認済みのUSBフラッシュメモリー (135ページ) 2 [AUDIO]ボタンを押します。 3 目的のオーディオファイルを選択します。 オーディオファイルの選び方は、ソングの選び方と 同じです。115ページ
その他の機能(ツール)を使う • ファイルを削除するには: その他の機能(ツール)を使う フォルダーの作成、ファイルの削除、 名前の変更 オーディオファイルを削除したり、名前を変更したりできま す。 1 オーディオファイルの入った、動作確認済みの USBフラッシュメモリーを挿入します。 関連ページ 画面の[削除]ボタンを押すとオーディオファイルを削 除するかどうか確認を求める画面が表示されます。 画面の[キャンセル]ボタンを押すとオーディオファイ ルは削除されずに元の画面に戻り、画面の[削除]ボタ ンを押すとオーディオファイルは削除され、元の画面 に戻ります。 • 名前を変更するには: 画面の[名前変更]ボタンを押すと文字入力画面が表示 され、名前を入力できます。入力方法は「ソングに名 前を付ける」(119ページ)と同じです。画面の[OK]ボ タンを押すと名前が変更され、オーディオページに戻 ります。 ツールページからオーディオページに戻るには、画面の [オーディオ]ボタンを押します。 • 動作確認済みのUSBフラッシュメモリー (135ページ) 2 [AUDIO]ボタンを押します。 3
9 ボイスエディット エレクトーンに内蔵されているボイスの音色や音量を変更して、オリジナルのボイスをつくることができます。この機 能をボイスエディット機能といいます。 まずは「ボイスの構成」を読んで、エレクトーンに入っているさまざまな楽器音がどのようにつくられているかを理解 しましょう。ボイスの構成が理解できたら、次に「ボイスをエディットする」を読みながら実際のエディット作業に進 みましょう。 NOTE スーパーアーティキュレーションボイスはエディットできません。 VA音色の構成 ボイスの構成 ボイスエディットを始める前に、エレクトーンに内蔵されて いる個々のボイス(楽器音色)がどのようにつくられている か、詳しく見てみましょう。また、「搭載されている音源に ついて」(41ページ)もあわせてご覧ください。 AWM音色の構成 VA音色は、生楽器の性質をシミュレートしてつくられてい ます(VA音源)。VA音色のボイスエディットでは、もとのボ イスの音量や音質を変更したり、AWM音源でつくられたエ レメントを加えたりして、オリジナルのボイスをつくること ができます。 VA音色はELS-02C/ELS-0
ボイスをエディットする DISPLAY SELECT ボイスをエディットする たとえば、アコーディオン1の音をエディットしたい 場合は、いずれかのボイスセクションの[オルガン]ボ タン(またはユーザーボタン)でアコーディオン1を選ん でおきます。 BRILLIANCE STRINGS BRASS WOODWIND TUTTI PAD SYNTH 1 PIANO ORGAN PERCUSSION GUITAR CHOIR WORLD 2 MDR FOOT SWITCH UTILITY AUDIO U.ORGAN FLUTES エディットしたいボイスを鍵盤に呼び出します。 UPPER KEYBOARD VOICE 1 A.B.C. M.O.C. RHYTHM PROGRAM VOICE EDIT PATTERN SEQUENCE エディットしたいボイスを選ぶ 1 VOICE DISPLAY L.ORGAN ROTARY SP SPEED FLUTES 押しながら...
ボイスをエディットする 4 EQハイフリケンシー /EQハイゲイン AWM音色のエディット AWM音色のエディットは、ボイスエディット画面のAWM ページとレイヤーページで行ないます。AWMページは、ボ イス全体の音質を調整するためのページで、レイヤーページ は、ボイスを構成する各エレメントを細かくエディットする ためのページです。 AWMページ EQ (イコライザー ) 1 1 高い周波数の音量を変化させます。フリケンシースライダー では、音量変化させたい周波数を500Hz〜16.
ボイスをエディットする レイヤーページ【1】 このボタンで画面を切り替えます 3 アタックレート 鍵盤を押さえたとき、0から最大の出力レベルに達するまで の速さを設定します。値が大きいほど、音の立ち上がりが速 くなります。 設定範囲:0〜127 関連ページ • エンベロープパラメーター (146ページ) 4 リリースレート 1 2 鍵盤から指をはなしたあと、出力レベルが0になるまでの速 さを設定します。値が大きいほど、音が消えるまでの時間が 短くなります。 設定範囲:1〜127 3 1 レベル 5 カットオフフリケンシー エレメントの出力レベルを設定します。 設定範囲:0〜127 フィルターのカットオフ周波数(フリケンシー )を設定します。 設定範囲:9600〜24000セント 2 ノートリミット エディット中のエレメントを発音させる音域を設定します。 ここで設定した最低音(ロー )と最高音(ハイ)の間でのみ発音 します。最高音(ハイ)を最低音(ロー )より低く設定すること はできません。エレメントによっては、設定したとおりに ノートリミットの効果がかからないものもあります。 設定範
ボイスをエディットする レイヤーページ【3】 LFO (ローフリケンシーオシレーター ) LFOは、低い周波数の信号を発生する発振器です。 LFOから発振された低周波で、ピッチをふるわせてビブ ラート効果をかけたり、音質をふるわせてワウワウ効果 をかけたり、音量を揺らしてトレモロ効果をかけたり、 といった使い方ができます。 発振する信号の波形としては以下の5種類が用意されて います。いろいろな波形でどんな効果が得られるか、試 してみてください。 1 2 3 4 鋸歯波(saw) 三角波(tri) 矩形波(squ) ランダム(rnd) 5 1 LFOウェーブ LFOから発振される出力波形(ウェーブ)を選択します。右コ ラムをご覧ください。 2 LFOスピード LFOから発振される信号の速さを設定します。値が大きい ほど、スピードが上がります。 設定範囲:2〜93 正弦波(sine) 3 LFOピッチ LFOでピッチを周期的に変化させます。値が大きいほど、 ピッチの変化幅が大きくなります。値を0にすると、ピッチ は変化しません。 設定範囲:0〜400 ボイスエディット 9 4 L
ボイスをエディットする VA音色のエディット(ELS-02C/ ELS-02X) 6 EQロー 音を構成する成分(周波数)のうち、低音部を強調したり(+)、 抑えたり(−)します。 設定範囲:−64〜+63 VA音色のエディットは、ボイスエディット画面VAページ で行ないます。ELS-02ではVAページは表示されません。 7 EQハイ VAページ 音を構成する成分(周波数)のうち、高音部を強調したり(+)、 抑えたり(−)します。 設定範囲:−64〜+63 関連ページ • EQ (イコライザー )(143ページ) エンベロープパラメーター 1 2 3 4 5 6 7 個々の楽器によって、鍵盤を押さえたときの音の立ち上 がりかた、鍵盤を押さえている間の音量/音質の変化の しかた、鍵盤から指をはなしたあとの音の減衰のしかた などは異なっています。その波形の特性をエンベロープ といいます。上の2〜5は、このエンベロープを変化さ せるためのパラメーターです。 1 エレメントオン/オフ AWM音源の8つのエレメントとVA音源を表しています。 AWM1〜8の各ボタンを押すたびに、オンとオフ
エディットしたボイスを 保存する エディットしたボイスを 保存する ボイスエディットでつくったAWM音色は、ユーザーボイス として80個まで保存できます。 また、ELS-02C/ELS-02Xの場合、VA音色はVAカスタム ボイスとして6個まで保存できます。 1 画面右上の[保存]ボタンを押して、保存ページを 表示させます。 4 [保存]ボタンを押すと、 「保存しました。」という メッセージが一時的に表示されて、ユーザーボイ スまたはVAカスタムボイスが保存されます。 [キャンセル]ボタンを押すと、保存しないで前の画面 に戻ります。 注記 ユーザーボイスまたはVAカスタムボイスを保存すると、その ユーザーボイスナンバーまたはVAカスタムボイスナンバーに 入っていたボイスは、上書きされて消えてしまいます。大切な データを消去してしまわないよう、よくご確認ください。大切 なデータは、あらかじめMDR機能を使って、USBフラッシュ メモリーに保存されることをおすすめします。 AWM音色とVA音色とで画面は異なります。 AWM音色の場合 ボイスを保存したあとは、必ず148ページの方法でボイス エディッ
ボイスエディットを終了する ボイスエディットを終了する ボイスを保存したあとや、エディットを中止したいときな ど、どのページからでも簡単に終了できます。 1 保存したユーザーボイスは、各ボイスセクションのユーザー ボタンを使って呼び出します。第2章の「ユーザーボタンで ボイスを選ぶ」(30ページ)をご覧ください。 UPPER KEYBOARD VOICE 1 パネル上の[VOICE EDIT]ボタンを押します。 エディットしたボイスがすでに保存されている場合は、 そのままボイスエディットを終了します。エディット したボイスがまだ保存されていない場合には、保存せ ずに終了してよいか確認を求めるメッセージが現れま す。 2 保存したボイスを呼び出す [終了]ボタンを押すと、エディットしたボイスを 保存せずにボイスエディットを終了します。 [キャンセル]ボタンを押すと、ボイスエディット画面 に戻ります。 BRILLIANCE STRINGS BRASS WOODWIND TUTTI PAD SYNTH 1 PIANO ORGAN PERCUSSION GUITAR CHOIR
10 リズムプログラム リズムプログラムには、高品位でバラエティー豊かな打楽器音色を駆使して、ユーザーリズムパターンをつくり出せる リズムパターンプログラムと、内蔵されているリズムやユーザーリズムを1小節ずつ自由に並べ替えて、自分自身の リズムシーケンスが楽しめるリズムシーケンスプログラムがあります。リズムシーケンスプログラムでは、レジスト レーションシーケンスの情報も組み込んで、自動的にレジストレーションとリズムを切り替えながら演奏することもで きます。 リズムプログラムの概要 リズムパターンプログラム(149ページ〜 165ページ) 内蔵リズムの中に演奏したい曲に合ったものがない場 合、自分で打楽器を入力したり、内蔵されているリズ ムを編集したりして、オリジナルのリズムをつくれま す。 リズムパターンをつくる: リズムパターンプログラム リズムパターンプログラムでは、下鍵盤と上鍵盤の各キーに 割り当てられた打楽器音を使って、オリジナルのリズムをつ くることができます。つくったリズムパターンは、 48パターンまでユーザーリズムとして保存できます。 打楽器音の入力、編集 下鍵盤で演奏するアカンパニ
リズムパターンをつくる:リズムパターンプログラム 既存のリズムをもとにせず、最初からプログ ラムを始める場合: DISPLAY SELECT VOICE DISPLAY A.B.C. M.O.C. MDR FOOT SWITCH UTILITY AUDIO [PATTERN]ボタンを押して、すぐに手を離します。この場 合は、何も入力されていない状態からオリジナルのリズムパ ターンをつくることになります。 RHYTHM PROGRAM VOICE EDIT PATTERN SEQUENCE U.ORGAN FLUTES 一つのリズムは、リズムパターンのバリエーションとし て15種類のセクション(イントロ1〜3、メインA〜D、 フィルインA〜D、ブレイク、エンディング1〜3)から 構成されています。 リズムパターンプログラムでは、これらのセクション 1つ1つについて、打楽器を入力したり消去したり、あ るいは、ほかのリズムで使っているセクションをコピー して集めてきたり(アセンブリー )して、新しいユーザー リズムをつくります。 L.
リズムパターンをつくる:リズムパターンプログラム ケース2:既存の複数のリズムからセクション を組み合わせて、ユーザーリズムをつくる 既存のリズム フィルインA イントロ1 メインA 2 B B 3 C C D D エンディング1 2 ブレイク 3 入力するリズムの基本設定をする 設定ページで、拍子や小節数などの設定を行ないます。 また、別のリズムで使っているセクションをコピーしたり、 ドラムやアカンパニメントの各パートを削除したりもできま す。 1 画面上の[設定]ボタンを押して、設定ページを表 示させます。 既存のリズム フィルインA' イントロ1' メインA' 2' B' B' 3' C' C' D' D' エンディング1' 2' ブレイク' 3' 複数のリズムのセクションを 組み合わせる 保存 2 ユーザーリズム イントロ1 メインA フィルインA 2 B B 3' C' C' D' D' エンディング1 2 リズムの拍子を設定します。 表示されているボタンの中から拍子を選びます。 ブレイク' 10 3
リズムパターンをつくる:リズムパターンプログラム 3 リズムパターンを入力するセクションを選びます。 画面上でセクションのボタンを押すと、セクション選 択画面が表示されます。選択画面でセクションを選ぶ と、自動的に選択画面が閉じます。 1 メトロノーム メトロノームのオン/オフを設定します。メトロノームを オンにしてリズムをスタートさせると、拍にあわせてメトロ ノームが鳴ります。リアルタイム入力のときにオンにしてお くと便利です。 関連ページ • ステップ入力とリアルタイム入力(153ページ) • 打楽器(リズム)を入力する−リアルタイム入力(154ページ) NOTE パネル上のリズムのVOLUMEボタンを押すと、メトロノームの ボリュームも変わります。 2 アセンブリー ほかのリズムから現在プログラム中のリズムに、パートを コピーします。複数のリズムからセクションを組み合わせて ユーザーリズムを作成する場合に便利です。 [アセンブリー ]ボタンを押すと、以下の画面が表示されま す。 コピー元のリズム、 セクション、パートを選びます セクションを変更して、パネル上の[START]ボタンで リズムを
リズムパターンをつくる:リズムパターンプログラム コピー元のリズムに現在作成中のリズムパターンを選択 することもできます。 たとえばメインAをもとにしてメインBのリズムパター ンをつくるときは、メインAのリズムパターンを入力し たあと、メインBにコピーしてから編集すると便利で す。 作成中のリズムパターンをコピー元として選ぶには、 「USER」カテゴリーの5ページ目で「作成中のリズム」 を選択します。 消去したいパートを選ぶと、 「消去しますか?」というメッ セージが表示されます。[消去]ボタンを押すと消去し、 [キャンセル]ボタンを押すと消去せずにもとの画面に戻りま す。 NOTE ベースを消去すると、A.B.C.
リズムパターンをつくる:リズムパターンプログラム 打楽器(リズム)を入力する −ステップ入力 入力ページで打楽器音を入力します。各ボイスセクションの ボイスのボリュームを下げて、鍵盤を弾いたときにリズムだ けが鳴る状態にしておきましょう。 NOTE リズムパターンプログラム中のリズムやアカンパニメントの ボリュームは、パネル上のリズムのVOLUMEボタンで調節できま す。リズムパターンプログラムを終了すると、VOLUMEボタンは、 あらかじめ設定されていたリズムのボリューム値に戻ります。 1 2 ドラムキット SFXキット 画面上の[入力]ボタンを押して、入力ページを表 示させます。 パートのボタンで、打楽器を入力するパート (メインドラムまたはアドドラム)を選びます。 打楽器は、メインドラムまたはアドドラムのパートに 入力します。通常は、主な打楽器はメインドラムに入 力し、タンバリンなどの装飾音をアドドラムに入力し ます。 キットは、メインドラムとアドドラムのそれぞれにつ いて1種類ずつしか選べません。違うキットの打楽器 音を組み合わせてリズムをつくりたい場合は、メイン ドラムとアドドラムにそれ
リズムパターンをつくる:リズムパターンプログラム 5 入力したいリズムに適したクオンタイズを設定し ます。 クオンタイズの詳細については、158ページをご覧く ださい。 NOTE クオンタイズは、入力している途中に変更することもできま す。 2 アクセントボタン 入力したい音量のアクセントボタンを押すたびに、打楽器音 が入力されていきます。[ ppp ]ボタンが一番小さい音、 [ fff ]ボタンが一番大きい音で、8段階の音量で入力できま す。入力と同時に、リズムクロックの表示も、現在選択され ているクオンタイズの長さ分だけ進行します。[休符]ボタン を押したときには、音は出ずにリズムクロックの表示だけが 進行します。休符を入力するときに使用します。 3 クオンタイズ[L][R] 1ステップずつリズムクロックの表示を前または次に進めま す。ステップは、選択されているクオンタイズによって変わ ります。 8 6 7 ホイッスルなどの持続音を入力する場合は、ゲー トタイム(音符の長さ)を設定します。 手順4〜7の操作を繰り返して打楽器音を重ねて いき、リズムを完成させます。 入力した音符を編集/
リズムパターンをつくる:リズムパターンプログラム 2 音符[L][R] 入力した音符の位置を移動するには: 同一打楽器内で、現在選ばれている音符の前または次に入力 されている音符を選びます。 たとえば下図では、休符である2や5はとばして、1、3、 4を順番に選択できます。 1 2 155ページの手順1に従って、移動したい音符を 選択します。 リズムクロック表示ボックスを押します。 リズムクロック表示ボックスのまわりに青枠が表示さ れます。 1 23 4 5 3 クオンタイズ[L][R] 1ステップずつリズムクロックの表示を前または次に進めま す。ステップは、選択されているクオンタイズによって変わ ります。 2 アクセント表示ボックス、またはアクセントボタ ンで、音量を変更します。 アクセント表示ボックスで音量を変更する方が、より 細かい調整ができます。 1 3 データコントロールダイアルを回して、音符の位 置をクロック単位で変更します。 入力した音符の長さを変えるには: スネアロールやホイッスルのような持続音については、ゲー トタイムを変更することで、音の鳴る長さを調節できます
リズムパターンをつくる:リズムパターンプログラム また、特定の打楽器音をすべて消去したり、すべての打楽器 の音を消去したりすることもできます。 すべての打楽器音を消去するには: 1 次のような表示が現れ、選ばれている打楽器音を消去 するか、すべての打楽器音を消去するかの確認を求め てきます。 特定の打楽器音をすべて消去するには: 1 画面右下の[消去]ボタンを押します。 消去したい打楽器が割り当てられているキーを押 します。 選んだキーと打楽器名が、画面に表示されます。 選んだキー 2 打楽器名 画面右下の[消去]ボタンを押します。 次のような表示が現れ、すべての打楽器音を消去する か、選ばれている打楽器音を消去するかの確認を求め てきます。 2 [全てを消去]ボタンを選びます。 瞬間的にすべての打楽器音が消去されます。 また、入力する打楽器を間違えた場合などは、一度消去して から入力し直さなくても、以下の方法で、すでに入力してあ る打楽器音をほかの打楽器音に置き換えることもできます。 ほかの打楽器音に置き換えるには: リズムをストップした状態で、以下の操作をします。 [消去
リズムパターンをつくる:リズムパターンプログラム クオンタイズについて ステップ入力で楽器音を入力する際の入力タイミング、 あるいはリアルタイム入力でタイミングを補正する精度 を、クオンタイズで設定します。9種類のクオンタイズ 値が選べます。 打楽器(リズム)を入力する −リアルタイム入力 すでに入力してあるリズムを鳴らしたり、メトロノームを鳴 らしたりしながら、鍵盤を弾いて打楽器音を入力します。弾 いた音がそのままリズムとして入力されます。 1 1 2 3 4 5 2 このボタンで 切り替えます 6 7 8 9 154ページの手順1〜3に従って、入力するパー トやキットを選びます。 入力したいリズムに適したクオンタイズを設定し ます。 設定されたクオンタイズによって、入力する音符のタ イミングが自動的に補正されます。左コラムをご覧く ださい。 5 ステップ入力を行なう場合 選択したクオンタイズで、楽器音を入力することができ ます。入力ページのクロック表示ボックスでは、クオン タイズに応じた数字が表示されます。 各クオンタイズで移動できるタイミング 1 2 240 3 1
リズムパターンをつくる:リズムパターンプログラム 4 リズム(またはメトロノーム)に合わせて、入力し たい打楽器音が割り当てられたキー (鍵)を弾い て打楽器を演奏します。 3 既存のリズムをもとにプログラムを始めた場合は、そ のリズムに合わせながら入力できます。何も入力され ていない状態から始めた場合は、設定ページでメトロ ノームをオンにし、メトロノームの音を聞きながら入 力します。設定ページで選んだ小節数だけパターンが 繰り返されます。 コピー元の[リズム]ボタンや[セクション]ボタン で、使用したいアカンパニメントのあるリズム、 セクションを選択します。 関連ページ • リズムの基本設定をする(151ページ) 関連ページ • メトロノーム(152ページ) 5 手順2〜4の操作を繰り返して打楽器音を重ねて いき、リズムを完成させます。 入力を間違えたときには、リズムが鳴っている状態のまま で、特定の打楽器音をすべて消去できます。 特定の打楽器音を消去するには: [消去]ボタンを押しながら、消去したい打楽器音が割り当て られているキーを押します。 指定された打楽器音は、瞬間的にすべて消去
リズムパターンをつくる:リズムパターンプログラム 2 ただし、ボイスは、コード1とコード2のそれぞれにつ いて1種類ずつしか選べません。違うボイスを組み合 わせてリズミックパターンをつくりたい場合は、コー ド1とコード2にそれぞれ別のボイスを割り当てること で、2種類のボイスが混ざったリズミックパターンを 作成できます。 パートのボタンで、リズミックパターンを入力す るパート(コード1またはコード2)を選びます。 ロワーリズミックは、コード1またはコード2のパート に入力します。 4 入力したいリズミックパターンに適したクオンタ イズを設定します。 158ページをご覧ください。 5 ゲートタイムの ボタンで操作するか、ゲー トタイムが青枠で囲まれている状態でデータコント ロールダイアルを操作することで、ゲートタイムを設 定します。 ボタンを使うと、大まかに値を変 更できます。データコントロールダイアルを回すと、 値を一つずつ増減できます。 既存のリズムからコピーしたデータが入っていた場合 は、「消去してよろしいですか?」というメッセージが 表示されます。消去してオリジナルのリズミックパ ターン
リズムパターンをつくる:リズムパターンプログラム ゲートタイムを変更するには: 1 2 3 155ページの手順1に従って、ゲートタイムを変 更する音符を選びます。 画面に表示されているボタンのうち、ボイスを変 更したいパートのボタンを押します。 ボイスメニューが表示されます。 ゲートタイム表示ボックスを押します。 ゲートタイム表示ボックスのまわりに青枠が表示され ます。 3 データコントロールダイアルを回して、ゲートタ イムを変更します。 コード1、コード2以外のアカンパ ニメントを変更する 1 2 ボイスメニューの中から、使用したいボイスを選 びます。 ボイスメニューが自動的に閉じ、もとの画面に戻りま す。 10 リズムプログラム リズムパターンプログラムでは、打楽器パート(メインドラ ムとアドドラム)、リズミックパート(コード1とコード2)は 作成できますが、その他のアカンパニメントのパート(パッ ド、フレーズ1、フレーズ2)は作成できません。 しかし、パッド、フレーズ1、フレーズ2に関しても、既存 のリズムで使われているものをコピーしてそのまま使うだけ でなく、音色(ボイス)を
リズムパターンをつくる:リズムパターンプログラム リバーブ画面 ボリューム/パンを設定する ボリュームやパンは、ボイス/エフェクトページで設定しま す。 ボリューム画面 1 各パートのリバーブ量を設定します。 設定範囲:0〜127 2 コーラス画面 1 オン/オフ 各パートのオン/オフを設定します。オフ(OFF)にしたパー トはミュート(消音)されます。 1 2 ボリュームスライダー 各パートのボリュームを設定します。 設定範囲:0〜127 パン画面 2 1 コーラスタイプ コーラスエフェクトの種類を選びます。コーラスタイプの表 示されているボタンを押すと、コーラスタイプ一覧が表示さ れます。 各パートのパン(ステレオ出力の左右の位置)を設定します。 設定範囲:L64〜R63 エフェクトをかける リバーブ、コーラス、バリエーションの3種類のエフェクト をかけることができます。 リバーブは音が響き渡るような効果で広がりや奥行き感を与 え、コーラスは複数の音が同時になっているような効果で音 に厚みを持たせます。バリエーションは、さまざまなエフェ クトの中から好きなものを選んで使用できま
リズムパターンをつくる:リズムパターンプログラム 2 コーラススライダー 各パートにコーラスエフェクトをかける量を設定します。 設定範囲:0〜127 バリエーション画面 1 2 3 1 バリエーションエフェクトカテゴリー バリエーションエフェクトとして使用したいエフェクトのカ テゴリーを選びます。エフェクト名の表示されているボタン を押すと、エフェクトカテゴリー一覧が表示されます。 関連ページ • エフェクトリスト(57ページ) 一覧の中から使用したいエフェクトタイプを選ぶと、一覧表 示は自動的に閉じます。 3 バリエーションスライダー 各パートにバリエーションエフェクトをかける量を設定しま す。 設定範囲:0〜127 リズムプログラム 10 各打楽器の細かい設定をする それぞれの打楽器音について、チューニングを変更したり、 打楽器ごとのパンやボリュームを変更したりできます。 1 2 画面上の[ドラムセットアップ]ボタンを押して、 ドラムセットアップページを表示させます。 設定を変更したい打楽器パート(メインドラムま たはアドドラム)を選びます。 一覧の中から使用したいバリエーショ
リズムパターンをつくる:リズムパターンプログラム 3 設定を変更したい打楽器音が割り当てられている キーを押します。 画面に打楽器名が表示され、その打楽器の設定を変更 できることを示します。 5 ピッチコース 現在選ばれている打楽器のピッチを、100セント単位で設 定します。 設定範囲:−64〜+63 6 ピッチファイン 現在選ばれている打楽器のピッチを、1セント単位で設定し ます。ピッチコース(5)よりも細かく設定できます。 設定範囲:−64〜+63 リズムパターンを保存する 4 作成したリズムパターンを、ユーザーリズムとして48種類 まで保存できます。 設定を変更します。 パン、ボリューム、リバーブ、ピッチを変更できます。 1 必要に応じて、保存するデータの内容を確認しま す。 保存するリズムパターンの確認 1 2 作成したリズムパターンは、15種類のセクションをま とめて、1つのリズムとして保存します。保存の操作を 行なう前に、保存したいセクションすべてに希望のデー タが入っているかどうかを確認してください。 <例>メインAとメインBのリズムパターンをユーザー リズムとして保存
リズムパターンをつくる:リズムパターンプログラム 3 保存したいユーザーリズムナンバーを押します。 画面上に以下のメッセージが表示され、保存してよい かどうか確認を求めてきます。 リズムパターンを保存したあとは、必ず以下の方法でリズム パターンプログラムを終了してください。リズムパターンプ ログラムを終了せずに電源を切ると、エディットした内容が 失われてしまいます。 リズムパターンプログラムを終了 する どのページからでも、リズムパターンプログラムを終了でき ます。 1 パネル上の[PATTERN]ボタンを押します。 リズムが鳴っているときに[PATTERN]ボタンを押し た場合、リズムは自動的に止まります。 つくったリズムパターンがすでに保存されている場合 は、そのままリズムパターンプログラムを終了します。 リズムパターンがまだ保存されていない場合には、保 存せずに終了してよいか確認を求めるメッセージが現 れます。 2 4 [キャンセル]ボタンを押すと、保存しないで前の画面 に戻ります。 [キャンセル]ボタンを押すと、終了せずに前の画面に 戻ります。 注記 リズムパターンプログラムを終了
リズムパターンをつくる:リズムパターンプログラム 保存したユーザーリズムを呼び出す 4 ファイルの選び方は、MDR機能のフォルダー選択と 同じです。111ページ「USBフラッシュメモリーが見 つからないときは」をご覧ください。 リズムパターンプログラムでつくったユーザーリズムは、 リズムセクションのユーザーボタンで呼び出すことができま す。第5章の「ユーザーボタンでリズムを選ぶ」(63ページ) をご覧ください。 RHYTHM [選択]ボタンを押して、読み込みたいパターン ファイルを選択します。 VOLUME MAX SEQ. SEQ. 1 2 SEQ. SEQ.
リズムパターンをつくる:リズムパターンプログラム キットリスト ドラム ELキット1 & &ᅊ ELキット2 スタンダードキット 2 ヒットキット ルームキット スクラッチ マラカス ハイ スルド ミュート スルド ミュート スルド ミュート スルド ミュート コンサート バスドラム スルド ミュート スルド オープン スルド オープン スルド オープン スルド オープン ノイズ パーカッション マラカス ロー ハイ Q ハイ Q ハイ Q ハイ Q ( バスドラム マーチ スルド モフ ウィップ スラップ ウィップ スラップ ウィップ スラップ ウィップ スラップ ) アナログバスドラ ショート スルド リム スクラッチ H スクラッチ H スクラッチ H スクラッチ H シンセ タム 3 クイーカ ハイ スクラッチ L スクラッチ L スクラッチ L スクラッチ L アナログバスドラ ロング スルド オープン フィンガー スナップ フィンガー スナップ フィンガー スナップ フィンガー ス
リズムパターンをつくる:リズムパターンプログラム ドラム ロックキット & &ᅊ ' 'ᅊ ( ) )ᅊ * *ᅊ $ % & $ᅊ &ᅊ ' 'ᅊ ( ) )ᅊ * *ᅊ 下鍵盤 $ % & $ᅊ &ᅊ ' 'ᅊ ( ) )ᅊ * *ᅊ $ % & $ᅊ &ᅊ ' 'ᅊ ( ) )ᅊ * *ᅊ $ % & $ᅊ &ᅊ ' 'ᅊ ( ) )ᅊ * *ᅊ $ % & $ᅊ &ᅊ ' ㎛ ⋚ 'ᅊ ( ) )ᅊ * *ᅊ $ % & $ᅊ エレクトロキット アナログキット ダンスキット ジャズキット ブラッシュキット スルド ミュート スルド ミュート スルド ミュート キック ダンス 1 スルド ミュート スルド ミュート スルド オープン スルド オープン スルド オープン キック ダンス 2 スルド オープン スルド オープン ハ
リズムパターンをつくる:リズムパターンプログラム ドラム シンフォニーキット & &ᅊ ' 'ᅊ ( ) )ᅊ * *ᅊ $ % & $ᅊ &ᅊ ' 'ᅊ ( ) )ᅊ * *ᅊ 下鍵盤 $ % & $ᅊ &ᅊ ' 'ᅊ ( ) )ᅊ * *ᅊ $ % & $ᅊ &ᅊ ' 'ᅊ ( ) )ᅊ * $ % & $ᅊ &ᅊ ' 'ᅊ ( ) )ᅊ * *ᅊ $ % & $ᅊ &ᅊ ' ㎛ ⋚ 'ᅊ ( ) )ᅊ * *ᅊ $ % & $ᅊ ライブ! スタンダードキット ライブ! Std+Pキット ライブ! ファンクキット ライブ! ファンク+Pキット スルド ミュート スルド ミュート スルド ミュート スルド ミュート スルド ミュート スルド ミュート スルド オープン スルド オープン スルド オープン スルド オープン スルド オープン
リズムパターンをつくる:リズムパターンプログラム ドラム ライブ! ブラッシュキット & &ᅊ ' 'ᅊ ( ) )ᅊ * *ᅊ $ % & $ᅊ &ᅊ ' 'ᅊ ( ) )ᅊ * *ᅊ 下鍵盤 $ % & $ᅊ &ᅊ ' 'ᅊ ( ) )ᅊ * *ᅊ $ % & $ᅊ &ᅊ ' 'ᅊ ( ) )ᅊ * *ᅊ $ % & $ᅊ &ᅊ ' 'ᅊ ( ) )ᅊ * *ᅊ $ % & $ᅊ &ᅊ ' ㎛ ⋚ 'ᅊ ( ) )ᅊ * *ᅊ $ % & $ᅊ ライブ! ブラッシュ +Pキット ライブ! スタジオキット ライブ! アコースティックキット ライブ! パワー キット 1 ライブ! パワー キット 2 スルド ミュート スルド ミュート スルド ミュート スルド ミュート スルド ミュート スルド ミュート スルド オープン スルド オープン
リズムパターンをつくる:リズムパターンプログラム ドラム ライブ! ロック キット & &ᅊ ' 'ᅊ ( ) )ᅊ * *ᅊ $ % & $ᅊ &ᅊ ' 'ᅊ ( ) )ᅊ * *ᅊ 下鍵盤 $ % & $ᅊ &ᅊ ' 'ᅊ ( ) )ᅊ * *ᅊ $ % & $ᅊ &ᅊ ' 'ᅊ ( ) )ᅊ * $ % & $ᅊ &ᅊ ' 'ᅊ ( ) )ᅊ * *ᅊ $ % & $ᅊ &ᅊ ' ㎛ ⋚ 'ᅊ ( ) )ᅊ * *ᅊ $ % & $ᅊ &ᅊ ' 'ᅊ ( ) * )ᅊ ライブ! リアル ブラッシュ アナログT8 キット アナログT9 キット ハウス キット スルド ミュート スルド ミュート スルド ミュート スルド ミュート スルド ミュート ダブル キック* スルド オープン スルド オープン スルド オープン
リズムパターンをつくる:リズムパターンプログラム ドラム ヒップホップ キット & &ᅊ ' 'ᅊ ( ) )ᅊ * *ᅊ $ % & $ᅊ &ᅊ ' 'ᅊ ( ) )ᅊ * *ᅊ 下鍵盤 $ % & $ᅊ &ᅊ ' 'ᅊ ( ) )ᅊ * *ᅊ $ % & $ᅊ &ᅊ ' 'ᅊ ( ) )ᅊ * *ᅊ $ % & $ᅊ &ᅊ ' 'ᅊ ( ) )ᅊ * *ᅊ $ % & $ᅊ &ᅊ ' ㎛ ⋚ 'ᅊ ( ) )ᅊ * *ᅊ $ % & $ᅊ &ᅊ ' 'ᅊ ( ) * )ᅊ SFX ドラムマシン ブレイク キット SFXキット1 SFXキット2 ライブ! SFX キット 1 スルド ミュート スルド ミュート スルド ミュート スルド オープン スルド オープン スルド オープン ハイ Q ハイ Q ハイ Q ウィ
リズムパターンをつくる:リズムパターンプログラム SFX ライブ! SFX キット 2 & ノイズ キット ボーカルエフェクト キット ゴスベルアドリブ ワンダーランドキット カホン L &ᅊ カホン スラップ ' カホン チップ 'ᅊ ( ) ポップラテンキット クラベス H クラベス L )ᅊ ハンド クラップ *ᅊ フィンガー スナップ * カスタネット $ % & コンガ H チップ $ᅊ コンガ H ヒール &ᅊ ' 'ᅊ ( ) )ᅊ * *ᅊ 下鍵盤 $ % & $ᅊ &ᅊ ' 'ᅊ ( ) )ᅊ % & $ᅊ &ᅊ ' & $ᅊ ボンゴ H Op.
リズムパターンをつくる:リズムパターンプログラム SFX キューバンキット & アラビックキット &ᅊ ' 'ᅊ ( ) )ᅊ * *ᅊ $ % & $ᅊ &ᅊ ' 'ᅊ ( ) )ᅊ * *ᅊ 下鍵盤 $ % & $ᅊ &ᅊ ' 'ᅊ ( ) )ᅊ * *ᅊ $ % & $ᅊ ティンパニ C ダ グ リム ティンパニ C♯ コンガ H スラップOp. ナカラザン エッジ ベンディル スラップ ダグf ティンパニ D コンガ H スラップ ハゲール ドム ベンディル ドゥン ダ グ ハンド ティンパニ D♯ コンガ H スラップMt.
リズムを自動で切り替える:リズムシーケンスプログラム DISPLAY SELECT リズムを自動で切り替える: リズムシーケンスプログラム VOICE DISPLAY A.B.C. M.O.C. MDR FOOT SWITCH UTILITY AUDIO RHYTHM PROGRAM VOICE EDIT PATTERN SEQUENCE リズムシーケンスプログラムを使えば、自分で作ったユー ザーリズムや、エレクトーンに内蔵されているリズムを1小 節ずつ自由に組み合わせて、完成されたリズム譜として1曲 分のデータ(リズムシーケンス)を作ることができます。 リズムシーケンスは、パネル上の4つのシーケンスボタン に、それぞれ140小節まで保存できます。複数のボタンに 入ったデータを連続して再生することができるので、必要に 応じてデータを分けておけば、次のような使い方ができま す。 U.ORGAN FLUTES L.
リズムを自動で切り替える:リズムシーケンスプログラム これで、シーケンスプログラムの準備が整いました。 すでにつくってあるシーケンスを編集してシーケンス プログラムを始める場合は、180ページの「シーケン スをコピーする」の操作が必要です。また、何も入力 されていない状態から一つ一つリズムを並べて、シー ケンスをつくり上げていく場合は、下記の「リズム シーケンスをプログラムする」の操作が必要です。 5 選んだリズムが1小節だけ入力され、画面上にボック スで表示されます。リズムを入力すると、カーソルが 自動的に1つ進み、次のリズムを入力できる状態にな ります。 一つのシーケンスボタンに、140小節までのリズムが 入力できます。エンディングを入力する場合は、 エンディングパターンがすべて入力されます。(たとえ ば、2小節のエンディングパターンの場合は、[セット] を押すと2小節分入力されます。 ) エンディングを入力したあとの小節には、シーケンス は入力できません。 リズムシーケンスをプログラムする 1 2 画面右上の[リズム]ボタンを押して、リズムペー ジを表示させます。 パネル上で、シーケンスを組
リズムを自動で切り替える:リズムシーケンスプログラム 削除 入力したリズムシーケンスを編集 する カーソルの位置のリズムを削除する場合に使います。 削除したいリズムにカーソルをあわせて、[削除]ボタ ンを押します。 エンディングパターンを選んで[削除]ボタンを押した 場合は、エンディングパターン全体が削除されます (1小節だけ削除することはできません)。 すでに入力したリズムの間に違うリズムを挿入したり、入力 してあるリズムを削除したりできます。 全消去 入力されているシーケンスデータをすべて消去する場 合に使います。 [全消去]ボタンを押すと、消去してもよいかどうか確 認を求めるメッセージが表示されます。 [消去]ボタンを押すと、すべてのデータは消去され、 消去が実行されたことを示す「すべてのデータを消去 しました。」が一時的に画面上に表示されます。 [キャンセル]ボタンを押すと、消去せずにもとの画面 に戻ります。 1 2 1 ポジション 編集画面にあるカーソル(オレンジ色表示)を移動するボタン です。カーソルは、自分で設定したリズムシーケンスの小節 内で移動させることができます。 レジス
リズムを自動で切り替える:リズムシーケンスプログラム 2 3 バンクを選択し、入力したいレジストレーション メモリーのナンバーボタンを押します。 レジストレーションを切り替えたいバー (小節)/ ビート(拍)/クロックを設定します。 ボタンやデータコントロールダイアルを 使ってバー /ビート/クロックを設定します(1拍=96ク ロックです)。 データコントロールダイアルを使う場合は、まず変更 したい数字を触って青枠を移動し、それからデータコ ントロールダイアルで値を変更します。 ネクストユニットの読み込み時間について • ネクストユニットの読み込みには時間がかかることが あります(読み込むデータのサイズによって、読み込 み時間は異なります)。読み込み時間がかかることを 考慮して、早めのタイミング(バー /ビート/クロック) にネクストユニットを入力することをおすすめしま す。 • レジストレーションシーケンス中にネクストユニット をプログラムしても、フットスイッチでネクストユ ニットを実行しても、レジストの読み込み時間は同じ です。 入力したレジストレーションシー ケンスを編集する レジストレーション
リズムを自動で切り替える:リズムシーケンスプログラム リズムシーケンスプログラムを 終了する 複数のシーケンスを順番に再生する どのページでも、リズムシーケンスプログラムを終了するこ とができます。リズムシーケンスプログラムを終了すると、 それまでに作成したシーケンスは、自動的に保存されます。 リズムシーケンスプログラムを終了するには: パネル上の[SEQUENCE]ボタンを押します。 画面表示がボイスディスプレイに変わり、リズムシーケンス を終了します。 4つあるSEQ.(シーケンス)ボタンを同時に複数使うことで、 順番に再生させることができます。一つのシーケンスでは足 りない場合に組み合わせて使用します。 1 2 使用したいすべてのシーケンスボタンを押して、 ランプを点灯させます。 リズムの[START]ボタンを押します。 SEQ.ボタンのナンバー表示の小さい方からシーケンス の再生が始まり、ナンバー表示の大きい方へと再生し ていきます。(SEQ.
リズムパターンやリズムシーケンスをUSBフラッシュメモリーに保存する シーケンスをコピーする シーケンスプログラムの保存先に別のシーケンスナンバーの 内容をコピーしたり、保存先のシーケンスプログラムの最後 に別のシーケンスナンバーの内容を追加したりできます。 1 シーケンス画面のメニューページで、画面上の編 集[コピー ]または編集[追加]ボタンを押します。 画面上に、コピー元選択画面または追加元選択画面が 表示されます。 NOTE コピー先の最後のセクションがエンディングのときにシーケ ンスの追加を選択すると、コピー先の最後のセクションは自 動的にメインAに変更され、その後ろにシーケンスが追加され ます。 2 シーケンスプログラムの保存先にコピーまたは追 加したいシーケンスナンバーを選びます。 画面上に、コピー /追加してもよいかどうか確認を求 めるメッセージが表示されます。 3 [コピー ]または[追加]を押すとコピー /追加が実 行されます。 [キャンセル]を押すとコピー /追加せずにもとの画面に 戻ります。 4 必要に応じて、コピー /追加後のシーケンスを編 集します。 177ペー
11 フットスイッチ/ニーレバー / エクスプレッションペダル フットスイッチやニーレバー、エクスプレッションペダルを使用すると、演奏中に右足を使っていろいろな機能を操作 したり、エフェクトのオン/オフを切り替えたりできます。手を使ってレジストレーションやリズムなどを切り替える必 要がなくなるので、演奏に専念できます。 1 フットスイッチ 2 フットスイッチは、エクスプレッションペダルの左右に一つ ずつあります。 右フットスイッチは、レジストレーションシフトをコント ロールするのに使用します。 左フットスイッチは、リズム、グライド、そしてロータリー スピーカーのコントロールに使用します。 右フットスイッチ設定については、102ページをご覧くだ さい。ここでは、左フットスイッチの設定について説明しま す。 左フットスイッチ [FOOT SWITCH]ボタンを押します。 画面右上の[レフト]ボタンを押して、レフトペー ジを表示させます。 DISPLAY SELECT VOICE DISPLAY A.B.C. M.O.C.
フットスイッチ リズムをコントロールする グライドをコントロールする 左フットスイッチでリズムのスタート/ストップなどをコン トロールします。 1 2 左フットスイッチでグライド効果をコントロールします。 3 1 4 1 停止 フットスイッチを押すたびに、リズムがスタート/ストップ します。 2 ブレイク フットスイッチを押すと、パネル上の[BREAK]ボタンを押 したときと同じ効果が得られます。演奏中に、フットスイッ チでリズムにブレイクを入れることができます。 フットスイッチを押すと、上鍵盤/下鍵盤のボイスセクショ ンごとに音色のピッチを半音下げます。 フットスイッチから足をはなすと、ゆるやかに元の音程に戻 ります。 1 上鍵盤1/上鍵盤2/リード1/リード2/ 下鍵盤1/下鍵盤2 グライドをかけたいボイスセクションを選択します。複数の ボイスセクションをオンにしておくこともできます。 3 メインA〜D 2 タイム フットスイッチを押すと、パネル上のMAIN/FILL IN [A]〜 [D]ボタンを押したときと同じ効果が得られます。リズムパ ターン(A〜D)を切り替えたり、フ
ニーレバー ロータリースピーカーをコント ロールする 左フットスイッチで、ロータリースピーカーのオン/オフを 切り替えます。 関連ページ • ロータリースピーカー (52ページ) ニーレバー 鍵盤下にあるニーレバーは、上鍵盤と下鍵盤のサステイン、 メロディーオンコード、リードスライド効果、ソロ機能の切 り替えをコントロールします。 NOTE 二―レバーには、同時に複数の機能が割り当てられます。この場合、 ニーレバーを操作すると割り当てたすべての機能が同時にオン/オフ されることになります。 サステインをコントロールする 上鍵盤と下鍵盤のサステインをニーレバーでオン/オフでき ます。ただし、ペダル鍵盤のサステインは、ニーレバーでは コントロールできません。 ここで[ロータリースピーカー ]ボタンを選んで、フットス イッチを押すと、パネル上の[ROTARY SP SPEED]ボタ ンを押したときと同じ効果が得られます。この機能を使うた めには、あらかじめ、それぞれのボイスセクションやオルガ ンフルート音色で、ロータリースピーカーが正しく設定され ていることが必要です。詳しくは、52ページをご覧くださ い。
ニーレバー 3 演奏中にサステインをかけたいところで、右足で ニーレバーを右に押します。 二―レバーを押している間だけ、サステインがかかり ます。押すのをやめると、サステインはかからなくな ります。 1 ニーレバーがたたんである場合: パネルのサステインボタンがオンになっていると、 サステインがかかります。 メロディーオンコードをコント ロールする 1 [A.B.C./M.O.C.]ボタンを押します。 画面の右半分にメロディーオンコードが表示されます。 2 2 ニーレバーが垂直の場合: メロディーオンコードのモード(1〜3)を選択し、 ニーレバーの[ON]ボタンを選択します。 パネルのサステインボタンがオンになっていても、 サステインはかかりません。 • メロディーオンコード(70ページ) 関連ページ 3 ニーレバーが右に押されている場合: DISPLAY SELECT パネルのサステインボタンがオンになっていると、 サステインがかかります。 VOICE DISPLAY A.B.C. M.O.C.
エクスプレッションペダル リードスライドをコントロールする 1 リードスライドをかけたいリードボイスの、ボイ スコンディション画面2ページ目を表示させま す。 関連ページ • ボイスコンディション画面(47ページ) 2 スライドの[ニーレバー ]ボタンを選択します。 エクスプレッションペダル エクスプレッションペダルは、演奏中に音の強弱をコント ロールします。また、ELS-02C/ELS-02Xには、ピッチベ ンドとリズムテンポをコントロールするためのセカンドエク スプレッションペダルがあります。ここではセカンドエクス プレッションペダルについて説明します。 関連ページ • 演奏までの準備(15ページ) セカンド エクスプレッションペダル (ELS-02C/ELS-02X) 3 演奏中にスライドをかけたいところで、右足で ニーレバーを右に押します。 押している間だけ、リードボイスにスライドがかかり ます。ニーレバーを押すのをやめると、リードスライ ドはかからなくなります。 1 画面右上の[EXP.
エクスプレッションペダル この画面で、セカンドエクスプレッションペダルの機 能を設定します。セカンドエクスプレッションペダル ではピッチベンドとリズムテンポがコントロールでき ます。 ピッチベンドとリズムテンポの両方をオンにすると、 セカンドエクスプレッションペダルを操作したときに、 両方の機能が同時に働きます。通常はどちらか一つの 機能をセカンドエクスプレッションペダルに割り当て るようにします。 ピッチベンドをコントロールする リズムテンポをコントロールする 1 2 1 モード リズムテンポの変化の幅を設定します。 設定範囲:1〜12 値が2 (NARROW: ナロー =狭い)の場合は、セカンドエク スプレッションペダルを踏み込んだときに、テンポを70% 〜140%の範囲で変化させます。 値が12 (WIDE: ワイド=広い)の場合は、セカンドエクスプ レッションペダルを踏み込んだときに、テンポを50%〜 200%の範囲で変化させます。 1 2 2 テンポ 1 モード ピッチベンドの幅を設定します。値を1増やすたびに、ピッ チ変化の範囲は半音ずつ増えます。 設定範囲:1〜12 値が2 (
12 トランスポーズ/ピッチ エレクトーンの音程を変更する機能として、半音ずつ移調するトランスポーズと、音程の微調整をするピッチがありま す。ユーティリティー画面で、トランスポーズやピッチに関する設定を行ないます。 1 2 [UTILITY]ボタンを押します。 NOTE ユーティリティー画面が表示されます。 XGソングにはトランスポーズ/ピッチの効果はかかりませ ん。 画面右上の[ピッチ]ボタンを押して、ピッチペー ジを表示させます。 DISPLAY SELECT VOICE DISPLAY A.B.C. M.O.C. MDR FOOT SWITCH UTILITY AUDIO RHYTHM PROGRAM VOICE EDIT PATTERN SEQUENCE U.ORGAN FLUTES L.
ピッチとチューニング オーケストラのように複数の人数で楽曲を演奏するときには、かならず演奏前に「チューニ ング」と呼ばれる作業を行ないます。たとえば、A (ラの音)を演奏したときに435Hz (ヘル ツ)の音を出す楽器、440Hzの音を出す楽器、445Hzの音を出す楽器を同時に演奏すると、 不協和音になってしまいます。 こんなことがおこらないように各楽器のピッチをそろえる作業が「チューニング」です。 楽器によって「調律」 「調弦」などと呼ばれることもあります。 チューニングの方法は、大きく分けて2通りあります。 1つめは、奏者ひとりひとりが自分の楽器を決められたピッチに合わせる方法。音叉や チューニングメーターなどを使って正確なピッチに合わせます。ギター合奏などはこの方法 で行なうことが多いでしょう。たとえばロックバンドの場合は、ギタリストとベーシストが それぞれの楽器を「A=440Hz」に合わせておきます。すると、いっしょに演奏したときに は同じピッチの音が出せるというわけです。 エレクトーンをほかの楽器といっしょに演奏する場合は、187ページのピッチ設定でエレク トーンを相手の楽器に合わせます。もちろん、
13 外部機器との接続 このエレクトーンには、鍵盤の下側にいろいろな端子があります。左側には入/出力端子があり、携帯プレーヤーなどの 外部機器の再生音やマイクからの音声を入力したり、エレクトーンの音をヘッドフォンや外部のスピーカーやステレオ 機器から出力したりできます。左側手前には、格納できる[USB TO DEVICE]端子にUSBフラッシュメモリーを2つま で接続できます。右側には1つの[USB TO DEVICE]端子やMIDI端子があり、エレクトーンとコンピューターをつない でデータをやり取りしたり、エレクトーンでほかの楽器をコントロールしたりできます。また、ELS-02Xには、ペダ ルユニットにも出力端子があります。 NOTE 新規でご購入されたELS-02シリーズには、[USB TO DEVICE]端子が左側手前に2つと右側の鍵盤の下に1つありますが、ELS-01U/ELS01C/ELS-01CU/ELS-01CH/ELS-01X/ELS-01XUは、左側手前には[USB TO DEVICE]端子はなく、右側の鍵盤の下に2つあります。 また、ELS-01は、左側手前には[USB TO DEVI
付属端子の名称と機能 AUX IN L / L+R R 9 7 6 -1 5 AUX OUT L / L+R R AUX OUT L USB R (LEVEL FIXED) TO DEVICE )* (ELS-02Xのみ) (LEVEL FIXED) R L R L AUX OUT 8 6 -2 5 AUX INフォーン端子L/L+R、R 外部機器からの音声信号をステレオ入力する端子です。入力 された信号は、エレクトーンの音と一緒にエレクトーンのス ピーカーから出力されます。 関連ページ • 携帯プレーヤーなどの外部機器の音をエレクトーンのスピーカー から流す(193ページ) 6 AUX OUTフォーン端子 6 -1 AUX OUTフォーン端子L/L+R、R ! IN OUT MIDI @ * ELS-01シリーズにSTAGEAバイタライズユニットを取り付けた 楽器では、ここに2個の[USB TO DEVICE]端子があります。 9 USB DOCK 鍵盤の左側手前のUSB DOCKには、USBフラッシュメモ リーを接続するための[USB TO DEVI
外部機器との接続 ) [USB TO DEVICE]端子 [USB TO DEVICE]端子について詳しくは、113ページを ご覧ください。 外部機器との接続 注意 ) USB DOCK ! [USB TO HOST]端子 コンピューターのUSB端子と接続するための端子です。 USBケーブルを使って直接接続できます(接続にはUSBMIDIドライバーが必要です)。 関連ページ • コンピューターとの接続(195ページ) USBとは 外部機器と接続するときは、すべての機器の電源を切った上で 行なってください。また、電源を入れたり切ったりする前に、 必ず機器のボリュームを最小(0)にしてください。感電または 機器の損傷のおそれがあります。 スピーカーから音を出さずヘッド フォンで音を聞く ヘッドフォンをPHONES端子(標準ステレオフォーン端子) に接続して使います。 PHONES端子は2つありますので、ヘッドフォンを2本接 続して2人で演奏を楽しむこともできます。1本だけ接続す る場合は、どちらの端子を使用しても構いません。 USBとは、Universal Serial Bus (ユニバーサルシリ
外部機器との接続 接続例:ミキサーを使ったライブ演奏 エレクトーンをコンサートなどで使用する場合は、エレ クトーンを直接外部スピーカーに接続するのではなく、 エレクトーンとミキサーを接続し、ミキサーを外部ス ピーカーに接続するのが一般的です。 ミキサーを通すことで、他の楽器との間で音量/音質バ ランス調整が容易に行なえるようになり、調整すること でまとまりのある演奏になります。 ミキサーとの接続には、エレクトーンのAUX OUT端子 を使用します。 エレクトーンのAUX OUTには、MASTER VOLUME ダイアルに連動して出力レベルを調整できる端子と、 一定のレベルで出力するLEVEL FIXEDの端子がありま すので、用途に応じて使い分けることができます。 端子名称 出力タイプ 位置 AUX OUT フォーン 端子 L/L+R、R アンバランス方式* MASTER VOLUME ダイアルで出力レベ ル調整可能 キーボード ユニット左下 AUX OUT RCAピン 端子 L、R アンバランス方式* LEVEL FIXED キーボード ユニット左下 AUX OUT フォーン 端子 L、
外部機器との接続 外部オーディオ機器の音をエレク トーンのスピーカーから流す 2 エレクトーンのAUX IN端子に外部オーディオ機器の出力端 子からのケーブルを接続することで、外部オーディオ機器の 再生音をエレクトーンのスピーカーで鳴らせます。 音声を入力する場合は、MIC./LINE切り替えス イッチをMIC.側に、ギターなど出力レベルの高 い機器を接続する場合はLINE側に切り替えます。 MIC. LINE MIC. LINE マイクを接続したとき ギターを接続したとき NOTE AUX IN L/L+R MIC.とLINEのどちらにするべきかわからない場合は、LINE の状態で音を出してみて、音が小さければMIC.
外部機器との接続 エレクトーンから外部MIDI音源を 鳴らす 外部MIDI機器からエレクトーンを コントロールする エレクトーンを演奏すると、接続先の機器もその機器の音色 で同時に鳴らすことができます。音に厚みを出すときなど便 利です。(ただし、外部MIDI機器の受信チャンネルがエレク トーンの送信チャンネルと一致していることが必要です。) この他にもいろいろな演奏の動作や状態を「メッセージ」と 呼ばれるデジタルデータ(数値に置き換えたデータ)として送 信することができます。接続先がメッセージを受けてどう対 応するかは、接続先のMIDI機能によって決まります。 外部のMIDIキーボードを演奏してエレクトーンを同時に鳴 らしたり、シーケンサーからエレクトーンにMIDI信号を 送ってエレクトーンの音源を鳴らしたり、レジストレーショ ンを切り替えたりできます。 (ただし、外部MIDI機器の送信 チャンネルがエレクトーンの受信チャンネルと一致している ことが必要です。) MIDI IN 外部MIDIキーボードやシンセサイザー MIDI OUT 外部MIDI機器 MIDI OUT MIDI IN M
コンピューターとの接続 コンピューターとの接続 [USB TO HOST]端子、またはMIDI端子を使ってエレク トーンとコンピューターを接続し、両者の間でMIDI通信が できます。 エレクトーンとコンピューターを接続すると、自分の演奏を コンピューターに保存して、楽譜を作ったり、ホームページ で公開したりできます。(楽譜作成ソフトやシーケンスソフ トなどが必要です。)また、コンピューターのシーケンスソ フトで再生したMIDIデータをエレクトーンを使って鳴らす こともできます。 [USB TO HOST]端子ご使用時の注意 [USB TO HOST]端子でコンピューターと接続すると きは、以下のことを行なってください。行なわないと、 コンピューターや本体が停止(ハングアップ)して、デー タが壊れたり、失われたりするおそれがあります。 コンピューターや本体が停止したときは、アプリケー ションやコンピューターを再起動したり、本体の電源を 入れ直してください。 注記 • USBケーブルは、ABタイプのものをご使用ください。 また、3メートル未満のケーブルをご使用ください。 USB3.
MIDIコントロール それぞれのON/OFFボタンを使って、個別に設定します。 ONに設定したMIDIデータはカットされ、外部機器には出力 されません。 MIDIコントロール NOTE エレクトーンをほかのMIDI機器やコンピューターと接続し たときに、外部機器からどのようにエレクトーンをコント ロールするか、またはエレクトーンからどのように外部機器 をコントロールするかを設定します。送信チャンネルを選択 したり、外部機器との同期設定をしたりします。 1 [UTILITY]ボタンを押します。 MIDIアウトフィルターでセカンドエクスプレッションをONにする と、アウトプット(1)でのセカンドエクスプレッションの設定は無 効になります。 3 インターナル/エクスターナル 表示された各項目のコントロールをエレクトーンで行なう (インターナル)か、外部機器で行なう(エクスターナル)かを 切り替えます。 ユーティリティー画面が表示されます。 2 3 -1 リード1 画面右上の[MIDI]ボタンを押して、MIDIページ を表示させます。 リードボイス1の発音方法を設定します。 インターナル:リー
iPhone/iPadと接続する iPhone/iPadと接続する この楽器はiPhoneやiPadなどのスマートデバイスと接続で きます。楽器に対応のアプリケーションを使うことにより、 楽器をもっと便利に楽しむことができます。 接続の方法については、電子マニュアル(7ページ)の「エレ クトーンのお客様向け iPhone/iPad接続マニュアル」を ご覧ください。 無線LAN接続する iPhone/iPad接続マニュアルの説明手順に沿って操作を始 めると、途中で「WPSによる接続」、「ネットワーク一覧か ら選んで接続する」、「手動接続」、「アドホックモードによる 接続」のいずれかの設定が楽器側で必要になります。本書の 198ページ〜201ページをご覧いただき、必要な操作を行 なってください。 使用できるアクセスポイントがない場合は、「アドホック モードによる接続」(201ページ参照)を行なってください。 関連ページ 対応のスマートデバイスやアプリケーションについて詳しく は、ウェブサイト上の下記ページでご確認ください。 https://jp.yamaha.
iPhone/iPadと接続する WPSによる接続 アクセスポイントがWPS機能に対応している場合は、設定 情報の画面入力などを行なうことなく簡単な操作で楽器を ネットワークに接続できます。 5 NOTE 画面の[OK]ボタンを押すとWPSが開始されます ので、2分以内にお使いのアクセスポイントの WPSボタンを押してください。 楽器とネットワークの接続に成功すると表示されます アクセスポイントがWPS機能に対応しているかは、アクセスポイン トの取扱説明書をご覧ください。 1 2 USB無線LANアダプターを接続します。 [UTILITY]ボタンを押したあと、画面の[無線 LAN]ボタンを押して、無線LANページを表示さ せます。 DISPLAY SELECT VOICE DISPLAY A.B.C. M.O.C. MDR FOOT SWITCH UTILITY AUDIO 6 RHYTHM PROGRAM VOICE EDIT PATTERN SEQUENCE U.ORGAN FLUTES L.
iPhone/iPadと接続する ネットワーク一覧から選んで接続する 画面のネットワーク一覧から接続できるネットワークを選び ます。 1 2 5 USB無線LANアダプターを接続します。 画面の接続するネットワーク名が表示されている ボタンを押して、お使いになるネットワークを選 択します。 • 鍵アイコンが付いていないネットワークの場合: 接続が開始されます。 [UTILITY]ボタンを押したあと、画面の[無線 LAN]ボタンを押して、無線LANページを表示さ せます。 • 鍵アイコンが付いているネットワークの場合: パスワード入力画面が表示されますので、アクセスポ イント側で設定しているパスワードと同じに設定して ください。文字の入力方法は、「ソングに名前を付け る」(119ページ)と同じです。入力が終わったら画面 の[OK]ボタンを押して確定します。すると接続が自動 的に開始されます。 DISPLAY SELECT VOICE DISPLAY A.B.C. M.O.C.
iPhone/iPadと接続する • パスワード 手動接続 画面の[パスワード]ボタンを押すとパスワード入力画 面が表示されますので、SSIDと同様の方法で入力しま す。入力が終わったら、画面の[OK]ボタンを押しま す。 アクセスポイントがSSIDを非公開にしているためネット ワーク一覧に表示されない場合は、SSID、セキュリティー 方式、パスワードを入力して接続します。 NOTE NOTE アクセスポイントの設定内容の確認や変更については、使用するア クセスポイントの取扱説明書をご覧ください。 1 無線LANのモードが「インフラストラクチャー モード」になっているか確認します。 セキュリティーで「なし」を選ぶと、パスワードの設定は できません。 4 199ページの「ネットワーク一覧から選んで接続す る」の手順1〜3と同じ操作を行なってください。 2 画面の[接続]ボタンを押すと、接続を開始します。 楽器とネットワークの接続に成功すると表示されます 画面のネットワーク名が[その他]のボタンを押し ます。 「その他ネットワーク」画面が表示されます。 5 3 SSID、セキュ
iPhone/iPadと接続する アドホックモードによる接続 1 無線LANのモードをアドホックモードに切り替 えます。 「無線LANのモードの切り替え」をご覧ください。 2 SSIDなどを変更する必要がなければ、これで楽 器側の設定は完了しました。「エレクトーンのお 客様向け iPhone/iPad接続マニュアル」を参照 して、iPhone/iPadと楽器を接続してください。 SSIDやセキュリティーを変更したい場合は、詳細設定 画面で行ないます。 関連ページ • 無線LANの詳細設定(202ページ) 無線LANのモードの切り替え 1 2 199ページの「ネットワーク一覧から選んで接 続する」の手順1〜2と同じ操作を行なってくだ さい。 無線LANのモードを変更します。 アドホックモードまたはインフラストラクチャーモー ドに変更できます。 画面の[モード変更]ボタンを押すと、モードを変更す るかどうか確認を求めるメッセージが表示されますの で、変更する場合は画面の[OK]ボタンを押します。 外部機器との接続 13 ELS-02/ELS-02C/ELS-02X 取扱説明書 201
iPhone/iPadと接続する 無線LANの詳細設定 インフラストラクチャーモードと、アドホックモードそれぞれに詳細設定があります。 すでに楽器とiPhone/iPadが接続済みの場合、詳細設定は特に必要ありません。 関連ページ • 無線LANのモードの切り替え(201ページ) 1 無線LANのモードを選んだあと、無線LAN画面ページの[詳細]ボタンを押して、詳細画面を表示させます。 インフラストラクチャーモード時 アドホックモード時 詳細 (IP アドレス ) 画面 詳細 ( 無線 ) 画面 詳細 ( その他 ) 画面 詳細 (IP アドレス ) 画面 詳細 ( その他 ) 画面 202 ELS-02/ELS-02C/ELS-02X 取扱説明書
iPhone/iPadと接続する 2 必要に応じて設定します。 無線LANのモード インフラストラクチャー モード時 アドホックモード時 画面 詳細(IPアドレス) 画面 詳細(無線)画面 項目名 初期値 設定/入力方法 ON DHCPを使用するか「ON」、使用しな いか「OFF」を設定します。使用して いるアクセスポイントがDHCPに対応 している場合は、 「ON」を選びます。 画面の[ON]/[OFF]ボタンでON/OFF を切り替えます。 IPアドレス 0.0.0.0 サブネットマスク 0.0.0.0 ゲートウェイ 0.0.0.0 DNSサーバー 1 0.0.0.0 DNSサーバー 2 0.0.0.0 DHCPを「OFF」に設定したときは、 IPアドレス、サブネットマスク、ゲー トウェイ、DNSサーバー 1、DNS サーバー 2の設定が必要です。設定内 容については、使用しているアクセス ポイントの取扱説明書などをご確認く ださい。 入力方法は、 「ソングに名前を付ける」 (119ページ)と同じです。設定範囲は 0.0.0.0〜255.255.255.
iPhone/iPadと接続する 無線LAN設定を初期化する 無線LAN設定は、1章「エレクトーンの初期化」(25ページ)では初期化されません。ここで説明する方法で初期化をする必要 があります。初期化を実行すると、無線LAN設定画面で行なったすべての設定が消去されて工場出荷時の状態に戻ります。 1 [UTILITY]ボタンを押したあと、画面の[無線LAN]ボタンを押して、無線LANページを表示させます。 2 初期化します。 画面の[初期化]ボタンを押すと、無線LAN設定を初期化するかどうか確認を求めるメッセージが表示されますので、初期 化する場合は画面の[OK]ボタンを押します。 インターネット用語辞典 204 アクセスポイント 無線LANで電波のやりとりを行なうときの基地局となる機器。無線LANを有線LANにつなぐ役割も持つ。 アドホックモード アクセスポイントなどの中継機器を経由せずに直接、端末機器同士で通信を行なうことができる通信方式。 インフラストラクチャー モード 各端末が無線LANのアクセスポイントなどの中継機器を経由することによってデータ通信を行なう通信方式。 ゲート
14 付録 困ったときは 現象 原因と対処 楽器全般 [P]電源スイッチを押して電源を入れたと 楽器の通常の起動動作にともない、まれに発生する音のため、故障ではありません。 き、 「ポツッ」などのノイズ音が発生する。 電源を入れて10秒程度待たないと音が システムの起動に時間がかかるためです。故障ではありません。 出ない。 時々ガリッとかポツンという雑音が入る。 近くで電気器具の電源をオン/オフしたり、電気ドリルなどを使用している場合は、雑音が入 ることがあります。原因と思われる機器から、なるベく離れたコンセントを使ってください。 携帯電話や、ラジオ、テレビ、無線などの エレクトーンの近くで携帯電話を使ったり、呼び出し音が鳴ったりすると、雑音が出る場合が 電波が入る。 あります。エレクトーンの近くに携帯電話を置かないでください。 ラジオやテレビなどに雑音が入ることが エレクトーンのすぐ近くにラジオやテレビを置くと、雑音が入ることがあります。できるかぎ ある。 り離してご使用ください。 音が周囲のものを共鳴させてびりつく。 エレクトーンの音は持続音が多いため、周囲の戸棚やガ
困ったときは 現象 原因と対処 ボイス/リズム 選んだボイスによって、鍵盤位置による 一般に電子楽器は、音色を変えるという本質的な要素を持つため、音色による各鍵盤の音量の 音量のばらつきがある。 ばらつきをなくすことは非常に困難です。エレクトーンはどのボイスでも演奏上問題のないよ うに設計、調整されていますが、設置場所や聞く位置によって音量や音色が異なることがあり ます。 ペダル鍵盤ではピッチが高く、上/下鍵盤 特にピアノと比較した場合に感じることです。ピアノでは倍音構成が複雑なため、高音と低音 の高音部ではピッチが低く感じられる。 の調律は実音での調律ができず、倍音を聞いて調律しています。エレクトーンの場合は逆に実 音で調律していますから、ピアノとエレクトーンでは、高音と低音の調律自体が本質的に違う わけです。 割れるような感じや、ノイズが入るような おもに管楽器の音色で感じることです。これは実際の楽器音の特長を再現するため、意図的に 感じのするボイスがある。 組み込まれた音色効果です。ブラスの振動やブレスノイズなど、よりリアルな特徴をそなえた 音色が得られます。 複数の鍵盤を
困ったときは 現象 原因と対処 A.B.C./アカンパニメント/M.O.C. A.B.C.のシングルフィンガーで下鍵盤の高 シングルフィンガーでは定められた1オクターブの中の音が出るようになっています。 い方を押さえても、音程が変わらない。 同じコードまたは同じ音色であれば、下鍵盤のどの位置を押さえても同じ音程で和音が 得られます。 イントロ/エンディングパターンが鳴って イントロ/エンディングパターンの演奏中はアカンパニメントコードが自動的に選択演奏され いるとき、下鍵盤を弾いても発音しない。 るので、その他の音は発音しないようになっています。 アカンパニメントを選んでリズムをスター • アカンパニメントのボリュームが0に設定されています。リズムコンディション画面でアカ トさせたが、アカンパニメントが鳴らな い。 ンパニメントのボリュームを上げてください(68ページ)。 • アカンパニメントのパートがすべてOFFになっています。ONに設定してください(68ペー ジ)。 メロディーオンコード(M.O.C.
困ったときは 現象 原因と対処 MDR 楽器がUSBフラッシュメモリーを認識しな 接続したUSBフラッシュメモリーが動作確認済みのものかご確認ください。動作確認済み い。 USB機器については、下記ウェブサイトの「資料/データ」から確認できます。 サポート・お問い合わせ: https://jp.yamaha.
仕様 仕様 ELS-02 ELS-02C AWM 音源 AWM/VA/ORGAN 上鍵盤: 49鍵(C〜C)、下鍵盤: 49鍵(C〜C)、ペダル鍵盤: 20鍵(C〜G) 鍵盤 スタンダード鍵盤 (FS鍵盤) 鍵盤種 アフタータッチ ホリゾンタルタッチ レジストレー レジストレーション ション メニュー 上鍵盤、下鍵盤、ペダル鍵盤 上鍵盤、下鍵盤 上鍵盤、下鍵盤、ペダル鍵盤 − 上鍵盤、下鍵盤 506 566 レジストレーション メモリー 1ユニット 16×5 M.(メモリー )、1〜16、D.
仕様 ELS-02 プログラム 機能 ELS-02C ボイスエディット ○ リズムパターン プログラム ○ リズムシーケンス プログラム 1ユニット キーボード パーカッション アサイン 各種コント ロール フット スイッチ レフト [リズム] 停止、ブレイク、メインA、B、C、D、イントロ1、2、3、エンディング1、2、3 [グライド] 上鍵盤1、2、リード1、2、下鍵盤1、2、タイム設定 [ロータリースピーカー ] ライト レジストレーションシフト セカンドエクスプレッ ションペダル ○ ピッチベンド、テンポ (設定/再生のみ) ピッチベンド、テンポ サステイン(上鍵盤1、2、下鍵盤1、2)、M.O.C.、リードスライド、ソロ(リード2) ニーレバー -6〜+6 トランスポーズ ピッチ A=427.2〜452.
エレクトーン用語辞典 エレクトーン用語辞典 ここでは、エレクトーンに特有の機能や、パネル上または画面上に出てくる難しい用語について掲載します。 電子楽器全般に関する基本的な用語、ボイスエディットやエフェクトに関する各パラメーターの意味などは、インターネット 上の下記ページにも掲載してありますので、参考にしてください。 ■ エレクトーン用語検索 https://jp.yamaha.
エレクトーン用語辞典 用語 セ セカンドエクスプレッション セクション 解説 ピッチベンドやテンポをコントロールするためのペダル。 リズムパターンのバリエーションのこと。イントロ、エンディング、メイン、フィル ページ 185 60 イン、ブレイクなどに分かれている。 ソ タ ソロ機能 リードボイス2の音だけを上鍵盤で演奏することのできる機能。ニーレバーで操作する。 ソング MDRに保存する1曲分のデータ。 タッチトーン 鍵盤を押す力や押さえ続ける力によって、音量や音色を変化させる機能。イニシャル 29 112 46 タッチとアフタータッチがある。 チ タッチビブラート 鍵盤を押さえる強さによってビブラートをコントロールする機能。 48 チューン ボイスセクションごとに、ボイスのピッチを変更する機能。各ボイスセクションの 49 チューンをずらしておくことで、演奏に厚みを持たせることができる。 テ ディスプレイセレクト LCDディスプレイの右側にある12個のボタン群。 14 データコントロールダイアル 画面に表示される数値やスライダーなどを操作するためのダイア
エレクトーン用語辞典 用語 ホ 解説 ページ ボイス 各鍵盤で鳴らすことのできる楽器音色。 ボイスエディット ボイスを編集すること。音量や音色を変更して、ユーザーボイスをつくることができる。 ボイスコンディション 26 ボイスの発音状態(=コンディション)を設定する画面の名称。ボイスボタンを2回押す 141 28 と表示される。 ボイスセクション ボイスを選ぶときに使用するひとかたまりのボタン群。ボイスボタンとユーザーボタ 26 ン、BRILLIANCEボタン、VOLUMEボタンで構成される。 ボイスディスプレイ 現在選ばれているボイスやリズムなどの状態を表示する画面。 ボイスメニュー ボイスボタンを押したときに表示される画面。 ボイスリンク ボイスコンディション画面の設定(ボリュームとブリリアンスを除く)を含めた音色を、 1つのボイスとして登録できる機能。 19 28 46、53 ポリ 複音のこと。ペダル鍵盤で和音が弾けるモード。 47 ホリゾンタルタッチ 鍵盤を押さえたまま、指の重心を左右に動かす演奏法。音色を変化させてビブラート 46 などの効果を
索引 索引 A S A.B.C./M.O.C. ........................................69, 70 AEM ..................................................................... 9 AUX IN ......................................................... 190 AUX OUT ..................................................... 190 AUX OUT (LEVEL FIXED) ...................... 190 AWM (ボイスエディット) .......................... 143 AWM音源 ......................................................... 41 SEQUENCE ................................................
索引 スピード(ビブラート) ..................................... 47 スピード(ロータリースピーカー ) ................. 52 スライド ........................................................... 48 スルー (エフェクト) ........................................ 58 スロー (ロータリースピーカー ) .................... 52 セ セカンドエクスプレッションペダル .......... 185 セクション ........................................................ 60 ソ 送信チャンネル(MIDI) ................................. 196 ソロ ................................................................... 29 ソング ................
BSDライセンスソフトウェアの利用に関するお知らせ 本製品はソフトウェアの一部にBSDライセンスに従った ソフトウェアを利用しています。BSDライセンスとは、無 保証の旨の明記、著作権表示、ライセンス条文一覧の表示を 条件としてプログラムの再頒布が許諾されるソフトウェアの ライセンス形式です。 下記の内容は、上記ライセンス条件にもとづき表示されるも のであり、お客様の使用制限等を規定するものではありませ ん。 記 WPA Supplicant XySSL Copyright © 2006-2008, Christophe Devine. All rights reserved.
保証とアフターサービス サービスのご依頼、お問い合わせは、お買い上げ店、または ヤマハ修理ご相談センターにご連絡ください。 ●保証書 ◆修理に関するお問い合わせ ヤマハ修理ご相談センター ナビダイヤル(全国共通番号) 0570-012-808 本機には保証書がついています。 保証書は販売店がお渡ししますので、必ず「販売店印・お買 い上げ日」などの記入をお確かめのうえ、大切に保管してく ださい。 上記番号でつながらない場合は TEL 053-460-4830 へ おかけください。 ●保証期間 受付 月曜日〜金曜日 10:00〜17:00 保証書をご覧ください。 ●保証期間中の修理 保証書記載内容に基づいて修理いたします。詳しくは保証書 をご覧ください。 ※固定電話は、全国市内通話料金でご利用いただけます。 通話料金は音声案内で確認できます。 (土曜、日曜、祝日およびセンター指定の休日を除く) FAX 東日本(北海道/東北/関東/甲信越/東海) 03-5762-2125 西日本(北陸/近畿/中国/四国/九州/沖縄) 06-6649-9340 ●保証期間経過後の修理 修理すれば使用できる場
◆エレクトーンの仕様や取り扱いに関するお問い合わせ ご購入の特約店または下記ヤマハお客様コミュニケーションセンターへ お問い合わせください。 お客様コミュニケーションセンター エレクトーン・D-DECKご相談窓口 ナビダイヤル(全国共通番号) 0570-005-808 ※固定電話は、全国市内通話料金でご利用いただけます。 通話料金は音声案内で確認できます。 上記番号でつながらない場合は TEL 053-460-4836へおかけください。 受付: 月曜日〜金曜日 10:00〜17:00 (土曜、日曜、祝日およびセンター指定の休日を除く) https://jp.yamaha.com/support/ ◆ウェブサイトのご案内 ヤマハ株式会社ホームページ https://jp.yamaha.com/ ヤマハエレクトーン・キーボードサイト https://jp.yamaha.com/kbd/ ヤマハ サポート・お問い合わせ https://jp.yamaha.