
User Manual
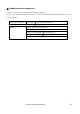

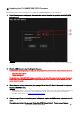
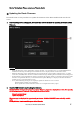
Table Of Contents
- ■ Important Notice
- ■ Precautions (Please be sure to read this section first!)
- ■ Checking the version number
- ■ Preparing for the update
- ■ Update procedure sequence
- ■ Updating the CL series firmware
- ■ Updating the CL NAME SUB CPU Firmware
- ■ Updating the Dante Firmware
- ■ Updating the Dante firmware by using PC application.
- ■ Preparing for the update
- ■ Update procedure sequence
- ■ Install the Dante Firmware Update Manager
- ■ TCP/IP settings of computer
- ■ Updating the Dante firmware
- ■ About Failsafe Mode
- ■ Preparing for recovery
- ■ Recovery procedure sequence
- ■ Install the Dante Firmware Update Manager
- ■ TCP/IP settings of computer
- ■ Recovery of the Dante module

CL5/CL3/CL1Firmware Update Guide 9
■
Updating the Dante firmware by using PC application.
Described below are the procedures to update the Dante firmware by using PC application.
■
Preparing for the update
You will need the following items ready to execute the update procedure.
● A Windows computer equipped with the following conditions:
OS
Windows 8/8.1
/Pro
Windows 7
Ultimate / Professional / Home Premium
CPU
Intel Pentium 1.2GHz or Intel Celeron 1.7GHz or higher
HDD
250MB or more
Connector An Ethernet connector that supports a data transfer rate of 100Mbps or
higher
A USB connector
● An Ethernet cable (CAT5e or higher recommended. Straight or cross.)
■
Update procedure sequence
Update in the following sequence.
If you plan to update multiple CL series units, repeat the procedure described in “Update” for each
unit in sequence.
Preparing for update
Install the Dante Firmware Update Manager
TCP/IP settings of computer
Update Updating the Dante firmware
■
Install the Dante Firmware Update Manager
Before you update the Dante firmware, you must install the Dante Firmware Update Manager.
Double-click the Dante Firmware Update Manager installer downloaded in “Preparing for the update”
(DanteFirmwareUpdateManager-x.x.x.exe) and follow the on-screen instructions to install the
firmware.
x.x.x represents the version number of the Dante Firmware Update Manager.
In addition, extract the Dante firmware (extension: .dnt) from the compressed file.
The Dante firmware will not work correctly if the path contains any characters other than single-byte
alphanumeric characters, "-" (hyphen), or "_" (underscore). You must save the firmware update file in
a directory whose name contains only single-byte alphanumeric characters, "-" (hyphen), or "_"
(underscore). (E.g., C:\temp)