
User Manual


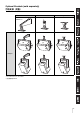
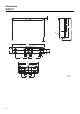
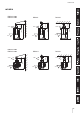
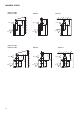
Table Of Contents

3
Package Contents
Parts bag contents
Check Before Installation
Fittings, bolts, and other items for installing the bracket to a wall or ceiling are not included. If you are not sure what fittings to
use, consult a specialist.
FOR DXR & DHR FOR DXR (DXR10) FOR DHR (DHR10, CHR10)
M5×10 screws
with flat washer and
spring washer × 4
M5×16 screws
with flat washer and
spring washer × 2
M8×35 hexagon bolts
with flat washer and
spring washer × 4
M8 spring washers × 2 M8×25 hexagon bolts × 2 M8×55 hexagon bolts
× 2
M8 flat washers × 2 Rubber spacers
(∅50 mm, 10mm thickness)
× 2
Rubber spacers
(∅50 mm, 18 mm thickness)
× 2
Spacers,
3.2 mm thickness × 2
Bottom plate, 16 mm height × 1 Bottom plate, 7 mm height × 1
CAUTION
• Make sure that the installation surface is strong enough to support the total weight of the speaker and the U-bracket. If you
are not sure about the installation surface, consult a specialist. Avoid attaching the U-bracket to drywall such as acoustic
tiles.
• Make sure to take precautionary measures using wires to prevent the speaker
from falling down in the event of an installation failure. Attach commercially-avail-
able M8 eye bolts to the screw holes for the U-bracket, and attach M8 for DXR10 or
M10 for DHR10/CHR10 to the screw holes (rigging points) located at the top (two
locations) and on the lower rear (one location) of those units. For the DHR10 and
CHR10, use eye bolts 30–50 mm in length.
• When installing the safety wire to the wall, install it higher than the wire’s attach-
ment point on the speaker, with as little slack as possible. If the wire is too long,
and the speaker happens to fall, the wire may snap as a result of too much strain.
Yamaha cannot be held responsible for damage or injury caused by insufficient strength of the support structure or
improper installation.
Owner’s Manual
(this book)
Required.
Brackets × 2 Parts bags × 3
Use two of these.
Select one with the name of the speaker
you are using.
For the CHR10, select “FOR DHR.”