
User Manual
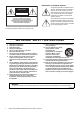
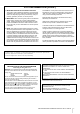
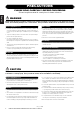
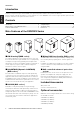
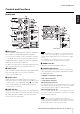

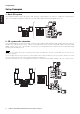
Table Of Contents

DXR15/DXR12/DXR10/DXR8/DXS15/DXS12 Owner’s Manual 9
Controls and Functions
English
&
AC IN socket
Connect the supplied AC power cord here. First, connect the
power cord to the device, then insert the power cord plug
into the AC outlet.
Be sure to turn the power off before connecting
or disconnecting the power cord.
*
Power switch
Turns the power supply on or off.
Press the switch to the On position to turn the power on (O).
NOTE
If you are using multiple devices, turn on the power to each device
individually. If you turn on the power to multiple devices
simultaneously, a temporary drop in the power voltage may occur,
possibly resulting in abnormal operation of the devices.
Rapidly turning the unit on and off in
succession can cause it to malfunction. After
turning the unit off, wait for about 5 seconds
before turning it on again.
Tiltable pole socket (DXR series)
(
Tiltable pole socket (DXR series)
This mount has two pole sockets. You can choose the angle
of the DXR (mounted on a speaker pole) so that the speaker
will be horizontal to the floor or tilting toward the floor by 7
degrees.
Suspended installation
If you plan to suspend your DXR series speaker, attach
commercially-available eye bolts to the screw holes (which
are sealed at the time of shipment) located on the top (two
locations) and on the lower part of the rear (one location).
The size of the screw holes on the DXR15 and DXR12 is
M10 (for an eye bolt length of 18mm or less). The size of
the screw holes on the DXR10 and DXR8 is M8 (for an eye
bolt length of 15mm or less). Keep in mind that you will
need three eye bolts to suspend it. Make sure to use the
eye bolts according to the standards and safety
regulations in your area.
Before doing any installation or construction
work, consult with an installation expert.
When choosing the installation location,
suspension wire and mounting hardware, make
sure all are strong enough to support the
weight of the speaker.
Some fittings may deteriorate over extended
periods of time due to wear and/or corrosion.
For optimum safety, the installation should be
checked thoroughly at regular intervals.
Yamaha cannot be held responsible for damage
or injury caused by insufficient strength of the
support structure or improper installation.
#
&
$
*
DXR15, DXR12, DXR10, DXR8, DXS15, DXS12
CAUTION
CAUTION
(
7˚
0˚
7˚
CAUTION