
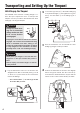
User Manual


9
n
Pedal Adjustment
After depressing the toe and heel of the pedal, turn
the spring tension adjustment bolt as described below.
5
Loosen all over-tightened bolts according to the
procedure described in step
3
(*2). When the
pitch is approximately the same at each bolt,
repeatedly depress the toe and heel of the pedal
several times.
6
Repeat steps
3
through
5
until the pitch at each
bolt is exactly the same.
7
Check the sound by striking the head as de-
scribed in step
2
.
•Soundislowerthanthetuningnote
→
Tune the instrument by tightening all
tuning bolts by an equal amount (max.
1/16 of a turn).
•Soundishigherthanthetuningnote
→
Tune the instrument by loosening all
tuning bolts by an equal amount (max.
1/16 of a turn) according to the procedure
described in step
3
.
8
Operate the pedal as described in step
5
. If the
pitch does not change, the instrument is tuned
properly.
(If the pitch changes, repeat from step
7
.)
The instrument is now tuned to the lowest sound
(note) of its tonal range. Depress the toe of the
pedal to change to a higher pitch (note).
9
After tuning, perform
n
Pedal Adjustment and
then
n
Tuning Indicator Adjustment.
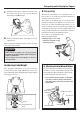
Adjusting the Pitch
l
Pedal balance spring mechanism
Your Yamaha timpani is equipped with a unique pedal
balance spring mechanism (a coil spring counteract-
ing the tension of the head) which allows you to freely
change the pitch (note) of the instrument. When the ped-
al is moved, the pitch of the head will change, and the
balance spring ensures that the pedal angle (pitch) will
not change when you remove your foot from the pedal.
•Heelmoves up when releasing the footfrom
the pedal after depressing the heel, or the heel
feels heavier than the toe.
→
Turn the spring tension adjustment bolt to
the left (counterclockwise).
•Toemovesupwhenreleasing thefoot from
the pedal after depressing the toe, or the toe
feels heavier than the heel
→
Turn the spring tension adjustment bolt to
the right (clockwise).
Use the supplied tuning key to turn the spring adjust-
ment bolt. Do not turn too many full rotations at once,
and re-check the adjustment every 2 turns by press-
ing the toe and heel of the pedal.
Spring Tension
Adjustment Bolt
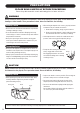
Caution
Never place your fingers or foot into the mov-
ing parts or the space under the pedal or base.
Serious injury can result if fingers or feet be-
come pinched.
Note
Do not loosen the spring tension adjustment
bolt by more than 3 rotations at a time, as
the toe of the pedal tends to drop abruptly
after a specific point.