LVF Front Surround System YAS-101 OWNER’S MANUAL MANUAL DE INSTRUCCIONES ИНСТРУКЦИЯ ПО ЭКСПЛУАТАЦИИ
Caution: Read this before operating your unit. 1 2 3 4 5 6 7 8 9 10 11 12 13 14 15 16 17 To assure the finest performance, please read this manual carefully. Keep it in a safe place for future reference. Install this unit in a well ventilated, cool, dry, clean place - away from direct sunlight, heat sources, vibration, dust, moisture, and/or cold. For proper ventilation, allow the following minimum clearances.
English CONTENTS Enjoying sound with your preference ......... 7 Additional Information ................................ 8 Operation indicators of the unit ................ 11 Troubleshooting ....................................... 12 Specification............................................. 14 Русский What you can do with this unit Español Supplied items ............................................2 Front panel .................................................2 Placing................................
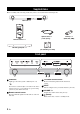
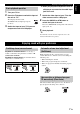
Supplied items Before assembly and connecting, make sure you have received all of the following items. Main unit × 1 Battery × 2 (AAA, R03, UM4) Optical cable × 1 (1.5 m (4.9 ft)) Remote control × 1 Mounting template × 1 Spacer × 2 (for attaching to a wall) Front panel 4 1 5 6 2 3 1 Indicators 3 TV remote control sensor Light up to show the system condition.(☞ P. 11) y The indicators automatically become darker if the unit is left turned on for 5 seconds without any operation being performed.
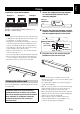
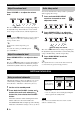
English Placing 1 Installation: illustrated examples Example 1 Example 2 Example 3 Attach the supplied mounting template on a wall and mark the holes of the mounting template. Tapes or thumbtacks Mark Example 1: Unit beneath TV Example 2: Unit without stand beneath TV (☞ P. 9) Example 3: Wall mounting 2 Notes • Do not place the unit on/under any other components such as BD player in a pile. The vibration of the unit may cause system failure, etc. in other components.
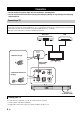
Connection • Do not connect the power cable until all connections are completed. • Do not use excessive force when inserting the cable plug. Doing so may damage the cable plug and/or terminal. Connecting a TV The unit plays the audio output from your TV. Connect input components such as a BD player, etc., to your TV first and check the components play properly before connecting to the unit. See the manuals of your TV and BD player, etc., for details.
Connection English yAlternative connections Connect the input components (BD player, STB, etc) to the unit directly in the following cases. • When the unit does not play the sound output from the components connected to your TV (☞ P. 4). • When your TV does not have any audio input jacks to connect input components, such as a BD player, etc. Refer to “Using an external subwoofer” (☞ P. 8) for details on the use of an external subwoofer and appropriate settings of the unit.
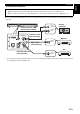
Operation Once you have finished all cable connections and remote control operation, follow the procedure below to start basic playback operation. Remote control Installing the batteries 1 3 4 2 5 Before installing batteries or using the remote control, make sure that you read precautions on the remote control and batteries in “Notes on remote controls and batteries” (☞ P. 1).
Enjoying sound with your preference 1 2 a BD player connected to the audio input jack of the unit. Turn your TV on. Press the TV button to switch the input of the unit to “TV.” The unit plays the TV sound. The INPUT indicator lights up in green. (☞ P. 11) 3 Switch the input of your TV if you use components such as a BD player. 1 Switch the video input of your TV to the video source such as a BD player. 2 Press the BD/DVD or STB button to switch the input of the unit.
Additional Information Adjust the volume level Audio delay control Press VOLUME +/– to adjust the volume level. You can use this function to delay sound to synchronize with a lagging video image. 1 Press and hold AUDIO DELAY more than 3 seconds to enter adjustment mode. Up Down The color of qD DTS indicator changes depending on the adjustable range. Green indicates a lower volume level, orange a moderate level, and red a higher level. Flashes in green (☞ P.
Additional Information 2 TV remote control operation may be difficult if the unit hides the sensor of your TV when beneath or under the TV. Try the two solutions below and see whether this solves the problem. Press both the VOLUME + button and button of the main unit, release the button first, then release the VOLUME + button. The unit is turned on when switching the TV remote control signal transmission function on/off. The CLEAR VOICE indicator lights up as the following illustration.
Additional Information 3 Press the button below of the main unit to select the operation you want the unit to learn. Operation you want the unit to learn The button The Indicator of the unit flashes in green Volume down VOLUME – Volume up VOLUME + Removing all learned TV remote control operations Power on/standby mode 4 Point your TV remote control at the remote control sensor and press the respective button twice or three times until the indicator changes from flashing green to lit green.
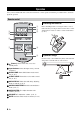
English Operation indicators of the unit The six indicators are placed in the above order, and their color and appearance are symbolically represented as below. : Lights up in green : Lights up in red : Lights up in orange : No light : Flashes in green : Flashes in red Indication immediately after turning on the unit Immediately after turning on the unit, the indicators show the state of the unit as below. TV remote control signal transmission function (☞ P. 9) Playback of the subwoofer (☞ P.
Troubleshooting Refer to the chart below should the unit not function properly. If the problem you are experiencing is not listed below, or if the instruction below does not help, set the unit to the standby mode, disconnect the AC power supply cable, and contact the nearest authorized Yamaha dealer or service center. Check the below first. 1 The AC power supply cable of the unit, TV and external components (such as BD player) are firmly connected to the AC wall outlet.
Troubleshooting Cause Solution The volume, subwoofer and The adjustment has reached the maximum or audio delay time is not minimum. adjustable. The unit does not learn the operation of TV remote control. See page 8 The remote control sensor of the unit may be exposed to direct sunlight or lighting. Reposition the unit. — The screen glare of TV disturbs the remote control signal. Disconnect the power cable and perform the remote control learning operation again.
Specification Amplifier section Input Jacks • Minimum RMS Output Power Front Left and Right (1 kHz, 1% THD, 6 Ω) ....................................................................... 24 W + 24 W Subwoofer (100 Hz, 1% THD, 3 Ω)........................... 48 W • Maximum Power Front Left and Right (1 kHz, 10% THD, 6 Ω) ....................................................................... 30 W + 30 W Subwoofer (100 Hz, 10% THD, 3 Ω)......................... 60 W • Optical ................................
Precaución: lea las indicaciones siguientes antes de utilizar este aparato 1 2 3 4 5 6 7 8 9 10 11 12 13 Para asegurar el mejor rendimiento de este aparato, lea atentamente este manual. Y luego guárdelo en un lugar seguro para poder consultarlo en el futuro en caso de ser necesario. Instale este sistema de sonido en un lugar bien ventilado, fresco, seco y limpio, alejado de la luz solar directa, fuentes de calor, vibraciones, polvo, humedad y/o frío.
ÍNDICE Disfrutar del sonido según sus preferencias ............................................... 7 Información adicional ................................. 8 Indicadores de funcionamiento de la unidad ...................................................... 11 Solución de problemas............................. 12 Especificaciones ...................................... 14 Qué puede hacer con esta unidad • Disfrutar de sonido envolvente de alta calidad (AIR SURROUND XTREME)..........
Elementos suministrados Antes de realizar las conexiones y el montaje, asegúrese de que ha recibido los siguientes elementos. Unidad principal × 1 Pilas × 2 (AAA, R03, UM4) Cable óptico × 1 (1,5 m) Mando a distancia × 1 Plantilla de montaje × 1 Separador × 2 (para fijación en pared) Panel frontal 4 1 5 6 2 3 1 Indicadores Se encienden para mostrar el estado del sistema. (☞ P. 11) 3 Sensor del mando a distancia del televisor Recibe señales de infrarrojos del mando a distancia del televisor.
Colocación Instalación: ilustraciones con ejemplos Ejemplo 1 Ejemplo 2 1 Ejemplo 3 Cintas o chinchetas Marca Ejemplo 1: unidad debajo del televisor Ejemplo 2: unidad sin pie base debajo del televisor (☞ P. 9) Ejemplo 3: montaje en pared 2 Notas • No apile la unidad encima ni debajo de otros dispositivos como reproductores de Blu-ray. Las vibraciones de la unidad pueden dar lugar a errores (por ejemplo, del sistema) en otros dispositivos.
Conexión • No conecte el cable de alimentación hasta que todas las conexiones se hayan completado. • No emplee demasiada fuerza al insertar el conector del cable. De lo contrario, podría dañar el conector del cable y/o el terminal. Conexión de un televisor La unidad puede reproducir la salida de audio del televisor.
Conexión yConexiones alternativas Consulte “Utilización de un subwoofer externo” (☞ P. 8) para obtener más información sobre el uso de subwoofer externos y la configuración adecuada para la unidad.
Funcionamiento Una vez finalizadas todas las conexiones de los cables y los preparativos del mando a distancia, siga este procedimiento para iniciar el funcionamiento de reproducción básico. Mando a distancia Instalación de las pilas 1 3 4 2 5 Antes de instalar las pilas o utilizar el mando a distancia, es muy importante leer las precauciones sobre el mando a distancia y las pilas que encontrará en “Observaciones sobre los mandos a distancia y las pilas” (☞ P. 1).
Disfrutar del sonido según sus preferencias Funcionamiento de reproducción básico Encienda el televisor. 1 Cambie la entrada de vídeo del televisor a una fuente de vídeo, por ejemplo, la de un reproductor de Blu-ray. 2 Pulse el botón BD/DVD o STB para cambiar la entrada de la unidad. Pulse el botón TV para cambiar la entrada de la unidad a “TV”. La unidad reproduce el sonido del televisor. El indicador INPUT se ilumina en verde. (☞ P.
Información adicional Ajuste del nivel de volumen Control de retardo de audio Pulse VOLUME +/– para ajustar el nivel de volumen. Puede utilizar esta función para retrasar el sonido, y sincronizarlo así con la imagen de vídeo. 1 Subir Mantenga presionado AUDIO DELAY durante más de 3 segundos para acceder al modo de ajuste. Bajar El color del indicador qD DTS cambia dependiendo del rango ajustable.
Información adicional El funcionamiento con el mando a distancia del televisor puede ser difícil si la unidad tapa el sensor del televisor (si está situada debajo del televisor). Intente las dos soluciones siguientes para ver si soluciona el problema. El indicador CLEAR VOICE (2 segundos después de haber encendido la unidad) 1 Mueva la unidad en todas direcciones. 2 Quite las bases para disminuir la altura de la unidad. Utilice un destornillador de estrella para quitar los tornillos.
Información adicional 3 Pulse el botón situado debajo de la unidad principal para seleccionar la operación que quiere que aprenda la unidad.
Indicadores de funcionamiento de la unidad Español Los seis indicadores se sitúan en el orden descrito arriba y su color y aspecto se representan de forma simbólica del modo siguiente. : Se ilumina en verde : Se ilumina en rojo : Se ilumina en naranja : No se ilumina : Se ilumina en verde : Se ilumina en rojo Indicación que aparece inmediatamente después de encender la unidad Justo después de encender la unidad, los indicadores muestran el estado de la unidad tal como se indica a continuación.
Solución de problemas Consulte la siguiente tabla si la unidad deja de funcionar correctamente. Si el problema que tiene no aparece en la tabla, o si las instrucciones facilitadas no sirven para su caso, ponga la unidad en modo de espera, desconecte el cable de alimentación de CA y póngase en contacto con el distribuidor autorizado Yamaha más cercano o con un centro de servicio técnico. Compruebe primero lo siguiente.
Solución de problemas Problema El volumen de la unidad y el del televisor aumentan al mismo tiempo. El televisor recibe la señal del mando a distancia del televisor después de haber aprendido la operación de la unidad. Solución Ajuste el volumen del televisor al mínimo o desactive la salida de audio del altavoz integrado del televisor. Ajuste el volumen con el mando a distancia de la unidad. El ajuste ha llegado al máximo o al mínimo.
Especificaciones Sección del amplificador Tomas de entrada • Potencia mínima de salida RMS Frontal, izquierda y derecha (1 kHz, 1% THD, 6 Ω) ....................................................................... 24 W + 24 W Subwoofer (100 Hz, 1% THD, 3 Ω)........................... 48 W • Potencia máxima Frontal, izquierda y derecha (1 kHz, 10% THD, 6 Ω) ....................................................................... 30 W + 30 W Subwoofer (100 Hz, 10% THD, 3 Ω).........................
Предупреждение: Внимательно прочитайте это перед использованием аппарата. 1 Для обеспечения наилучшего результата, пожалуйста, внимательно прочитайте данную инструкцию. Храните ее в безопасном месте для будущих справок. 2 Данную аудиосистему следует устанавливать в хорошо проветриваемых, прохладных, сухих, чистых местах, не подверженных воздействию прямого солнечного света, вибрации, пыли, влаги, и/или холода, вдали от источников тепла.
СОДЕРЖАНИЕ Поставляемые компоненты ....................2 Передняя панель......................................2 Размещение ..............................................3 Подключение ............................................4 Работа .......................................................6 Настройка звука в соответствии с личными предпочтениями....................... 7 Дополнительная информация................. 8 Индикаторы работы устройства........... 11 Поиск и устранение неисправностей ...
Поставляемые компоненты Перед выполнением сборки и подключений убедитесь в наличии всех следующих компонентов. Основной блок × 1 Оптический кабель × 1 (1,5 м) Батарейка × 2 (AAA, R03, UM4) Пульт дистанционного управления × 1 Шаблон для крепления × 1 Подкладка × 2 (для установки на стене) Передняя панель 4 1 5 6 2 3 1 Индикаторы Загораются для отображения состояния системы (☞ стр. 11). 3 Датчик дистанционного управления телевизора Получает инфракрасные сигналы от пульта ДУ телевизора.
Размещение 1 Примеры установки Пример 1 Пример 2 Пример 3 Прикрепите прилагаемый шаблон для крепления к стене и разметьте по нему отверстия. Клейкие ленты или кнопки Метка 2 Снимите шаблон для крепления и вверните имеющиеся в продаже саморезы в помеченные места через прилагаемые подкладки. Примечания • Не устанавливайте устройство на других компонентах, например на BD-проигрыватель или под ними. Вибрация этого устройства может вызвать сбои в работе других компонентов.
Подключение • Не подключайте кабель питания, пока не завершены все подключения. • Не прилагайте излишних усилий при включении штекера кабеля. Это может привести к повреждению штекера кабеля или разъема. Подключение телевизора Устройство воспроизводит звуковой сигнал, поступающий с телевизора. Перед тем как подключить устройство, подсоедините к телевизору входные компоненты, например BDпроигрыватель и т.д., а затем убедитесь в том, что компоненты надлежащим образом воспроизводят сигналы.
Подключение yДополнительные подключения Подсоедините входные компоненты (BD-проигрыватель, STB и т.д.) напрямую к устройству в следующих случаях. • Если устройство не воспроизводит звуковой сигнал с компонентов, подключенных к телевизору (☞ стр. 4). • Если телевизор не оснащен гнездами аудиовхода для подключения входных компонентов, например BD-проигрывателя и т.д. Для получения дополнительной информации об использовании внешнего сабвуфера и надлежащих настройках устройства см.
Работа После завершения подключения всех кабелей и работы с пультом ДУ выполните следующую процедуру, чтобы начать основные операции воспроизведения. Пульт ДУ Установка батареек 1 3 4 2 5 1 6 7 8 9 1 Перед установкой батареек или использованием пульта ДУ обязательно прочтите меры предосторожности при работе с пультом ДУ и обращении с батарейками в разделе “Примечания по пультам ДУ и батарейкам” (☞ стр. 1). (питание): включение устройства или перевод его в режим ожидания.
Настройка звука в соответствии с личными предпочтениями yВоспроизведение с таких Основные операции воспроизведения 1 2 компонентов, как BD-проигрыватель, подключенных к гнезду аудиовхода устройства. Включите телевизор. Нажмите кнопку TV, чтобы выбрать телевизор в качестве входа устройства. 3 Переключите вход телевизора, если используются такие компоненты, как BD-проигрыватель. Переключите видеовход телевизора к видеоисточнику, например BD-проигрывателю.
Дополнительная информация Регулировка уровня громкости Нажмите кнопки VOLUME +/–, чтобы отрегулировать уровень громкости. Управление задержкой звучания Эту функцию можно использовать для задержки вывода звука для синхронизации с видеоизображением. 1 Выше Нажмите и удерживайте нажатой кнопку AUDIO DELAY более 3 секунд, чтобы войти в режим настройки. Ниже Цвет индикатора qD DTS будет изменяться в зависимости от диапазона регулировки.
Дополнительная информация Функция передачи управляющих сигналов пульта ДУ телевизора будет включена или выключена после включения устройства. Индикатор CLEAR VOICE загорается, как показано на следующем рисунке. Проверьте правильность настройки (☞ стр. 11). Управление пультом ДУ телевизора затруднено (при установке устройства под телевизором) Управление пультом ДУ телевизора может быть затруднено, если датчик телевизора закрыт устройством, установленным под телевизором.
Дополнительная информация 3 Нажмите указанную ниже кнопку основного устройства, чтобы выбрать функцию, которой требуется обучить устройство.
Индикаторы работы устройства Русский Шесть индикаторов устройства расположены в следующем порядке. Их цвет и вид показаны ниже. : горит зеленым : горит красным : горит оранжевым : не горит : мигает зеленым : мигает красным Индикация сразу после включения устройства Сразу после включения устройства индикаторы следующим образом отображают состояние устройства. Используемый сабвуфер (☞ стр. 8) Функция передачи управляющих сигналов пульта ДУ телевизора (☞ стр.
Поиск и устранение неисправностей Если устройство работает неправильно, см. таблицу ниже. Если неисправность не указана в таблице или неисправность не удалось устранить, следуя указаниям таблицы, переведите устройство в режим ожидания, отсоедините силовой кабель и обратитесь к ближайшему авторизованному дилеру Yamaha или в сервис-центр. Сначала выполните следующие проверки.
Поиск и устранение неисправностей Проблема Громкость устройства и телевизора увеличивается одновременно. Причина Телевизор принял сигнал пульта ДУ телевизора после обучения устройства. Решение См. стр. Установите минимальный уровень громкости на телевизоре или выключите вывод звука на встроенные динамики телевизора. — Отрегулируйте уровень громкости с пульта ДУ устройства. 8 Уровень громкости, сабвуфер, Достигнут максимальный или минимальный предел регулировки. время задержки звука не регулируются.
Технические характеристики Раздел усилителя Входные гнезда • Минимальная выходная мощность RMS Передний левый и правый (1 кГц, 1% гармонич. искаж., 6 Ω) ...............................................24 Вт + 24 Вт Сабвуфер (100 Гц, 1% гармонич. искаж., 3 Ω) ...................................................................................48 Вт • Максимальная мощность Передний левый и правый (1 кГц, 10% гармонич. искаж., 6 Ω) .....30 Вт + 30 Вт Сабвуфер (100 Гц, 10% гармонич. искаж., 3 Ω) ................