U YAS-70 (YAS-70CU + YAS-70SPX) CENTER SYSTEM + SUBWOOFER/SYSTEM CONTROL OWNER’S MANUAL
IMPORTANT SAFETY INSTRUCTIONS IMPORTANT SAFETY INSTRUCTIONS CAUTION RISK OF ELECTRIC SHOCK DO NOT OPEN CAUTION: TO REDUCE THE RISK OF ELECTRIC SHOCK, DO NOT REMOVE COVER (OR BACK). NO USER-SERVICEABLE PARTS INSIDE. REFER SERVICING TO QUALIFIED SERVICE PERSONNEL.
IMPORTANT SAFETY INSTRUCTIONS FCC INFORMATION (for US customers) 1 IMPORTANT NOTICE: DO NOT MODIFY THIS UNIT! This product, when installed as indicated in the instructions contained in this manual, meets FCC requirements. Modifications not expressly approved by Yamaha may void your authority, granted by the FCC, to use the product. 2 IMPORTANT: When connecting this product to accessories and/or another product use only high quality shielded cables. Cable/s supplied with this product MUST be used.
CAUTION: READ THIS BEFORE OPERATING YOUR UNIT. Caution: Read this before operating your unit. 1 To assure the finest performance, please read this manual carefully. Keep it in a safe place for future reference. 2 Install this sound system in a well ventilated, cool, dry, clean place – away from direct sunlight, heat sources, vibration, dust, moisture, and/or cold. Allow ventilation space of at least 30 cm on the top, 20 cm on the left and right, and 20 cm on the back of this unit.
INTRODUCTION ADVANCED OPERATION Getting started ............................................................ 2 Adjusting the virtual speaker settings.....................22 Supplied parts ................................................................ 2 Controls and functions................................................... 3 Using the speaker test mode ........................................ 23 Adjusting the characteristics of the tonal quality (ROOM EQ) ...........................................
GETTING STARTED Getting started Supplied parts This product consists of the following parts. Before making connections, make sure you received all of the following parts.
Getting started INTRODUCTION Controls and functions ■ Front panel of the center system Front panel display Remote control sensor Shows the information about the operational status of this system. (☞ P. 4) Receives infrared signals from the remote control. (☞ P. 5) + STANDBY/ON VOLUME INPUT INPUT - VOLUME + STANDBY/ON Power indicator VOLUME +/– Lights up when this system is turned on. (☞ P. 13) Controls the volume of this system. (☞ P.
Getting started ■ Front panel display of the center system AUTO/TUNED/STEREO/MEMORY indicator DSP indicators CINEMA DSP indicator Lights up when CINEMA DSP is activated. (☞ P. 14) AUTO indicator Shows that this system is in the automatic tuning mode. (☞ P. 17) HiFi DSP indicator Lights up when HiFi DSP is activated. (☞ P. 14) TUNED indicator Lights up when this system is tuned into a radio station. (☞ P.
Getting started MOVIE MUSIC SPORTS GAME STANDBY/ON Sound field program buttons Turns on this system or sets it to the standby mode. (☞ P. 13) INTRODUCTION ■ Remote control Select a sound field program. (☞ P. 14) VOLUME INPUT 1 INPUT 2 INPUT 3 MUTE DOCK FM INPUT Control the volume of this system. (☞ P. 13) Infrared signal transmitter Input buttons Select an input source you want to listen to. (☞ P.
Getting started ■ Using the remote control + STANDBY/ON VOLUME INPUT Within 6 m (20 feet) 30˚ 30˚ Use the remote control within 6 m (20 feet) of the center system and point it toward the remote control sensor. Notes • Be careful not to spill liquid on the remote control. • Be careful not to drop the remote control.
Placing this system To enjoy quality sounds thoroughly, you need to place this system in their appropriate positions and install them correctly. After deciding the layout, follow the procedure below to install this system. Center system (YAS-70CU) Subwoofer/system control (YAS-70SPX) Center system (YAS-70CU) Subwoofer/system control (YAS-70SPX) Place the subwoofer near a the center system and turn it slightly toward the center of the room to reduce wall reflections.
Placing this system ■ Attaching the center system to a wall You can attach the center system to a wall using commercially available screws (#8, Diameter: 7.5 mm or more (9/32” or more)). When installing the center system on a wall, all installation work must be performed by a qualified contractor or dealer personnel. The customer must never attempt to perform this installation work. Improper or inadequate installation could cause the center system to fall, resulting in personal injury.
Connection • Do not connect the power cable until all connections are completed. • Do not use excessive force when inserting the cable plug. Doing so may damage the cable plug and/or terminal. Connecting the center system and the subwoofer/system control PREPARATION Follow the procedure below to connect the center system and the subwoofer/system control. Connecting speaker cables Connect the cable plug to the speaker jack of the same color. Connect the cable plug to the speaker jack of the same color.
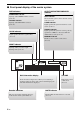
Connection Connecting external components The subwoofer/system control has 3 digital/analog input jacks (optical digital x 1, coaxial digital x 1, analog x 1). Before connecting your external components, check the output jacks of the components and be sure to use correct connection cables. ■ Digital connection Notes • The digital jacks of this system support PCM, Dolby Digital, and DTS signal system. • The digital jacks support digital signals of which sampling frequency is 96 kHz or less.
Connection ■ Analog connection [INPUT 3] ANALOG jacks Example1: TV FM 75Ω UNBAL SYSTEM CONNECTOR ANTENNA 2 OPTICAL COAXIAL L R R TV 1 PREPARATION 3 L ANALOG DOCK R INPUT L SPEAKERS AUDIO OUTPUT Example 2: VCR or video camera VCR or video camera, etc. with no digital output. FM 75Ω UNBAL VCR etc.
Connection Connecting a Yamaha iPod universal dock This system is equipped with the DOCK terminal that allows you to connect a Yamaha iPod universal dock (such as the YDS-10, sold separately) where you can station your iPod and control playback of your iPod using the supplied remote control. Connect a Yamaha iPod universal dock to the DOCK terminal of the subwoofer/system control using its dedicated cable.
Basic playback operation Basic playback operation Once you have finished all cable connections (see pages 9 to 12) and remote control preparation (page 6), follow the procedure below to start basic playback operation. STANDBY/ON. 1 Press This system turns on and the power indicator lights up. To set this system to the standby mode, press STANDBY/ON again.
Enjoying various sound features Enjoying various sound features The sound program features allow you to enjoy various kinds of audio such as movie or music. Choose a program based on your listening preference, and not purely on the name of the program. Enjoying realistic sounds (Sound field program) The sound field programs reproduce realistic sounds with the multi speaker channels. y This system automatically memorizes the settings assigned to each input source.
Enjoying various sound features Enjoying stereo sounds with multi speaker channels (Dolby Pro Logic II) The Dolby Pro Logic II modes reproduce 5.1-channel audio from stereo sounds. Press DEC. MODE repeatedly to select the desired Dolby Pro Logic II mode. -E RY MO ME ET ES PR UNE /T SW TO AU N'L /MA DEC. MODE HT G NI “PL II” appears in the front panel display. ER Lights up NT CE E . EC D MO D Q ME R. O RO E IMM E SU R PLII Movie q PL D R OD .
FM tuning FM tuning Overview You can use two tuning modes to tune into the desired FM station: Frequency tuning mode you can search or specify the frequency of the desired FM station automatically or manually. (“Basic tuning operation” on page 17) Preset tuning mode You can preset the desired FM station in advance, and then recall the station by specifying the preset group and number.
FM tuning Basic tuning operation TS OR MU T3 E VI MO ME LU VO PU T PU IN 2 IN T1 PU P IN “FM” appears in the front panel display. 3 UT TE MU FM IN Press FM to select this system to the FM tuner 1 mode. 1 SP C SI E A- CK DO ME ER AUTO/MAN’L so that the AUTO indicator 2 Press lights up in the front panel display. ENT E A- RY MO ME ET ES PR UNE /T FM 2 NU SW TO AU AN'L /M T GH NI This system is set to the automatic tuning mode.
FM tuning Using station preset feature ■ Automatic station preset First, scan the FM stations with strong signals and store them to the memory by using the automatic preset station feature. You can store up to 40 FM stations (A1 to E8: 8 preset station numbers in each of the 5 preset station groups). G TS OR IC S MU T3 E VI MO PU T1 M LU VO T U NP IN I PU and hold MEMORY for more than 3 2 Press seconds. TE MU FM IN “FM” appears in the front panel display.
FM tuning ■ Manual station preset Use this feature to preset your desired station manually. into a station. 1 Tune See page 17 for tuning instructions. Press MEMORY. 2 The MEMORY indicator flashes in the front panel display TS OR SP C SI MU T3 E VI MO PU T PU IN TE 3 2 MU FM IN Flashes T PU IN 1 for approximately 10 seconds. ME LU VO PU IN T2 E A- K C DO NU ME ER ENT E A- RY MO ME ET ES PR UNE /T is flashing. The selected preset station group letter appears.
Using iPod™ Using iPod™ You can play back the audio sources stored on your iPod on this system. Supported iPod iPod (Click and Wheel) iPod nano iPod mini Battery charge feature This system charges the battery of the iPod stationed to the Yamaha iPod universal dock connected to the DOCK terminal of the subwoofer/system control while this system is turned on.
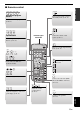
Useful operation Useful operation Changing the brightness of the front panel display You can change the brightness of the front panel display. RY MO ME ET ES PR UNE /T SW TO AU N'L /MA T GH E NT CE NI DIMMER R Press DIMMER repeatedly. Each time you press DIMMER, the brightness of the front panel changes. E OD C. M DIMMER OFF DE ME Q R. SU O RO P.
Adjusting the virtual speaker settings Adjusting the virtual speaker settings Ordinarily, the 5.1 channel speaker system needs two front speakers, a center speaker, two surround speakers, and a subwoofer. Ordinal 5.1 channel speaker system Front speaker This system employs the Air Surround technology that enables you to enjoy the surround sound with the front left and right speakers in the center system; you can hear the center and surround channel sounds without the corresponding speakers.
Adjusting the virtual speaker settings Using the speaker test mode Use this feature to adjust the volume balance of each (virtual) speaker and the position of the virtual surround speakers. ■ Adjusting the volume balance of each channel Press TEST to activate the speaker test mode. 1 Following message appears in the front panel display and this system outputs the test tones. TEST FL 0dB Active (virtual) speaker channel Volume balance Test tone is output at each (virtual) speaker for about 2.
Adjusting the virtual speaker settings ■ Adjusting the position of the virtual surround speakers This system employs the Yamaha Air Surround system that enables the surround sound field using the center system and the subwoofer/system control. This system creates the surround sounds by using the reflections on the walls of your listening room. Use this feature to achieve the ideal surround sound.
Adjusting the virtual speaker settings Adjusting the characteristics of the tonal quality (ROOM EQ) Use this feature to set the equalizer to optimize the tonal quality of the sound for the acoustic characteristics of your listening room. Press ROOM EQ repeatedly to select the desired room equalizer setting.
ADDITIONAL INFORMATION Additional information Troubleshooting If there is any problem with this system, check the following items. If you cannot solve your problem with the following remedies or if your problem was not listed below, turn off and unplug this system, and then consult the nearest authorized Yamaha dealer or service center. Problem Power turns on but immediately shuts off. Cause Solution See page The power cable may be connected improperly.
Additional information Problem The remote control does not work for operating this system. Cause Solution See page This system may be operated outside the remote control operation range. For information on the remote control operation range, refer to “Remote control”. 5 The remote control sensor of this system may be exposed to direct sunlight of lighting. Change the lighting. The batteries may be worn out. Replace the batteries. — 5 \ ■ Tuner Problem Cause FM stereo reception is noisy.
Additional information Glossary ■ Air Surround ■ Dolby Pro Logic II Front surround sound system which is developed by Yamaha enables the surround sound field. In comparison with traditional front surround technologies, the Air Surround system enables a wide range of natural surround sound field.
Additional information Specifications YAS-70CU FM Tuner • Type ........... Full range acoustic suspension magnetic shielding type • Driver (Full range) ........................5 cm (2”) cone magnetic shielding type × 6 (L3, R3) • Frequency Response .............................................. 100 Hz to 25 kHz • Input impedance............................................................................6 Ω • Maximum Input .........................................................................
© 2007 YAMAHA ELECTRONICS CORPORATION, USA 6660 ORANGETHORPE AVE., BUENA PARK, CALIF. 90620, U.S.A. YAMAHA CANADA MUSIC LTD. 135 MILNER AVE., SCARBOROUGH, ONTARIO M1S 3R1, CANADA YAMAHA ELECTRONIK EUROPA G.m.b.H. SIEMENSSTR. 22-34, 25462 RELLINGEN BEI HAMBURG, GERMANY YAMAHA ELECTRONIQUE FRANCE S.A. RUE AMBROISE CROIZAT BP70 CROISSY-BEAUBOURG 77312 MARNE-LA-VALLEE CEDEX02, FRANCE YAMAHA ELECTRONICS (UK) LTD. YAMAHA HOUSE, 200 RICKMANSWORTH ROAD WATFORD, HERTS WD18 7GQ, ENGLAND YAMAHA SCANDINAVIA A.B.