
User Manual
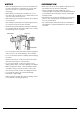


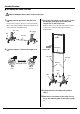


Table Of Contents

YCH7018 YCH6018 YCHS7018 YCHS7006 Owner’s Manual•7
Assembly Procedure
Attaching the Sound Tubes
Install the sound tubes with the damper released.
1.Put the sound tubes on a stable, flat, level
surface.
To prevent damage to the tubes, place a soft cloth on
the floor where the tubes will be placed.
2.Remove the protective film that was applied
to the sound tube surface.
3.Hook both end balls of the wire in the
grooves of the hanger.
At this time, turn the note name toward the player.
Replacing the Wire
1.Hold the sound tube while being careful not
to contact other sound tubes and stand,
detach the end balls from the grooves of the
hanger, and then remove the sound tube.
NOTICE
• When removing the sound pipes, pull them up straight.
Pulling them up aslant can cause the wire to contact the
outside surface and result in damage to the chimes.
2.Put the sound tubes on a stable, flat, level
surface.
To prevent damage to the tubes, place a soft cloth on
the floor where the tubes will be placed.
3.Remove the wire caps.
When removing the wire cap, pass the wire through
the slit of the wire cap.
4.Replace the wire.
5.Attach the wire caps to the sound tube.
The wire is structured by multiple strands of thin
metal wires. When a thin metal wire is cut, replace
the wire with a wire which is not damaged. If the
wire is broken, the sound tube might fall, and possi-
bly causing injury.
NOTICE
• Replace the wire cap if it is damaged. If you keep using
the damaged wire cap, the wire will be easily damaged.
Please contact qualified Yamaha service personnel about
the wire cap (sold separately) for replacement.
NOTE
• Since the wire caps are very small and can be easily lost, be
careful when handling them.
End ball
End ball
Hanger
Hanger
Note name
Accidental tone side
YCH7018, YCH6018, YCHS7018
Generally, arrange the sound tubes as shown
below. The places filled with gray are not used.
Natural tone side
Long tube Short tube
End ballEnd ball
Wire cap
Slit
Wire
Wire cap
Slit
Wire
CAUTION