
User Manual

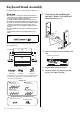

Keyboard Stand Assembly
32
YDP-163/YDP-143 Owner’s Manual
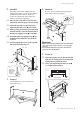
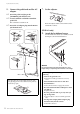
6. Connect the pedal cord and the AC
adaptor.
6-1 Insert the pedal cord plug to the
[TO PEDAL] jack from the rear.
6-2
Securely wind the cord holder around the
pedal cord.
The cord holder is attached to D.
6-3 Insert the AC adaptor plug into the DC IN
jack from the rear.
7. Set the adjuster.
Rotate the adjuster until it comes in firm contact
with the floor surface.
(YDP-163 only)
8. Attach the headphone hanger.
Use the included two screws (4 x 10 mm) to attach
the hanger as shown in the illustration.
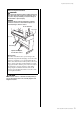
NOTICE
Do not hang anything other than the headphones on the
hanger. Doing so may damage this instrument or the hanger.
Insert the pedal cord securely until the metal part of the
cord plug disappears from view. Otherwise, the pedal may
not function properly.
6
-
1
6
-
3
6
-
2
D
B
After completing the assembly, please check the
following.
• Are there any parts left over?
Review the assembly procedure and correct any
errors.
• Is this instrument clear of doors and other
movable fixtures?
Move the instrument to an appropriate location.
• Does this instrument make a rattling noise when
you shake it?
Tighten all screws.
• Does the pedal box rattle or give way when you
step on the pedals?
Turn the adjuster so that it is set firmly against the
floor.
• Are the pedal cord plug and the adaptor plug
inserted securely into the sockets?
Check the connection.