
User Manual


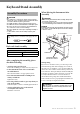


Keyboard Stand Assembly
35
YDP-164, YDP-144, YDP-S54 Owner’s Manual
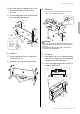
2-4 Insert the other two tapping screws (4 x 20
mm) into the other two screw holes to
secure B.
2-5 Securely tighten the screws on the top of B
that were attached in Step 2-2.
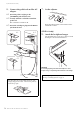
3. Secure C.
3-1 Securely tighten the screws on C that were
attached in Step 1-3.
3-2 Attach the caps to the head of the screws.
4. Mount A.
Be sure to place your hands at least 10 cm from
either end of A when positioning it.
CAUTION
• Fingers can become pinched between the main unit and the
rear or side panels, be extra careful so as not to drop the
main unit.
• Do not hold the keyboard in any position other than the
position shown in the illustration.
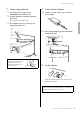
5. Secure A.
5-1 Adjust the position of A so that the left and
right ends of A will project beyond D and E
equally when seen from the front.
5-2 Secure A by tightening the short screws (6 x
16 mm) from the front.
2
-
3
2
-
3
2
-
4
2
-
2, 2
-
5
2
-
1
Place the
bottom ends
of the rear
panel on
each foot.
3
-
1
3
-
2
3
-
2
D
E
B
A
At least
10 cm
At least
10 cm
A
5
-
1
5
-
2
A
Projection of A