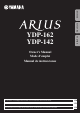
ENGLISH FRANÇAIS ESPAÑOL YDP-162 YDP-142 Owner’s Manual Mode d’emploi Manual de instrucciones For information on assembling the keyboard stand, refer to the instructions at the end of this manual. EN Pour obtenir des informations sur l'assemblage du support du clavier, reportez-vous aux instructions à la fin de ce manuel. FR Para información sobre el montaje del soporte del teclado, consulte las instrucciones al final de este manual.
This product utilizes batteries or an external power supply (adapter). DO NOT connect this product to any power supply or adapter other than one described in the manual, on the name plate, or specifically recommended by Yamaha. WARNING: Do not place this product in a position where anyone could walk on, trip over, or roll anything over power or connecting cords of any kind.
FCC INFORMATION (U.S.A.) 1. IMPORTANT NOTICE: DO NOT MODIFY THIS UNIT! This product, when installed as indicated in the instructions contained in this manual, meets FCC requirements. Modifications not expressly approved by Yamaha may void your authority, granted by the FCC, to use the product. 2. IMPORTANT: When connecting this product to accessories and/or another product use only high quality shielded cables. Cable/s supplied with this product MUST be used. Follow all installation instructions.
Contenido PRECAUCIONES...................................... 5 Reproducción y ensayo de canciones .........................................22 Acerca de los manuales .......................... 7 Escuchar las 50 canciones predefinidas ........................22 Ensayo de una parte a una mano .................................23 Accesorios incluidos ............................... 7 Terminales y controles del panel ...........
LEER DETENIDAMENTE ANTES DE EMPEZAR Guarde este manual en un lugar seguro y fácilmente accesible para futuras consultas. ADVERTENCIA Siga siempre las precauciones básicas detalladas a continuación para prevenir la posibilidad de lesiones graves, o incluso la muerte, por descargas eléctricas, cortocircuitos, daños, incendios u otros peligros.
• No utilice el instrumento o dispositivo ni los auriculares con volumen alto o incómodo durante un periodo prolongado, ya que podría provocar una pérdida de audición permanente. Si experimenta alguna pérdida de audición u oye pitidos, consulte a un médico. Conexiones • Antes de conectar el instrumento a otros componentes electrónicos, desconecte la alimentación de todos los componentes. Antes de conectar o desconectar la alimentación de todos los componentes, ponga todos los niveles de volumen al mínimo.
Le damos las gracias por escoger el Yamaha ARIUS. Para aprovechar al máximo el potencial y las características del instrumento, lea con detenimiento los manuales y guárdelos en un lugar seguro para posteriores consultas. Acerca de los manuales Este instrumento incluye los siguientes manuales. Manual de instrucciones (este manual) Explica cómo usar el instrumento.
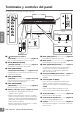
Terminales y controles del panel Las ilustraciones corresponden al modelo YDP-142. 3 4 1 9 5 2 ESPAÑOL 6 7 Trasera YDP-142 8 $ Trasera ) TO PEDAL 12V @ # Trasera ! YDP-162 PHONES (Lateral del teclado) TO PEDAL (Lateral del teclado) 1 [ ] Interruptor (en espera/ encendido)........................................ página 10 Para encender el instrumento o ponerlo en espera. 2 Mando [MASTER VOLUME] (Volumen maestro) ..............................
Operaciones básicas Instalación Cubierta del teclado Para abrir la cubierta del teclado: Levante ligeramente la cubierta y, a continuación, empújela y deslícela hasta el fondo. Para cerrar la cubierta del teclado: ATENCIÓN Tenga cuidado de no pillarse los dedos al abrir o cerrar la cubierta. ATENCIÓN • Sujete la cubierta con las dos manos al abrirla o cerrarla. No la suelte hasta que esté completamente abierta o cerrada.
Operaciones básicas Encendido 1 Conecte las clavijas del adaptador de alimentación de CA en el orden que se muestra en la ilustración. [YDP-162] 16 Toma DC IN (página 8) Toma DC IN (página 8) 2 Adaptador de corriente de CA ESPAÑOL [YDP-142] Toma de CA Cable de alimentación 1 1 3 La forma del enchufe y la toma varían según la zona. Adaptador de corriente de CA 2 Toma de CA ADVERTENCIA Utilice solamente el adaptador (página 32) especificado.
Operaciones básicas Apagado automático Para evitar un consumo de electricidad innecesario, este instrumento presenta una función de apagado automático que desactiva automáticamente el instrumento si no se utiliza durante aproximadamente 30 minutos. Si no desea utilizar la función de apagado automático, desactive la función tal como se describe a continuación. El ajuste (desactivado o activado) se conserva aunque se desconecte la alimentación.
Operaciones básicas Tocar el piano Ajuste del volumen Cuando comience a tocar, utilice el mando [MASTER VOLUMEN] para ajustar el volumen de todo el sonido del teclado. Reducción del nivel. Aumento del nivel. ATENCIÓN ESPAÑOL No utilice este instrumento a un volumen elevado durante mucho tiempo, ya que podría dañarle la audición. Intelligent Acoustic Control (I.A.C.
Operaciones básicas Uso de los pedales Al pisar este pedal las notas se sostendrán durante más tiempo. Al liberar este pedal, las notas sostenidas paran (se amortiguan) inmediatamente. Este pedal también cuenta con una función de “medio pedal” que crea efectos de sostenido parcial, dependiendo de hasta donde se pise el pedal. Si pisa el pedal de sostenido aquí, esta nota y las notas que se reprodujeron antes de liberar el pedal se sostienen durante más tiempo.
Operaciones básicas Uso del metrónomo La función del metrónomo resulta práctica para ensayar con un tempo exacto. 1 2 Presione [METRONOME] para iniciar el metrónomo. Presione [METRONOME] para parar el metrónomo.
Operaciones básicas Cambio de la sensibilidad de pulsación Puede especificar la sensibilidad de pulsación (cómo responde el sonido al modo en que se tocan las teclas). Mientras mantiene pulsado [PIANO/VOICE], presione una de las teclas de A6 a C7. NOTA A6 Este ajuste está deshabilitado para algunas voces, como el sonido de órgano.
Operaciones avanzadas Reproducción de varios sonidos de instrumentos musicales (voces) Selección de una voz Para seleccionar “Grand Piano 1”: NOTA Simplemente presione [PIANO/VOICE]. Para oír las características de las voces, reproduzca las canciones de demostración (página 17). Para seleccionar otra voz: Después de presionar [PIANO/VOICE], presione [+R] o [–L] para seleccionar la voz siguiente o la anterior.
Operaciones avanzadas Escuchar canciones de demostración Se proporcionan canciones de demostración especiales independientes para todas las voces del instrumento. 1 NOTA Presione [DEMO/SONG] para iniciar la reproducción. Se ilumina la luz [PLAY] y comienza la canción de demostración para la voz actual. Si desea cambiar el tempo de reproducción, consulte la página 14. Después de ésta, se seguirán reproduciendo las demás canciones de demostración.
Operaciones avanzadas Adición de variaciones al sonido (reverberación) Este instrumento incluye varios tipos de reverberación que añaden una profundidad y expresión extra al sonido para crear un ambiente acústico realista. El tipo de reverberación y la profundidad adecuados se seleccionan automáticamente al seleccionar cada voz y cada canción. Por este motivo, no es necesario seleccionar el tipo de reverberación; sin embargo, puede cambiarlo si lo desea.
Operaciones avanzadas Transposición del tono en semitonos Puede subir o bajar el tono de todo el teclado en semitonos para que sea más fácil tocar en signaturas de clave difíciles, o para hacer coincidir el tono de teclado con el registro de un cantante o de otros instrumentos. Por ejemplo, si selecciona “+5”, al tocar la tecla C (Do) se produce un tono Fa, lo cual permite tocar una canción en Fa mayor como si fuese en Do mayor.
Operaciones avanzadas Superposición de voces (modo dual) Puede superponer dos voces y reproducirlas simultáneamente para crear un sonido con más matices. 1 Active el modo dual. Mientras mantiene pulsado [PIANO/VOICE], mantenga pulsadas simultáneamente dos teclas que estén entre C1 y A1 para seleccionar las dos voces deseadas. Para obtener información acerca de qué voces están asignadas a las teclas, consulte “Lista de voces” (página 16).
Operaciones avanzadas Interpretar a dúo 1 Mientras mantiene pulsado [PIANO/VOICE], presione [+R] NOTA y [-L] simultáneamente para activar el modo dúo. Puesto que el modo dúo está diseñado para una representación de piano de dos intérpretes (a diferencia de la función dual parecida), no es posible asignar voces diferentes a la voz derecha y a la voz izquierda. El teclado está dividido en dos secciones con la tecla E3 y el punto de división.
Operaciones avanzadas Reproducción y ensayo de canciones Escuchar las 50 canciones predefinidas Además de las canciones de demostración, se ofrecen canciones predefinidas para que disfrute escuchándolas. 1 Busque el número de la canción que desea reproducir entre las canciones del libro incluido 50 greats for the Piano. ESPAÑOL El número de cada canción predefinida para piano se asigna a las teclas C2–C 6.
Operaciones avanzadas Ensayo de una parte a una mano Todas las canciones, excepto la de demostración (página 17), permiten que las partes de la mano izquierda y la mano derecha se activen o se desactiven individualmente. Por ejemplo, si desactiva [+R], puede ensayar la parte de la mano derecha mientras la parte de la mano izquierda se está reproduciendo, y viceversa. 1 Seleccione una canción predefinida (página 22) o la canción NOTA de usuario (página 24).
Operaciones avanzadas Grabación de su interpretación Este instrumento le permite grabar su interpretación en el teclado como una canción de usuario. Se pueden grabar hasta dos partes (la de la mano derecha y la de la mano izquierda) de manera independiente. Grabación de su interpretación 1 Seleccione la voz deseada y otros parámetros, como el tiempo, para la grabación. ESPAÑOL Para obtener más información acerca de cómo seleccionar una voz, consulte la página 16.
Operaciones avanzadas 5 Si lo desea, grabe la otra parte repitiendo los pasos 1 a 4. 6 Para oír la canción grabada, presione [PLAY] para iniciar la NOTA reproducción. Los datos de la canción grabada se pueden guardar en el ordenador como un archivo MIDI estándar (SMF). Para obtener más detalles, consulte el manual acerca de las operaciones relacionadas con el ordenador (página 7). Vuelva a presionar [PLAY] para parar la reproducción.
Operaciones avanzadas Copia de seguridad de los datos e inicialización de los ajustes Mantenimiento de datos cuando se corta la alimentación Los siguientes ajustes y los datos se conservan aunque corte la alimentación.
Apéndice Resolución de problemas Problema Causa posible y solución La alimentación se corta inesperada y repentinamente. Esto es normal y puede que se haya activado la función de apagado automático (página 11). Si lo desea, desactive la función de apagado automático. El instrumento no se enciende. Inserte bien el adaptador en la toma del instrumento y en una toma de CA adecuada (página 10). Esto es normal cuando llega corriente eléctrica al instrumento. Los altavoces o los auriculares emiten ruido.
Apéndice Montaje del soporte para teclado Las ilustraciones corresponden al YDP-142. ATENCIÓN • Tenga cuidado de no confundir los componentes y asegúrese de instalarlos con la orientación correcta. Efectúe el montaje siguiendo la secuencia que se indica a continuación. • Del montaje se deben encargar, al menos, dos personas. • Monte el soporte sobre una superficie dura y plana y con amplio espacio. • Utilice únicamente los tornillos incluidos e insértelos en los orificios correctos.
Apéndice 4 Acople B. Monte A. Ponga las manos al menos a 10 centímetros de los extremos de la unidad principal al colocarla. Dependiendo del modelo de piano digital que haya adquirido, el color de un lado de B podría no coincidir con el del otro lado. En este caso, coloque B de modo que el lado del color similar a D y E quede mirando hacia el intérprete. 2-1 Coloque el lado inferior de B sobre cada pata de D y E, y acople el lado superior a D y E.
Apéndice 6 Conecte el cable del pedal y el adaptador de alimentación de CA. 7 Regule la rueda de ajuste. 6-1 Inserte el enchufe del cable del pedal en el conector de pedal de la parte posterior. 6-2 Acople los portacables al panel posterior, tal como se muestra y, a continuación, sujete el cable en los soportes. 6-3 Utilice un enganche de vinilo para tensar el cable del pedal. Gire la pieza de sujeción hasta que esté en firme contacto con la superficie del suelo.
Apéndice Cuando mueva el instrumento tras el montaje, sujete siempre la unidad principal por debajo. Cubierta del teclado Parte superior No sujetar por aquí No sujetar por aquí ESPAÑOL Sujetar por aquí ATENCIÓN No sujete el piano por la cubierta del teclado ni por la parte superior. Un manejo incorrecto podría provocar daños al instrumento o lesiones personales.
Apéndice Especificaciones YDP-162 Tamaño/ peso Anchura Sin atril Altura [Para modelos con acabado Con atril pulido] Profundidad [Para modelos con acabado pulido] Peso [Para modelos con acabado pulido] Número de teclas Teclado ESPAÑOL Interfaz de control Mueble Voces Efectos Canciones Funciones Almacenamiento y conexiones Sistema de sonido Tipo Sensibilidad de pulsación Cantidad de pedales Pedal Medio pedal Funciones Panel Idioma Cubierta del teclado Atril Generador de Tecnología de tonos genera
Apéndice Números O 50 canciones predefinidas ........................................ 22 Octava .................................................................... 20 A P Accesorios ................................................................ 7 Adaptador de corriente de CA ..................................... 7 Afinación ........................................................... 15, 19 Alimentación ............................................................ 10 Apagado automático .............
The model number, serial number, power requirements, etc., may be found on or near the name plate, which is at the bottom of the unit. You should note this serial number in the space provided below and retain this manual as a permanent record of your purchase to aid identification in the event of theft. Model No. El número de modelo, el número de serie, los requisitos de alimentación, etc. pueden encontrarse en la placa de identificación o cerca de ella.
U.R.G., Digital Musical Instruments Division © 2012 Yamaha Corporation Yamaha Global Site http://www.yamaha.com/ Yamaha Downloads http://download.yamaha.com/ 303APGR*.