
User Manual


22
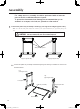
Assembly
3
Adjustments
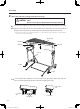
3-1
Pedal height adjustment
Loosen the center rod wing bolts (two each) on the right and left side center rods and hold the
pedal up to adjust the pedal height (the space between the bottom of the pedal and the floor).
After determining the height, hold the pedal and tighten the center rod wing bolts (two each) on
both right and left side center rods.
* 2-3cm of space between the bottom of the pedal and the floor should be adequate.
Center rod wing bolts
Pedal
Center rod wing bolts
Loosen the center rod wing bolts Hold here while tightening the
center rod wing bolts
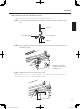
3-2
Damper Adjustment
3-2-1
Rotate the damper adjustment nut 2 (thinner nut) to the left to unlock the damper ad-
justment nut 1 (thicker nut).
3-2-2
Rotate the damper adjustment nut 1 and adjust the damper (the amount of damper
applied to the tone bars).
Rotate the damper adjustment nut 1 to the left
...............Increases the amount of damper.
Rotate the damper adjustment nut 1 to the right
............Decreases the amount of damper.
3-2-3
After damper adjustment is complete, tighten the damper adjustment nut 2 to lock the
damper adjustment nut 1.
* If the damper adjustment nut 2 is not tightened firmly, the damper adjustment nuts can drop off or
cause noise.
* A half damper effect can be obtained by lessening the amount of damper until the sound slightly sus-
tains even though the pedal is not depressed.
Damper adjustment nut 1
Damper adjustment nut 2
A
* If the space labeled “
A
” in the illustration is under
10mm, the damper stopper will not function properly.
Make sure this space is more than 10mm.
02_yg2500_en_new.indd 22 14/08/26 11:25