
Setup Guide


9
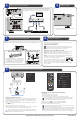
OPTIMIZING THE SPEAKER SETTINGS AUTOMATICALLY WITH YPAO
7
8
CONNECT POWER
5
CONNECTING TV & OTHER SOURCES
PREPARING A NETWORK CONNECTION
SETTING UP MUSICCAST
6
MusicCast is a wireless solution that allows you to share music among all
of your rooms with a variety of devices.
Using MusicCast CONTROLLER
To use the network features on the MusicCast compatible device, you
need the free, dedicated app “MusicCast CONTROLLER.” Search for
it on the App Store or Google Play and install it on your device.
Adding your receiver to the MusicCast network
Perform the following procedure to add the unit to the MusicCast network.
NOTE: You will need the SSID and security key for your network.
1 Tap the MusicCast Controller app on your mobile device and tap “Setup.”
NOTE: If you’ve previously connected other MusicCast-compatible devices
to the network, tap “Settings” and then “Add New Device.”
2 Follow the app’s on-screen instructions.
3 Press and hold the CONNECT button on the front panel
of the receiver for five seconds, as instructed by the app.
4 Follow the app’s on-screen instructions to configure network settings.
When a connection has been established, “Completed” will appear on the
receiver’s display.
ANTENNA
FMAM
AUDIO 5AUDIO 4
OPTICAL COAXIAL
HDMI
CENTER FRONT
SURROUND
/ZONE B/BI-AMP
SPEAKERS
PRE OUT
SUBWOOFER
AUDIO 2
(3 MUSIC)
AUDIO 1
AUDIO 3
NETWORK
HDMI OUT
eARC/ARC
( 2 RADIO )
(4 NET RADIO)
1 2 3 4
(1 MOVIE)
1
2
75
FRC FL SR SL
AUDIO 5AUDIO 4
OPTICAL COAXIAL
HDMI
CENTER FRONT
SURROUND
/ZONE B/BI-AMP
SPEAKERS
AUDIO 2
(3 MUSIC)
AUDIO 1
AUDIO 3
HDMI OUT
eARC/ARC
1 2 3 4
(1 MOVIE)
FRC FL SR SL
TV
BD/DVD player
or video game console
Satellite/cable set top box
HDMI HDMI
HDMI
HDMI
HDMI HDMI
HDMI OUT
eARC/ARC
(1 MOVIE)
Video device
HDMI
HDMI
Connect a TV and other sources to the receiver using an HDMI cable
(not included). See the receiver’s owner’s manual for more information.
MENU [CONNECT]
ANTENNA
FMAM
AUDIO 5AUDIO 4
OPTICAL COAXIAL
HDMI
CENTER FRONT
SURROUND
/ZONE B/BI-AMP
SPEAKERS
PRE OUT
SUBWOOFER
AUDIO 2
(3 MUSIC)
AUDIO 1
AUDIO 3
NETWORK
HDMI OUT
eARC/ARC
( 2 RADIO )
(4 NET RADIO)
1 2 3 4
(1 MOVIE)
1
2
75
FRC FL SR SL
Wireless network connection Wired network connection
ANTENNA
MA MF
AUDIO 5AUDIO 4
OPTICAL COAXIAL
HDMI
PRE OUT
SUBWOOFER
AUDIO 2
(3 MUSIC)
AUDIO 1
AUDIO 3
NETWORK
HDMI OUT
eARC/ARC
( 2 RADIO )
(4 NET RADIO)
1 2 3 4
(1 MOVIE)
1
2
75
LAN
WAN
Network Attached Storage
(NAS)
Internet
Modem
Wireless router
PC
Network cable
Raise the wireless antennas so that they stand
up straight. (Procedures for connecting the unit
to a wireless router are described in the owner’s
manual.) NOTE: Do not use excessive force on
the antennas — doing so may damage them.
Prepare a wired or wireless network connection in accordance with your network environment.
NOTE: The wireless antennas must be raised if the unit will be connected to a Bluetooth
®
device.
Visit yamaha.com/AV today to register your product
ANTENNA
MA MF
PRE OUT
SUBWOOFER
NETWORK
( 2 RADIO )
(4 NET RADIO)
75
Plug the power cable into the AC wall outlet after
all connections are complete.
Optimizing the speaker settings automatically (YPAO)
1 Press ENTER.
The measurement will start in 10 seconds.
It takes about three minutes to measure.
The screen above appears on the TV when the measurement finishes.
If an error message (such as E-1) or warning message (such as W-2) appears,
see “Error Messages” or “Warning Messages” under “Optimizing the speaker
settings automatically (YPAO)” in the owner’s manual.
2 Use the cursor keys ( ) to select “SAVE” and press ENTER.
3 Confirm the results displayed on the screen and press ENTER.
4 Disconnect the YPAO microphone from the unit.
Do not leave the YPAO microphone in a place where it will be exposed to high
temperature for an extended period of time.
Test tones are output at high volume and may surprise or frighten small children.
Test tone volume cannot be adjusted. Keep the room as quiet as possible. Stay
in a corner of the room behind the listening position so that you do not become an
obstacle between speakers and the YPAO microphone. Do not connect headphones.
Preparing for YPAO measurement
The Yamaha Parametric room Acoustic Optimizer (YPAO) function detects speaker
connections, measures the distances from them to your listening position(s), and
then automatically optimizes the speaker settings, such as volume balance and
acoustic parameters to suit your room.
1 Press (receiver power) and switch the TV input to display video from the unit
(HDMI OUT jack).
2 Turn on the subwoofer and set the volume to half.
3 Place the YPAO microphone at your listening position and connect it to the YPAO
MIC jack on the front panel. The screen above appears on the TV.
Place the YPAO microphone at your listening position (same height as your
ears). We recommend using a tripod as a microphone stand. You can use the
tripod mount to stabilize the microphone.
ENTER
Cursor keys
POP-UP/MENU
MEMORY
TOP MENU
RED
GREEN
YELLOW
BLUE
TUNING
TUNING
PRESET
DISPLAY
MUTE
VOLUME
INPUT
RETURN
OPTION
SETUP
BLUETOOTH
USB
PRESET
TUNINGTUNING
MEMORY
BLUE
YELLOWGREEN
RED
POP-UP/MENU
HOME
TOP MENU
DISPLAYRETURN
OPTION
ENTER
SETUP
MUTE
VOLUME
BLUETOOTH
NET
USB
TUNER
IN PU T
PROGR AM
SUR.DECODEENHANCER
PURE DIRECT
STRAIGHT
1 2
SCENE
4
3
SLEEP
ZONE A ZONE B
PRESET
TUNING
TUNING
MEMORY
BLUE
YELLOW
GREEN
POP-UP/MENU
HOME
TOP MENU
DISPLAY
RETURN
OPTION
OPTION
ENTER
SETUP
SETUP
MUTE
VOLUME
BLUETOOTH
NET
USB
TUNER
IN PU T
PROGR AM
SUR.DECODE
ENHANCER
PURE DIRECT
STRAIGHT
1
2
SCENE
4
3
SLEEP
ZONE A
ZONE B
PRESET
TUNINGTUNING TUNINGTUNING MODE BAND
MEMORYMEMORY
BLUE
YELLOWGREEN
RED
POP-UP/MENU
HOME
TOP MENU
DISPLAYRETURN
OPTION
ENTER
SETUP
MUTE
BLUETOOTH
NET
USB
TUNER
IN PU T
VOLUME
BLUETOOTH
NET
USB
TUNER
IN PU T
PROGR AM
SUR.DECODEENHANCER
PURE DIRECT
STRAIGHT
1 2
SCENE
4
3
SLEEP
ZONE A ZONE B
Ear height
SW
C
FL
SL SR
FR
YHT5960ESG V.2