
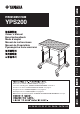
User Manual


5
YPS200 Owner’s Manual
Assembly
CAUTION
When assembling the instrument, always use
two or more people.
• Assemble the instrument in a place where
there is sufficient room.
CAUTION
For safety reasons, do not unlock the casters
until the assembly is completed.
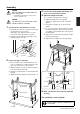
1. Connect the two legs with the cross bar.
q Insert the projections for connection of the legs
into both ends of the cross bar.
At this time, also align the position of each
screw hole on the legs and the cross bar.
w Using the two knob bolts, temporarily secure
the legs and the cross bar.
2. Connect the legs to the table.
q Place the table of the stand upside down on a
piece of cardboard or a cloth spread out on the
floor to protect the floor from scratches.
w Align the position of each screw hole on the bot-
tom of the table and the legs.
e Using the four knob bolts, secure the table and
the legs.
r Tighten the two knob bolts secured in step 1-w.
3. Position the stand upright while being care-
ful to avoid overturning or falling.
4. Adjust the height of the table.
q Loosen the four wing bolts of the legs.
w Adjust the height of the slide guides.
At this time, align all four scales of the slide
guides.
e Using the four wing bolts, secure the slide
guides.
r Loosen each screw of the four memory clamps
by using a tuning key, and then move the mem-
ory clamps to the boundary line of the leg and
the slide guide.
t Tighten each screw of the four memory clamps
by using a tuning key.
y Tighten the four wing bolts of the legs firmly.
5. Make sure all bolts and screws are tightened
securely.
The assembly is now complete.
w
q
Knob bolt
Projection for
connection
Leg Cross bar
Screw
holes
w
w
Leg
q Table
e Knob bolt
r Knob bolts
To disassemble, follow the assembly steps in
reverse order.
w
qey
w
r
rt
Legs
Slide guides
Wing bolt
Tuning key
Memory
clamp
Scale