Unified Communications Microphone & Speaker System YVC-1000 User’s Manual Update the firmware and use the latest features. You can download the latest firmware and user's manual from the following website: http://www.yamaha.
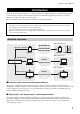
YVC-1000 User's Manual Contents Introduction Introduction .........................................................3 Using the YVC-1000 Configurator ................. 35 Available functions ............................................3 Downloading ................................................... 35 About this manual .............................................4 Basic usage ..................................................... 36 Controls and functions ........................................
YVC-1000 User's Manual Introduction Thank you for purchasing a Yamaha YVC-1000. This product is a unified communications microphone and speaker system that serves as an audio terminal when connected to communication equipment, such as a PC or a Mac, a smartphone or tablet, and a video conference system. Please thoroughly read this manual before installing and connecting the product. • No part of this manual may be copied or used in any form without permission of Yamaha.
YVC-1000 User's Manual ■ Extension of microphone and speaker The product allows you to connect an optional microphone (YVC-MIC1000EX) or external speakers to extend the sound pickup range or playback range. This feature offers great flexibility for a layout or a multi-participant conference that cannot be covered by only the product.
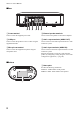
YVC-1000 User's Manual Controls and functions Control Unit (YVC-CTU1000) ■ Top 1 2 3 4 5 6 7 1 Power button/indicator ( 4 Tuning fork button/indicator ( ) Press to turn the product on. Press and hold the power button for two or more seconds to enter standby mode. 2 Volume +/- button/indicator ( ) Press to adjust the speaker volume. Hold down the appropriate button for 0.5 or more seconds to continuously increase or decrease the volume.
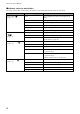
YVC-1000 User's Manual ■ Indicator status for each button The status of the product is indicated by the indicator color and the light up/flash mode for each button.
YVC-1000 User's Manual ■ Level indicator (page 5: 3) The level indicator shows the input level of an incoming voice, speaker volume, or speaker output settings. Level indicator The table below shows indicator patterns viewed from this side.
YVC-1000 User's Manual ■ Rear 1 2 3 4 5 6 1 Power terminal 4 External speaker terminals Used to connect the supplied power cable. Used to connect the speakers to the built-in amplifier. 2 USB port 5 Audio output terminals (AUDIO OUT) Used to connect the product to a PC or a Mac using the supplied USB cable. Used to connect to the audio input terminals of a video conference system.
YVC-1000 User's Manual Microphone (YVC-MIC1000) ■ Top 1 1 Microphone mute button ( 2 ) Press to temporarily turn off (mute) the microphone. To cancel the mute function, press it again. 2 Microphone status indicator Lights up green when the microphone is active. Flashes red when the microphone is set to mute. When the microphone is active, this indicator lights up brightly if sounds are input. ■ Side 1 Input terminal (IN) Connects the optional microphone (YVC-MIC1000EX) using the microphone cable.
YVC-1000 User's Manual Setting up for use Installation Place the product in a location you will actually use it in, for example, a conference room. ■ Notes on installation • Place the microphone at least 1 m (3.3 ft) away from the Control Unit. If the Control Unit is too close to the microphone, it may cause an echo phenomenon in the remote location. • Keep the microphone away from any noise sources.
YVC-1000 User's Manual Connecting the microphone and power cables Connect the microphone and power cables supplied with the product. Power button 1 2 1 Match the color of the labels. 1 2 3 Connect the microphone to the Control Unit using the microphone cable supplied with the product. Connect the power cable to the power terminal of the Control Unit.
YVC-1000 User's Manual Setup Set the product up to make best use of it. ■ Turning the power on Press the power button ( ) of the product to turn the power on. When the power is turned on, all the buttons light up green. ■ Selecting the voice guidance language The voice guidance language is set to English in the factory settings. Switch the language as necessary. For details, refer to "Changing voice guidance settings" (page 30).
YVC-1000 User's Manual Connecting to communication equipment This section describes how to connect each communication device. After connecting them, check whether or not sounds are output normally. Connecting to a PC using the USB cable ■ Before connecting, check the following. Prepare the USB cable supplied with the product. The following system environment is required in the PC to be connected to the product. • OS: Windows (*1) • USB: USB 2.
YVC-1000 User's Manual ■ Checking whether the connection is made normally After the connection has been completed, execute the following steps to check that the product is normally recognized by the PC. Note The items and other options shown in the setting window vary depending on your PC environment. 1 Press the power button ( the product on. ) to turn 5 When the power is turned on, all the buttons light up green.
YVC-1000 User's Manual 7 Check that "Yamaha YVC-1000" in the Microphone field is set to the default device. If it is not set to the default device, click "Yamaha YVC-1000", and click "Set Default". Check Normally, when a connection is made, "Yamaha YVC1000" is automatically set to the default device. 8 Click "OK" to close the "Sound" window.
YVC-1000 User's Manual ■ Adjusting the microphone sensitivity The sound may crack or become faint in the remote location depending on your environment. In this case, adjust the microphone sensitivity. Note The items and other options shown in the setting window vary depending on your PC environment. 1 2 Display the control panel. • In Windows 7, click "Start" - "Control Panel". • In Windows 8.1/10, right-click at the lower-left end of the Start screen, then click "Control Panel".
YVC-1000 User's Manual Connecting to a Mac using the USB cable ■ Before connecting, check the following. Prepare the USB cable supplied with the product. The following system environment is required in the Mac to be connected to the product. • OS: macOS (*1) • USB: USB 2.0 or later (*1) For the supported versions, refer to the following website: http://www.yamaha.
YVC-1000 User's Manual ■ Checking whether the connection is made normally After the connection has been completed, execute the following steps to check that the product is normally recognized by the Mac. Note The items and other options shown in the setting window vary depending on your Mac environment. 1 Press the power button ( the product on. ) to turn 5 When the power is turned on, all the buttons light up green.
YVC-1000 User's Manual ■ Adjusting the microphone sensitivity The sound may crack or become faint in the remote location depending on your environment. In this case, adjust the microphone sensitivity. Note The items and other options shown in the setting window vary depending on your Mac environment. 1 2 From on the upper left of the Mac screen, select "System Preferences" - "Sound" - "Input" tab. In the "Input volume" field, adjust the microphone sensitivity.
YVC-1000 User's Manual Connecting to a smartphone or tablet via Bluetooth ■ Before connecting, check the following. Prepare a Bluetooth-compatible smartphone or tablet (hereinafter, referred to as a "smartphone"). Notes • The distance between the smartphone and the product must be within 10 m (32.8 ft) (with no obstacles between them). • Yamaha does not ensure all Bluetooth connections between the product and smartphones. • The product is displayed as "YVC-1000 Yamaha" on the display of the smartphone.
YVC-1000 User's Manual ■ Making a Bluetooth connection with the paired smartphone A Bluetooth connection is made simultaneously with pairing depending on smartphones. In such a case, this procedure is not required. Bluetooth button 1 Power button Press the power button ( the product on. ) to turn When the power is turned on, all the buttons light up green. 2 Press the Bluetooth button ( ). The Bluetooth button ( ) flashes blue, and the Bluetooth connection is enabled.
YVC-1000 User's Manual ■ Pairing and Bluetooth connection using the NFC function (for NFC-compatible model) If the smartphone satisfies the following conditions (hereinafter, referred to as an "NFC-compatible model"), pairing and Bluetooth connection operations can be performed easily. • NFC-compatible Android devices Before starting this procedure, turn the NFC function on in the smartphone. Note This function may not work or the connectable distance may be different depending on smartphones.
YVC-1000 User's Manual Connecting to a video conference system using audio cables ■ Before connecting, check the following. Prepare two audio cables (stereo RCA pin plug) for input and output. The video conference system may provide different shapes of audio input and output terminals depending on the model. Use audio cables with the plug shapes that match the shapes of the audio input and output terminals for your video conference system.
YVC-1000 User's Manual ■ Setting with "YVC-1000 Configurator" When using the video conference system, connect the product to a PC or a Mac on which the "YVC-1000 Configurator" application has been downloaded, and set the device to be connected to the audio input terminals to the video conference system. For details, refer to "When the video conference system is connected:" (page 37). The sound may crack or become faint in the remote location depending on your environment.
YVC-1000 User's Manual Using Convenient Functions This section describes convenient functions provided by the product. Using the optional microphone (YVC-MIC1000EX) Up to five microphones, including the supplied microphone and optional microphone (YVC-MIC1000EX), can be connected to the product. When using the product in a layout or a multi-participant conference that cannot be covered by only one microphone, use multiple microphones to extend the area where sounds can be picked up.
YVC-1000 User's Manual Using external microphones Up to two external microphones such as a handheld microphone or pin microphone can be connected to the product. If you want to amplify the sound in your location when having a conversation with the remote location, connect an external microphone. A wireless handheld microphone or wireless pin microphone can also be used.
YVC-1000 User's Manual Using external speakers Up to two speakers with built-in amplifiers can be connected to the product as external speakers. When using the product in a layout or a multi-participant conference that cannot be covered by only the built-in speaker, use external speakers to extend the area where playback sounds can be heard. Note Use external speakers with a low latency and distortion.
YVC-1000 User's Manual Using the automatic audio tuning function The automatic audio tuning function automatically measures acoustic features of the location the product is installed in as well as acoustic conditions such as positions to place the microphone and speaker, and tunes the acoustic settings to the optimal level to suit the environment the product is used in.
YVC-1000 User's Manual ■ When automatic audio tuning has ended abnormally (problem detection) When automatic audio tuning has ended abnormally (problem detection), the tuning fork button ( ) flashes orange at high speed. Check the detected problems using the voice guidance, and take the appropriate action, referring to "Warning guidance list" (page 44). Tuning fork button: High-speed flash (Orange) 1 Press the tuning fork button ( ) while it is flashing orange at high speed.
YVC-1000 User's Manual Changing voice guidance settings Notify results of operations such as a Bluetooth connection, problems in acoustic conditions, or the automatic audio tuning procedure using the voice guidance. The voice guidance can be enabled or disabled, and its language can be switched as necessary. The voice guidance language is set to English in the factory settings. Switch the language as necessary.
YVC-1000 User's Manual Selecting a speaker Select whether to output the incoming sound through only the built-in speaker, only external speakers, or both the built-in speaker and external speakers. Volume + and - buttons Level indicator The table below shows indicator patterns viewed from this side. 1 Hold down the volume + and - buttons ( same time. ) for 2 seconds or more at the The volume + and - buttons ( ) flash green.
YVC-1000 User's Manual Adjusting the speaker volume When external speakers are not connected or only the built-in speaker is enabled, press the volume + and buttons ( ) to adjust the volume. If external speakers are enabled, perform the following procedure to suit the environment they are used in. ■ When both the built-in speaker and Muting the microphone Temporarily stop the microphone so that the other party does not hear a voice in this side.
YVC-1000 User's Manual Enabling or disabling the Bluetooth function When not using a Bluetooth connection, you can disable the Bluetooth function. To use a Bluetooth connection again, enable the Bluetooth function. ■ Disabling the Bluetooth function ■ Enabling the Bluetooth function 1 1 When the power is on (the power button ( ) lights up green), press and hold the power button ( ) for 2 seconds or more to enter standby mode. The product enters the standby mode, and the power button ( ) lights up red.
YVC-1000 User's Manual Returning to the factory settings Return the settings of the product to the factory settings. 1 When the power is on (the power button ( ) lights up green), press and hold the power button ( ) for 2 seconds or more to enter standby mode. The product enters the standby mode, and the power button ( ) lights up red. 2 Press the power button ( ) while holding down the tuning fork button ( ) and the volume - button ( ) at the same time, then release the power button ( ) only.
YVC-1000 User's Manual Using the YVC-1000 Configurator Using the "YVC-1000 Configurator" application allows you to configure various settings for the input and output terminals that cannot be carried out using buttons on the product. This manual provides a description based on the "YVC-1000 Configurator" screens and the operations on the PC. Downloading Download this application from the download page on our website.
YVC-1000 User's Manual Basic usage This section describes the basic usage of "YVC-1000 Configurator". 1 2 Using the USB cable supplied with the product, connect the product to a PC or a Mac on which "YVC-1000 Configurator" has been downloaded. Turn on the product and a PC or a Mac. When the product is turned on, all the buttons light up green. 3 Double-click "YVC-1000 Configurator.exe" ("YVC-1000 Configurator.app" for Macs).
YVC-1000 User's Manual Changing the setting of the audio input terminals Change the setting depending on the device connected to the audio input terminals. ■ When external microphones are connected: 1 2 Audio input terminals ■ When the video conference system is In the "YVC-1000 Configurator" window, select the "AUDIO IN" tab. Select "PA MICROPHONE" from the "MODE" drop-down list. Select this item for the terminal (either or both of the L and R terminals) connected to the external microphones.
YVC-1000 User's Manual 3 Change the volume or tone setting to suit the type of external microphones you are using, or your environment. Change the setting in the drop-down list. 4 Select whether to amplify the sound from the external microphones in your location. Change the setting from the "PA MICROPHONE SOUND OUTPUT TO SPEAKER" drop-down list as necessary. This setting is applied to both the L and R terminals. Note If the firmware version of the product is below 2.
YVC-1000 User's Manual Changing the setting of the audio output terminals Change the setting depending on the device connected to the audio output terminals. Changing the setting of the USB port Change the setting depending on the device connected to the USB port. Audio output terminals USB port ■ Adjusting the audio output volume The sound may crack or become faint in the remote location depending on your environment. In this case, adjust the audio output volume.
YVC-1000 User's Manual Clicking "ONLINE HELP" allows you to access the support site that informs whether to select "HI-SPEED" or "FULLSPEED" depending on the connected device. 3 A message appears to confirm whether to restart the product. Click "OK". The product restarts. Then, the setting is changed.
YVC-1000 User's Manual Troubleshooting Before inquiry Referring to this manual, check whether the detected problem can be resolved. If the problem recurs, please contact the retailer or dealer who you purchased the product from. Q1 A button or indicator is turned off or flashing Symptom Cause Action The power button ( turned off. ) is • The power cable has been unplugged. • The power cable is not plugged in securely. Securely connect the power cable to an outlet or the Control Unit.
YVC-1000 User's Manual Symptom An echo or feedback is heard in the remote location. Noises are heard. Noises are heard in the remote location. Sound cracking occurs. Sound cracking occurs in the remote location. 42 Cause Action A microphone other than the product is connected to a communication device. Select the product in the communication device settings. (→ page 14, 18) The Control Unit is close to or far away from the microphone. Place all microphones 1 m to 20 m (3.
YVC-1000 User's Manual Symptom The volume in the remote location is low. Cause Action If a PC or a Mac is connected using the USB cable, its microphone sensitivity is low. Increase the microphone sensitivity. (→ page 16, 19) If a device is connected to the audio output terminals, the audio output volume is low. Turn up the audio output volume. (→ page 39) Q3 Others Symptom Cause Action The voice guidance is not played back. The voice guidance is disabled. Enable the voice guidance.
YVC-1000 User's Manual Warning guidance list When the product detects a problem related to acoustic conditions, you can confirm its details using the voice guidance. (For details, refer to "When automatic audio tuning has ended abnormally (problem detection)" (page 29) and "Detecting acoustic conditions in general use" (page 29)". Take the appropriate actions - outlined below - to resolve the detected problem. Voice guidance: Cause Action Please connect the microphones.
YVC-1000 User's Manual Using open source software This product uses open source software based on the BSD license. The BSD license is a software license system that grants program distribution subject to the no-warranty stipulation and the presentation of a copyright notice and license clause list. The following information is displayed based on the above-mentioned license conditions and does not prescribe any restrictions on use for the customer. Copyright (C) 2001 Richard Herveille richard@asics.
Manual Development Group © 2014 Yamaha Corporation Published 09/2017 AB-G0