
User Manual

9
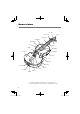
Changing Strings
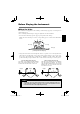
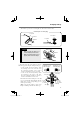
[Attaching the 1st String (E)]
String
Loop end
Loop end
Fine Tuner
Fine Tuner
Tailpiece
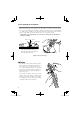
Caution
• Make sure that the endpin is in-
serted completely into the violin.
• Make sure that the tailpiece wire is
properly hooked onto the endpin.
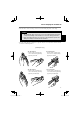
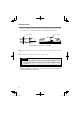
3
Insert the other end of the string into the hole
on the peg, then wrap the string onto the peg.
• On the 1st (E) and 2nd (A) strings, make
two windings to the left of the hole, then
the remaining windings to the right as
shown in the illustration on the far right.
• On the 3rd (D) and 4th (G) strings, make
two windings to the right of the hole,
then the remaining windings to the left as
shown in the illustration on the left.
Next, make sure that the bridge does not fall
over as you wind the strings. Ensure that the
strings pass over the corresponding grooves
on the top of the bridge.
(Make sure that the tailpiece side of the
bridge is standing vertical to the violin top.)
Winding the 3rd
and 4th strings
Winding the 1st
and 2nd strings
3rd string
2nd string
4th string
1st string
Rotate
the peg
as shown
Rotate
the peg
as shown
Tailpiece
Endpin
Tailpiece wire
Saddle
• Hook the loop end of the 1st string (E) onto the hook on the fine tuner.
02yvnwc44220En.indd902yvnwc44220En.indd9 08.10.74:17:46PM08.10.74:17:46PM